Pages

Strawberry Pistachio Bark


If you need a super fast, super delicious treat for the next party you're going to, or to impress your coworkers, or just to enjoy on your own, look no further. This candy is a nice mix of sweet and salty, smooth and crunchy, it has something for everyone! It takes only a few minutes to put together, but will need to be refrigerated for a while to set properly.

Start by melting the almond bark - I did this in the microwave at 50% power in 45 second intervals, stirring between each heating. At the end, stir it well until it is smooth. Hold back some of the pistachios and strawberries to use on top of the candy. Then add the remaining chopped pistachios,


and the freeze dried strawberries.


Stir well to coat the strawberries and pistachios then quickly spread it out onto a waxed-paper lined baking sheet.


Place the remaining strawberries over the top and sprinkle with the chopped pistachios.


Refrigerate for two hours or so until set, then remove and break into pieces.


That's all there is to it! You will love it.


And you'll probably want to share it, or else you might eat all of it yourself, not that I would know anything about that.


One year ago: Snickers Fudge
Two years ago: Chocolate Peppermint Swirl Cookies
Three years ago: Cranberry Apple Coffeecake
Four years ago: Layered Mint Fudge

Get more great inspiration at Hearth and Soul, Cast Party, What's Cooking, What's Cooking #2, Full Plate Thursday, Showcase your Talent, Foodie Friday, Foodtastic Friday, Foodie Friday #2, Friday Flash, Blog Strut, Food Frenzy.

Strawberry Pistachio Bark

12 oz. almond bark
1/4 cup chopped pistachios
1/2 cup freeze dried strawberries

In a microwave safe bowl, melt the almond bark using 50% power in 30 second intervals. Stir between each heating.

Reserve a few tablespoons of pistachios and strawberries. Add the rest to the almond bark and stir well to coat. Quickly spread onto a wax-paper lined baking sheet. Top with the reserved pistachios and strawberries. Refrigerate 2 hours to set, then remove and break into pieces.



If you need a super fast, super delicious treat for the next party you're going to, or to impress your coworkers, or just to enjoy on your own, look no further. This candy is a nice mix of sweet and salty, smooth and crunchy, it has something for everyone! It takes only a few minutes to put together, but will need to be refrigerated for a while to set properly.

Start by melting the almond bark - I did this in the microwave at 50% power in 45 second intervals, stirring between each heating. At the end, stir it well until it is smooth. Hold back some of the pistachios and strawberries to use on top of the candy. Then add the remaining chopped pistachios,


and the freeze dried strawberries.


Stir well to coat the strawberries and pistachios then quickly spread it out onto a waxed-paper lined baking sheet.


Place the remaining strawberries over the top and sprinkle with the chopped pistachios.


Refrigerate for two hours or so until set, then remove and break into pieces.


That's all there is to it! You will love it.


And you'll probably want to share it, or else you might eat all of it yourself, not that I would know anything about that.


One year ago: Snickers Fudge
Two years ago: Chocolate Peppermint Swirl Cookies
Three years ago: Cranberry Apple Coffeecake
Four years ago: Layered Mint Fudge

Get more great inspiration at Hearth and Soul, Cast Party, What's Cooking, What's Cooking #2, Full Plate Thursday, Showcase your Talent, Foodie Friday, Foodtastic Friday, Foodie Friday #2, Friday Flash, Blog Strut, Food Frenzy.

Strawberry Pistachio Bark

12 oz. almond bark
1/4 cup chopped pistachios
1/2 cup freeze dried strawberries

In a microwave safe bowl, melt the almond bark using 50% power in 30 second intervals. Stir between each heating.

Reserve a few tablespoons of pistachios and strawberries. Add the rest to the almond bark and stir well to coat. Quickly spread onto a wax-paper lined baking sheet. Top with the reserved pistachios and strawberries. Refrigerate 2 hours to set, then remove and break into pieces.


reade more... Résuméabuiyad

A Twist On a NYE Favorite

If you know me personally, or have been following the blog for a while now, you know we have a very fun tradition in this house for New Year's Eve. It doesn't involve getting all dressed up, or heading out with the masses. What it does involve is plenty of family time and yummy food. Each December 31st we ring in the new year here at home, just the 3 of us, watching movies or holiday specials, or even mixed martial arts on the tv, all while enjoying a buffet of our favorite appetizers. I filled the table with a huge variety of our most enjoyed "nibbly bits" (as Alex calls them) and we eat all night long, warm and safe in our home.

Today's recipe is a new twist on one of my husband's favorite things I put out on this buffet every year. Probably what is the most simple appetizer ever created. Dried Beef Rolls. You've had these, right?? Cream cheese spread on dried beef, rolled and cut into bite sized pieces. I still remember the first year I made them for him. I had all these amazing dishes sitting out, some kind of complicated, and these simple rolls that took me all of 10 minutes to make were the one thing he was most excited about. The thing he went on and on about. The thing he could not get enough of. I was like "All of this food, and that is what you are most excited about?" Hey, he likes the simple things, what can I say? So every year since they are always included in our New Year's Eve feast.

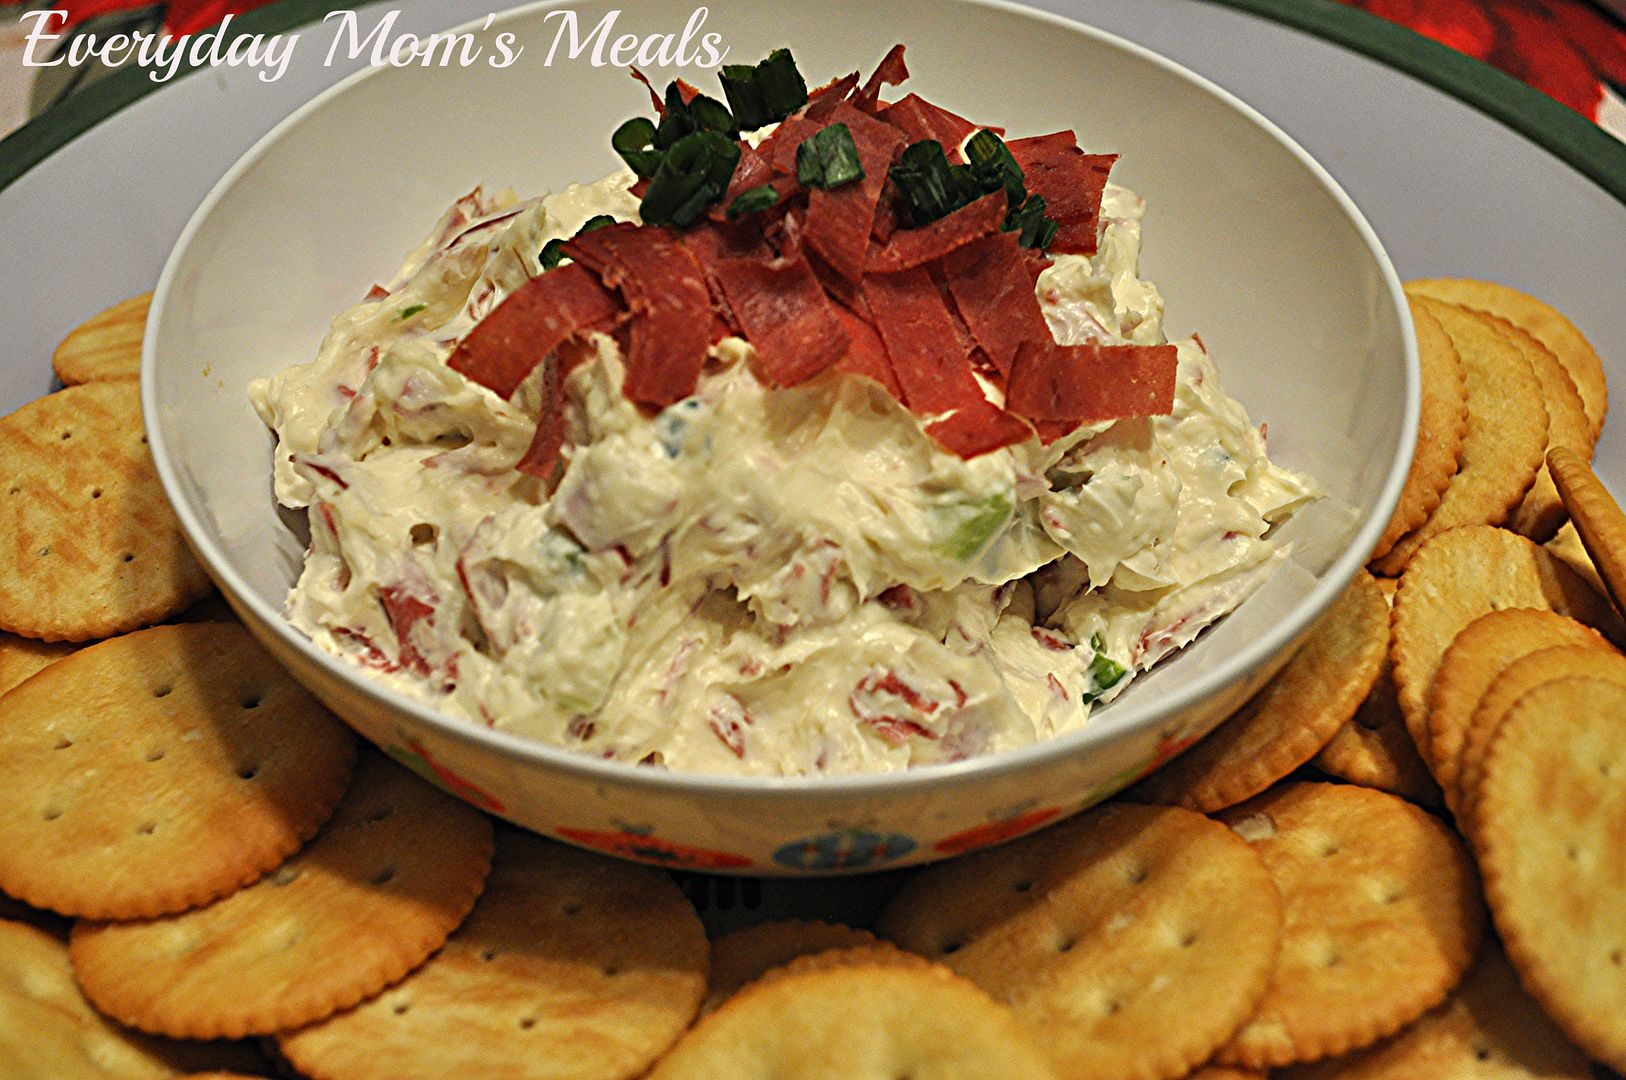
But this year I will be switching it up just a little, with this fantastic dip that is super tasty, and almost just as easy. It really doesn't take much more time and has incredible flavor. It would be perfect for any holiday party, rather it be next week for Christmas, or if like me you're already planning how to welcome in 2014. It will be here before we know it!

Creamy Beef Spread From Hometown Christmas
1 (8 oz.) package cream cheese, at room temperature
1/4 c. sour cream
1/4 c. mayo
1/4 c. grated Parmesan cheese
1 green onion, finely chopped, plus extra for garnish
1 (2.5 oz.) jar dried beefy, finely chopped and divided

In a bowl beat cream cheese until smooth. Add remaining ingredients, reserving 2 TBS dried beef. Mix well and transfer to a serving bowl. Sprinkle with reserved beef and extra onion. Cover and chill until serving. Serve with crackers.


Shared on The Country Cook Dec. 20, 2013

Appetizers at Very Good Recipes
If you know me personally, or have been following the blog for a while now, you know we have a very fun tradition in this house for New Year's Eve. It doesn't involve getting all dressed up, or heading out with the masses. What it does involve is plenty of family time and yummy food. Each December 31st we ring in the new year here at home, just the 3 of us, watching movies or holiday specials, or even mixed martial arts on the tv, all while enjoying a buffet of our favorite appetizers. I filled the table with a huge variety of our most enjoyed "nibbly bits" (as Alex calls them) and we eat all night long, warm and safe in our home.

Today's recipe is a new twist on one of my husband's favorite things I put out on this buffet every year. Probably what is the most simple appetizer ever created. Dried Beef Rolls. You've had these, right?? Cream cheese spread on dried beef, rolled and cut into bite sized pieces. I still remember the first year I made them for him. I had all these amazing dishes sitting out, some kind of complicated, and these simple rolls that took me all of 10 minutes to make were the one thing he was most excited about. The thing he went on and on about. The thing he could not get enough of. I was like "All of this food, and that is what you are most excited about?" Hey, he likes the simple things, what can I say? So every year since they are always included in our New Year's Eve feast.

But this year I will be switching it up just a little, with this fantastic dip that is super tasty, and almost just as easy. It really doesn't take much more time and has incredible flavor. It would be perfect for any holiday party, rather it be next week for Christmas, or if like me you're already planning how to welcome in 2014. It will be here before we know it!

Creamy Beef Spread From Hometown Christmas
1 (8 oz.) package cream cheese, at room temperature
1/4 c. sour cream
1/4 c. mayo
1/4 c. grated Parmesan cheese
1 green onion, finely chopped, plus extra for garnish
1 (2.5 oz.) jar dried beefy, finely chopped and divided

In a bowl beat cream cheese until smooth. Add remaining ingredients, reserving 2 TBS dried beef. Mix well and transfer to a serving bowl. Sprinkle with reserved beef and extra onion. Cover and chill until serving. Serve with crackers.


Shared on The Country Cook Dec. 20, 2013

Appetizers at Very Good Recipes
reade more... Résuméabuiyad

Baby Shower DIY Gifts

A baby shower is such a fun way to help a new mother-to-be prepare for the birth of her wee one. Seasoned parents know how much "stuff" it takes to welcome a baby into the world, and most new parents can use a little help getting started. Baby needs bottles, gowns, crib, booties, carseat, highchair, stroller, diapers, blankets, and the list goes on and on. Something that is nice to do at a baby shower is to add some home made items to all the store bought gifts.


All babies spit up occasionally, and it seems that mine were much more prone to losing mouthfuls of milk when I was wearing my best clothing. I learned quickly to always be prepared, and I think these DIY burp cloths make great shower gifts for new parents.


I recently made some burp cloths for a baby shower using these prefolded diapers.


I cut a strip of minky fabric 5 1/2 inches wide x 18 inches long for each diaper, then pressed under a 1/2-inch seam allowance on each long side of the strip.


Then I centered the fabric strip, right side up, over the diaper and stitched close to the edge down each side of the minky strip.


I finished the top and bottom edges with a zigzag stitch.


Then I embellished the burp cloths with ribbon trim of various types and widths.


Some of the burp cloths have a ribbon border all the way around and others are trimmed with ribbon along the sides of the minky strip and across the top. There's really no right or wrong way to make these. They could be done in colors especially to match nursery decor or made with other types of fabric. I like the handy size of the prefolded diapers and the softness of the minky fabric.


Another cute and easy DIY shower gift to make is a taggie blanket for baby. I used the remainder of my blue and yellow minky fabric to make two taggie blankets to go with with the burp cloths.


To make each taggie blanket, cut two squares of fabric. I made mine 14 inches square. Each taggie blanket needs twenty 5-inch pieces of ribbon. The ribbon should be folded in half and pinned to the right side of one of the squares of fabric, as shown in the photo. Space the ribbon out evenly, leaving about 3 inches on each corner. Stitch the ribbon in place, then sew both squares of fabric together, right sides together, leaving an opening on one side to turn. Turn the blanket to the right side and stitch up the opening.


This makes such a sweet, soft little blanket for the baby to cuddle up with. Neither of these baby shower projects require a great deal of sewing skill, and they make cute, personal gifts for a new mother and her precious baby.


This post was shared with:
Arkansas Women Bloggers
A baby shower is such a fun way to help a new mother-to-be prepare for the birth of her wee one. Seasoned parents know how much "stuff" it takes to welcome a baby into the world, and most new parents can use a little help getting started. Baby needs bottles, gowns, crib, booties, carseat, highchair, stroller, diapers, blankets, and the list goes on and on. Something that is nice to do at a baby shower is to add some home made items to all the store bought gifts.


All babies spit up occasionally, and it seems that mine were much more prone to losing mouthfuls of milk when I was wearing my best clothing. I learned quickly to always be prepared, and I think these DIY burp cloths make great shower gifts for new parents.


I recently made some burp cloths for a baby shower using these prefolded diapers.


I cut a strip of minky fabric 5 1/2 inches wide x 18 inches long for each diaper, then pressed under a 1/2-inch seam allowance on each long side of the strip.


Then I centered the fabric strip, right side up, over the diaper and stitched close to the edge down each side of the minky strip.


I finished the top and bottom edges with a zigzag stitch.


Then I embellished the burp cloths with ribbon trim of various types and widths.


Some of the burp cloths have a ribbon border all the way around and others are trimmed with ribbon along the sides of the minky strip and across the top. There's really no right or wrong way to make these. They could be done in colors especially to match nursery decor or made with other types of fabric. I like the handy size of the prefolded diapers and the softness of the minky fabric.


Another cute and easy DIY shower gift to make is a taggie blanket for baby. I used the remainder of my blue and yellow minky fabric to make two taggie blankets to go with with the burp cloths.


To make each taggie blanket, cut two squares of fabric. I made mine 14 inches square. Each taggie blanket needs twenty 5-inch pieces of ribbon. The ribbon should be folded in half and pinned to the right side of one of the squares of fabric, as shown in the photo. Space the ribbon out evenly, leaving about 3 inches on each corner. Stitch the ribbon in place, then sew both squares of fabric together, right sides together, leaving an opening on one side to turn. Turn the blanket to the right side and stitch up the opening.


This makes such a sweet, soft little blanket for the baby to cuddle up with. Neither of these baby shower projects require a great deal of sewing skill, and they make cute, personal gifts for a new mother and her precious baby.


This post was shared with:
Arkansas Women Bloggers
reade more... Résuméabuiyad

Peppermint Cheesecake Bars


One of the best parts of the season has to be finding new things to cook and bake. Last year, I discovered peppermint chocolate sandwich cookies at the store, and knew they were just begging to be made into a yummy dessert. There's no such thing as too much peppermint, so these bars start out with a chocolate peppermint crust, and are topped with a peppermint mocha infused cheesecake layer, then topped with crushed peppermint candies! Don't worry, it's not overwhelming. It's perfect.

These bars are quick to make, but they need to rest and chill for a while, so plan accordingly.

Crush the cookies with a rolling pin, or in a food processor. Combine with the melted butter


and press into the bottom of a foil-lined 8 or 9 inch pan.


Refrigerate the crust while you make the filling. Using an electric mixer, beat the cream cheese and sugar


until smooth. Add the eggs one at a time and beat well after each addition. Mix in the coffee creamer.


Fold in half of the crushed candies.


Pour the cheesecake batter into the crust.


Sprinkle with the remaining crushed candies.


Bake for 40 minutes. Then turn off the oven, open the door slightly and let the cheesecake cool in the oven for an hour.


Remove to cool completely on a wire rack. Refrigerate for 2 hours before removing from the pan, peeling off the foil,


then cutting into bars and serving.


One year ago: Chocolate Kissed Gingerbread
Two years ago: Sweet and Salty Breakfast Monte Cristos
Three years ago: Macaroon Kisses
Four years ago: Chocolate Coconut Neopolitans

Find more inspiration at Inspiration Monday, Mix it Up, Melt in Your Mouth, Recipe Sharing, Totally Tasty Tuesday, Create Link Inspire, Clever Chicks, Try a New Recipe, Share Your Stuff, Ingredient Spotlight.

Peppermint Cheesecake Bars

18 Chocolate-peppermint sandwich cookies (or regular)
1/4 cup butter, melted
2 - 8 oz. packages reduced fat cream cheese, softened
3/4 cup sugar
3 eggs
1/3 cup Peppermint Mocha coffee creamer
1/4 cup crushed peppermint candies or candy canes

Crush the cookies with a rolling pin, or in a food processor. Combine with the melted butter and press into the bottom of a foil-lined 8 or 9 inch pan. Refrigerate the crust while you make the filling.

Using an electric mixer, beat the cream cheese and sugar until smooth. Add the eggs one at a time and beat well after each addition. Mix in the coffee creamer. Fold in half of the crushed candies.

Pour the cheesecake batter into the crust. Sprinkle with the remaining crushed candies.

Bake at 325 for 40 minutes. Turn off the oven, open the door slightly and let the cheesecake cool in the oven for an hour. Remove to cool completely on a wire rack. Refrigerate for 2 hours before removing from the pan, peeling off the foil, then serving.


One of the best parts of the season has to be finding new things to cook and bake. Last year, I discovered peppermint chocolate sandwich cookies at the store, and knew they were just begging to be made into a yummy dessert. There's no such thing as too much peppermint, so these bars start out with a chocolate peppermint crust, and are topped with a peppermint mocha infused cheesecake layer, then topped with crushed peppermint candies! Don't worry, it's not overwhelming. It's perfect.

These bars are quick to make, but they need to rest and chill for a while, so plan accordingly.

Crush the cookies with a rolling pin, or in a food processor. Combine with the melted butter


and press into the bottom of a foil-lined 8 or 9 inch pan.


Refrigerate the crust while you make the filling. Using an electric mixer, beat the cream cheese and sugar


until smooth. Add the eggs one at a time and beat well after each addition. Mix in the coffee creamer.


Fold in half of the crushed candies.


Pour the cheesecake batter into the crust.


Sprinkle with the remaining crushed candies.


Bake for 40 minutes. Then turn off the oven, open the door slightly and let the cheesecake cool in the oven for an hour.


Remove to cool completely on a wire rack. Refrigerate for 2 hours before removing from the pan, peeling off the foil,


then cutting into bars and serving.


One year ago: Chocolate Kissed Gingerbread
Two years ago: Sweet and Salty Breakfast Monte Cristos
Three years ago: Macaroon Kisses
Four years ago: Chocolate Coconut Neopolitans

Find more inspiration at Inspiration Monday, Mix it Up, Melt in Your Mouth, Recipe Sharing, Totally Tasty Tuesday, Create Link Inspire, Clever Chicks, Try a New Recipe, Share Your Stuff, Ingredient Spotlight.

Peppermint Cheesecake Bars

18 Chocolate-peppermint sandwich cookies (or regular)
1/4 cup butter, melted
2 - 8 oz. packages reduced fat cream cheese, softened
3/4 cup sugar
3 eggs
1/3 cup Peppermint Mocha coffee creamer
1/4 cup crushed peppermint candies or candy canes

Crush the cookies with a rolling pin, or in a food processor. Combine with the melted butter and press into the bottom of a foil-lined 8 or 9 inch pan. Refrigerate the crust while you make the filling.

Using an electric mixer, beat the cream cheese and sugar until smooth. Add the eggs one at a time and beat well after each addition. Mix in the coffee creamer. Fold in half of the crushed candies.

Pour the cheesecake batter into the crust. Sprinkle with the remaining crushed candies.

Bake at 325 for 40 minutes. Turn off the oven, open the door slightly and let the cheesecake cool in the oven for an hour. Remove to cool completely on a wire rack. Refrigerate for 2 hours before removing from the pan, peeling off the foil, then serving.

reade more... Résuméabuiyad

Don't Party In The Kitchen

Christmas is only a little over 1 week away! And I have one question for you. How many holiday parties have you been to thus far? Is your calendar over flowing? Is your dance card full? Have you been to many already, with many still to come? Have you hosted any yet? Are you trying to plan one for next week, or maybe even New Year's Eve? Tis the season for parties, parties and more parties, and today I've got a great appetizer/party food your guests will love and will keep you in the party, not watching from the kitchen.

I love party foods; but I especially love those that I can either make ahead of time and have waiting on me, or those that can be assembled as needed, as the night goes on, so hungry guest can easily be satisfied, without me missing out on all the fun! 

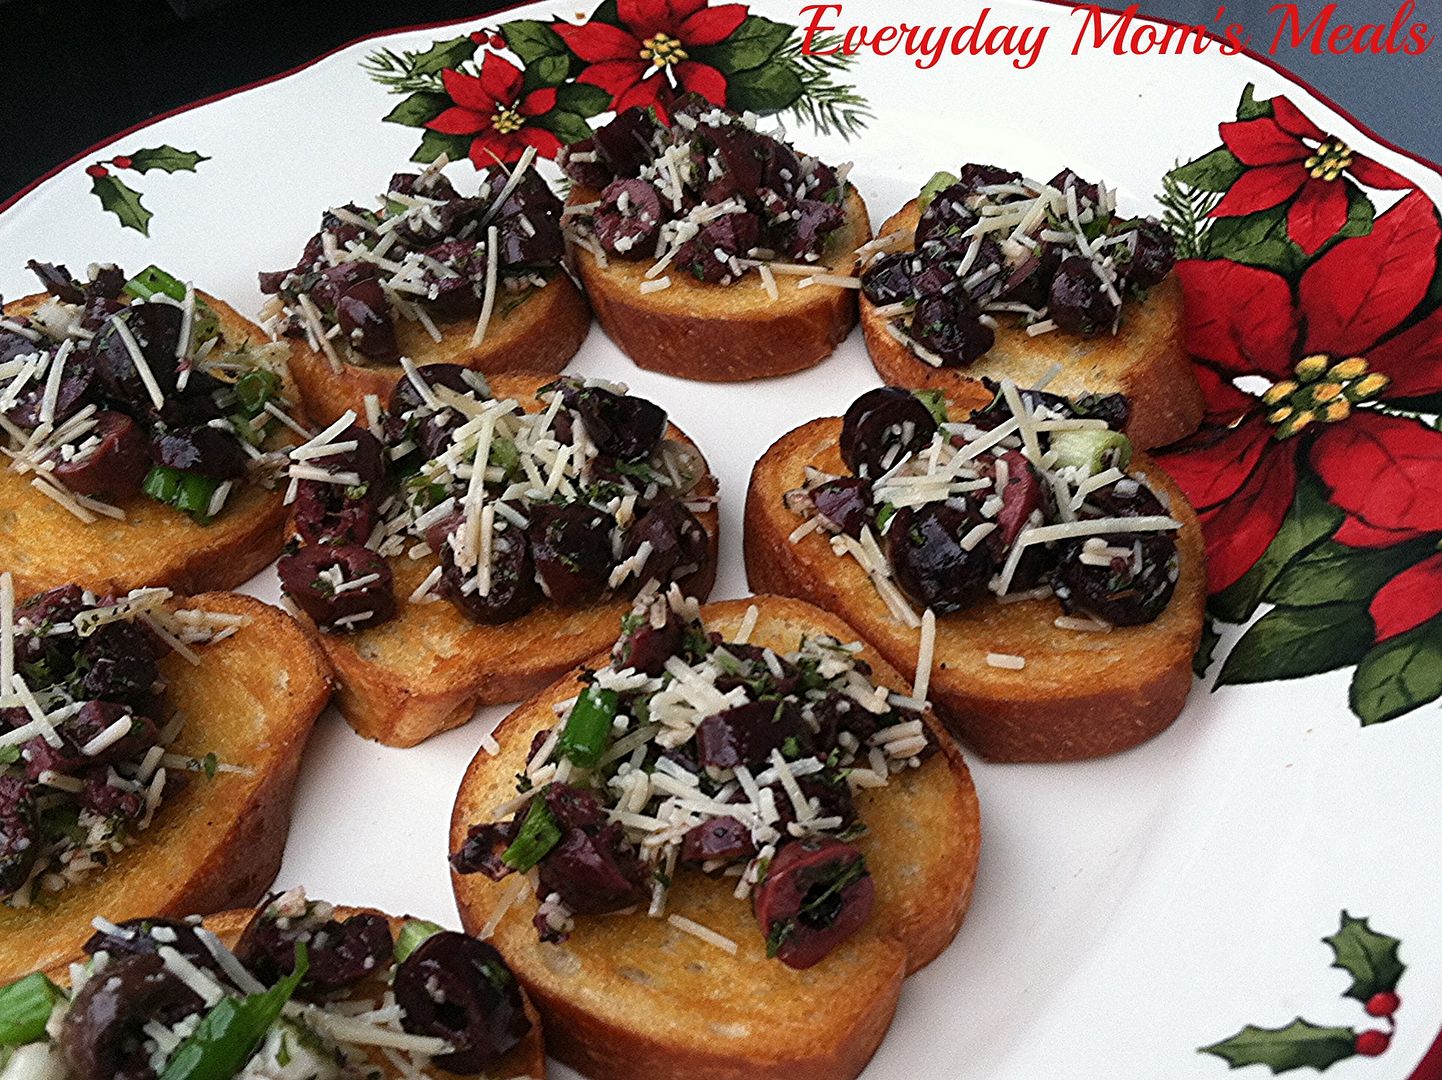
Bruschetta is one of my favorite appetizers of all time, but this time I wanted to switch it up a little and make one featuring olives instead of tomatoes. And not just every day olives, but kalamata olives! They are a little fancier in my mind, and it is the holiday season after all! 

Your guests will love the crisp bread, briny olives, and the salty nutty flavor of the Parmesan. It's a fantastic twist on a traditional bruschetta everyone will find refreshing and unique. Plus, you can make the olive mixture, keep it chilling in the fridge and then just bake off more bread as you need it, topping tray after tray all night long!

Holiday parties are meant to be enjoyed by all, and that includes the host/hostess! No where is there a rule saying if you are the "hostess with the mostess" you have to be in the kitchen all night, making sure everyone else is fed and having a good time while you miss out. Enjoy all those parties over the next couple weeks, it will be a whole year until they are here again!

Olive Bruschetta
20-24 Slices French bread or baguette about 1/4" thick
1 c. kalamata olives, pitted and chopped
2 green onions, chopped
1 garlic clove, finely minced
2 tsp. dried basil
2 tsp. dried parsley
1/4 c. olive oil, plus more for bread
1/4 c. shredded Parmesan cheese, plus extra for garnish
Salt and pepper

Preheat oven to 350. Brush both sides of bread with oil and season with salt and pepper. Place on rimmed baking sheets. Bake for 8-10 minutes, flip and bake 8-10 minutes more. (Watch carefully, these are times for my oven, but they can burn easily!)

In a medium bowl combine olive, garlic, green onions, basil, parsley, olive oil and cheese. Mix well. If not serving right away, chill. When bread is done, allow to cool. Top with olive mixture. Garnish with extra cheese.


Shared on The Country Cook Dec. 20, 2013

Appetizers at Very Good Recipes
Christmas is only a little over 1 week away! And I have one question for you. How many holiday parties have you been to thus far? Is your calendar over flowing? Is your dance card full? Have you been to many already, with many still to come? Have you hosted any yet? Are you trying to plan one for next week, or maybe even New Year's Eve? Tis the season for parties, parties and more parties, and today I've got a great appetizer/party food your guests will love and will keep you in the party, not watching from the kitchen.

I love party foods; but I especially love those that I can either make ahead of time and have waiting on me, or those that can be assembled as needed, as the night goes on, so hungry guest can easily be satisfied, without me missing out on all the fun! 

Bruschetta is one of my favorite appetizers of all time, but this time I wanted to switch it up a little and make one featuring olives instead of tomatoes. And not just every day olives, but kalamata olives! They are a little fancier in my mind, and it is the holiday season after all! 

Your guests will love the crisp bread, briny olives, and the salty nutty flavor of the Parmesan. It's a fantastic twist on a traditional bruschetta everyone will find refreshing and unique. Plus, you can make the olive mixture, keep it chilling in the fridge and then just bake off more bread as you need it, topping tray after tray all night long!

Holiday parties are meant to be enjoyed by all, and that includes the host/hostess! No where is there a rule saying if you are the "hostess with the mostess" you have to be in the kitchen all night, making sure everyone else is fed and having a good time while you miss out. Enjoy all those parties over the next couple weeks, it will be a whole year until they are here again!

Olive Bruschetta
20-24 Slices French bread or baguette about 1/4" thick
1 c. kalamata olives, pitted and chopped
2 green onions, chopped
1 garlic clove, finely minced
2 tsp. dried basil
2 tsp. dried parsley
1/4 c. olive oil, plus more for bread
1/4 c. shredded Parmesan cheese, plus extra for garnish
Salt and pepper

Preheat oven to 350. Brush both sides of bread with oil and season with salt and pepper. Place on rimmed baking sheets. Bake for 8-10 minutes, flip and bake 8-10 minutes more. (Watch carefully, these are times for my oven, but they can burn easily!)

In a medium bowl combine olive, garlic, green onions, basil, parsley, olive oil and cheese. Mix well. If not serving right away, chill. When bread is done, allow to cool. Top with olive mixture. Garnish with extra cheese.


Shared on The Country Cook Dec. 20, 2013

Appetizers at Very Good Recipes
reade more... Résuméabuiyad

Soul Food Saturday #35

Good Morning! I hope this weekend finds you warm and cozy. If you live in a part of the country, like we do, where the deep freeze set in this past week, I hope you are thawing out. Temps below 0 and wind chills around -15 are not what I consider fun! But the snow came with them, and that makes for a happy little boy! Today we've got something the kiddies will love for Christmas...and maybe they will even want to share with Santa!


Are you still looking for ideas for all those holiday parties coming your way? Don't you love when you show up with the one thing that everyone loves? Especially when the kids do too/ You know someone is going to ask you for the recipe, and why not share the holiday spirit in one more way. This is an oldie but goodie recipe for me. I have always loved our beloved Rice Krispie treats, who doesn’t? But I have also loved so many other cereals along the way. So just for you and in giving more during this holiday season here is a treat made just like our favorite, but with Pebbles cereal instead. This one uses the fruity variety keeping in tune with our Christmas theme. Grab a few bags of marshmallows you’ll want to make a few batches of these.
Christmas Treats Adapted from Rice Krispies
3 tbs. butter
1 (10 oz.) package regular marshmallows
6 c. Fruity Pebbles cereal

In a large saucepan melt butter over low heat. Add marshmallows and stir until completely melted. Remove from heat.  Add fruity pebbles cereal. Stir until well coated.
Using buttered spatula or wax paper evenly press mixture into 13 x 9 x 2-inch pan coated with cooking spray. Cool. Cut into 2-inch squares. Best if served the same day.


Good Morning! I hope this weekend finds you warm and cozy. If you live in a part of the country, like we do, where the deep freeze set in this past week, I hope you are thawing out. Temps below 0 and wind chills around -15 are not what I consider fun! But the snow came with them, and that makes for a happy little boy! Today we've got something the kiddies will love for Christmas...and maybe they will even want to share with Santa!


Are you still looking for ideas for all those holiday parties coming your way? Don't you love when you show up with the one thing that everyone loves? Especially when the kids do too/ You know someone is going to ask you for the recipe, and why not share the holiday spirit in one more way. This is an oldie but goodie recipe for me. I have always loved our beloved Rice Krispie treats, who doesn’t? But I have also loved so many other cereals along the way. So just for you and in giving more during this holiday season here is a treat made just like our favorite, but with Pebbles cereal instead. This one uses the fruity variety keeping in tune with our Christmas theme. Grab a few bags of marshmallows you’ll want to make a few batches of these.
Christmas Treats Adapted from Rice Krispies
3 tbs. butter
1 (10 oz.) package regular marshmallows
6 c. Fruity Pebbles cereal

In a large saucepan melt butter over low heat. Add marshmallows and stir until completely melted. Remove from heat.  Add fruity pebbles cereal. Stir until well coated.
Using buttered spatula or wax paper evenly press mixture into 13 x 9 x 2-inch pan coated with cooking spray. Cool. Cut into 2-inch squares. Best if served the same day.


reade more... Résuméabuiyad

Meal Plan Dec. 15- 20

*New Recipe
Links to Recipes on Blog
^ Recipes being "re-blogged"

Sunday
Pork Roast
Cabbage and Noodles
Applesauce

Monday (leftover from last week)
Goulash
Garlic Bread

Tuesday
We have Alex's Christmas program at church
Tomato Soup
Grilled Cheese

Wednesday
Mexican Black Bean Casserole*
Cottage Cheese

Thursday
Smoked Sausages
Baked Home Fries
Baked Beans

Friday
Crock Pot Cheddar Potato Soup^
Bacon and Chive Crescents

*New Recipe
Links to Recipes on Blog
^ Recipes being "re-blogged"

Sunday
Pork Roast
Cabbage and Noodles
Applesauce

Monday (leftover from last week)
Goulash
Garlic Bread

Tuesday
We have Alex's Christmas program at church
Tomato Soup
Grilled Cheese

Wednesday
Mexican Black Bean Casserole*
Cottage Cheese

Thursday
Smoked Sausages
Baked Home Fries
Baked Beans

Friday
Crock Pot Cheddar Potato Soup^
Bacon and Chive Crescents

reade more... Résuméabuiyad