Pages

Showing posts with label grilling. Show all posts

Don't Put It Away Quite Yet

Yep, autumn is here. We already established that on Monday. And for many of you I know that means the end of grilling season, but in this house it never ends. That's right. We are those crazy people are stand outside in our snow boots to grill a good steak in the dead of winter. In fact, we have been known to grill in a blizzard. An actual blizzard!! While the snow fell at an alarming rate, our neighbors were outside trying to keep up with shoveling, they were all jealous of the smells coming from our backyard, as the T-bones cooked to perfection!

So if you're like us, and the falling of the leaves has no reflection on the use of your grill, today's recipe will totally excite you. But don't worry, if your grill is all tucked away until next spring, there is also an oven option noted in the recipe! 

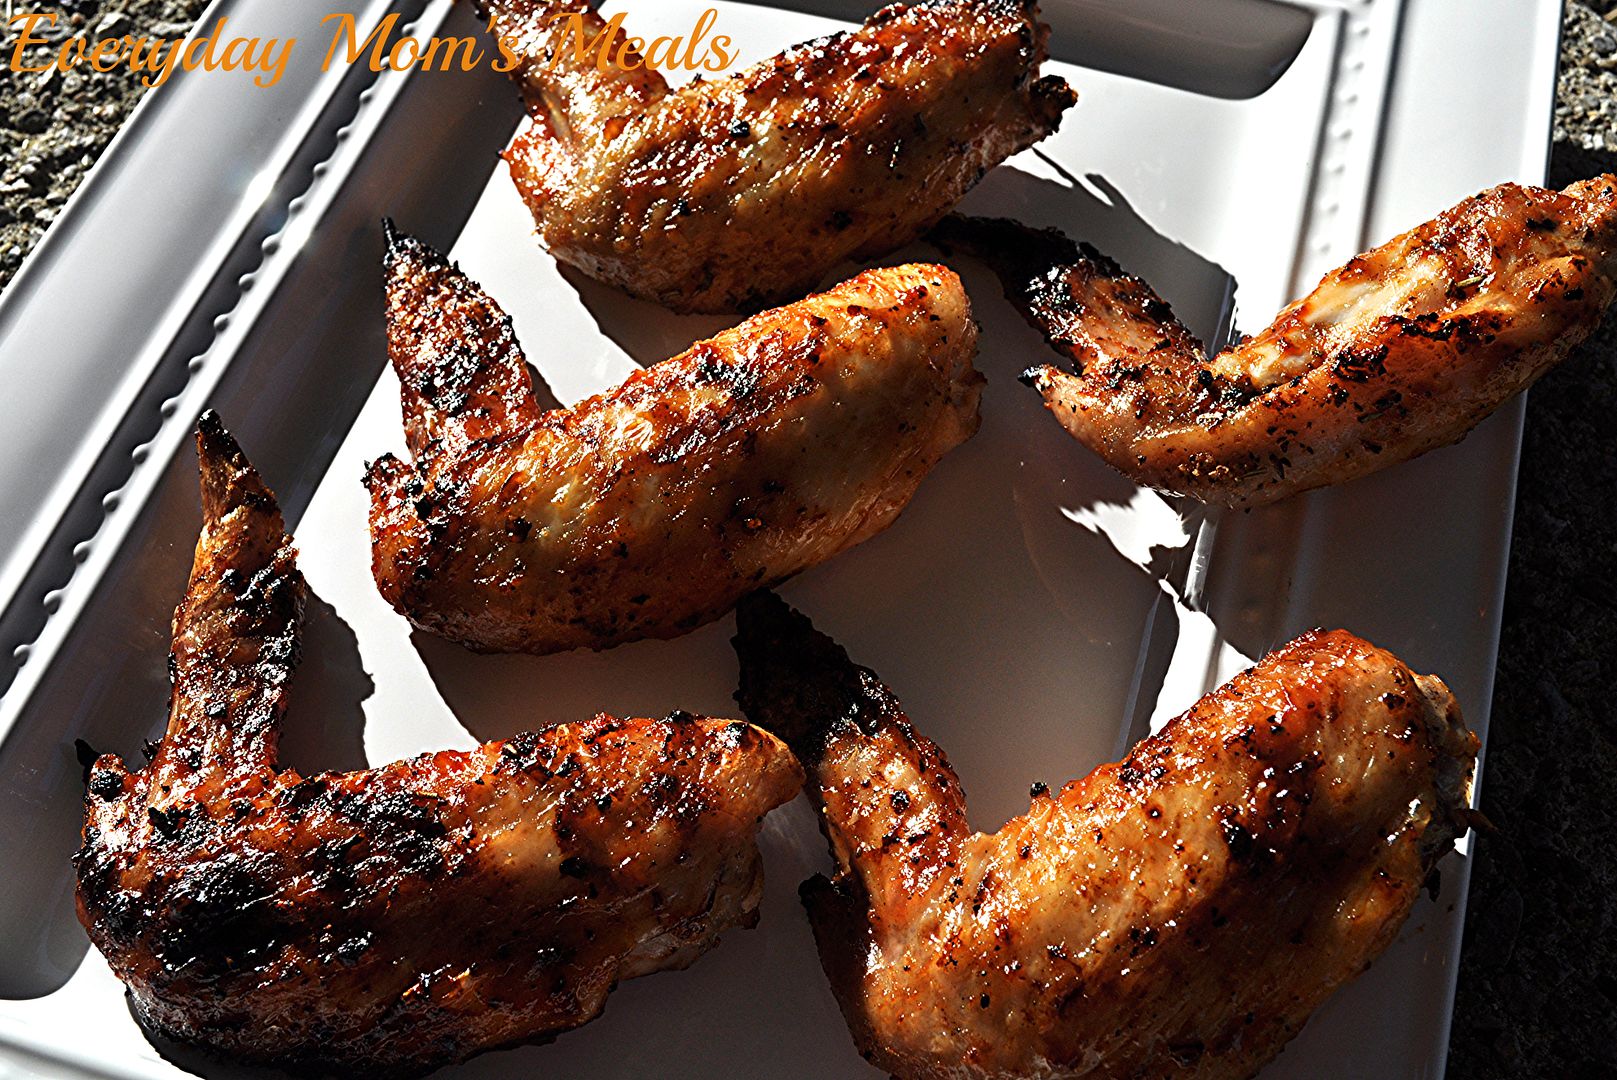
We love chicken wings. Buffalo. Barbecue. They are all scrumptious to us. And when I was a teenager, there was a local Chinese restaurant that had these amazing lunch specials that included a bunch of appetizers with each entree, one being a glazed chicken drummette (the small piece of the wing) that would have you licking your fingers when you were done. These are the closest thing to that I've had in years. In fact, Adam described them as "Asian barbecue". Sweet like barbecue, but with some of the best Asian flavors around, soy and ginger. 

If you are grilling this weekend, these are a definite must. Maybe for the big game? I would love to see these at a big tailgating party! Or if you want to stay inside, see the note above the oven. Either way, they are yummy, and easy, two things that are always welcome, winter, spring, summer or fall!

Asian Glazed Wings
2 lbs. chicken wings, separated into 2 pieces each
2 TBS all purpose seasoning, your favorite brand
2 TBS honey
2 TBS soy sauce
1 cup vegetable juice
1 tsp. ground ginger
Garlic Salt to taste
Salt and Pepper to taste
Cooking Spray

In a large bowl combine vegetable juice, honey, soy sauce and ginger. Set aside. Sprinkle wings with seasoning, garlic salt, salt and pepper. Allow to marinade for at least 30 minutes. When ready, preheat grill to medium-high. Spray wings with cooking spray. Sear on both sides, about 2 minutes. Reduce heat to medium-low and continue cooking for 15-20 minutes until cooked through. For the last 10 minutes baste with sauce on both sides many times. 
*NOTE* These can also be cooked in the oven. Follow directions, but roast on a baking sheet in 400 degree oven for 20 minutes, and then baste and cook for another 20 minutes, basting often.


Shared on The Country Cook September 27, 2013
Chicken at Very Good Recipes
Yep, autumn is here. We already established that on Monday. And for many of you I know that means the end of grilling season, but in this house it never ends. That's right. We are those crazy people are stand outside in our snow boots to grill a good steak in the dead of winter. In fact, we have been known to grill in a blizzard. An actual blizzard!! While the snow fell at an alarming rate, our neighbors were outside trying to keep up with shoveling, they were all jealous of the smells coming from our backyard, as the T-bones cooked to perfection!

So if you're like us, and the falling of the leaves has no reflection on the use of your grill, today's recipe will totally excite you. But don't worry, if your grill is all tucked away until next spring, there is also an oven option noted in the recipe! 

We love chicken wings. Buffalo. Barbecue. They are all scrumptious to us. And when I was a teenager, there was a local Chinese restaurant that had these amazing lunch specials that included a bunch of appetizers with each entree, one being a glazed chicken drummette (the small piece of the wing) that would have you licking your fingers when you were done. These are the closest thing to that I've had in years. In fact, Adam described them as "Asian barbecue". Sweet like barbecue, but with some of the best Asian flavors around, soy and ginger. 

If you are grilling this weekend, these are a definite must. Maybe for the big game? I would love to see these at a big tailgating party! Or if you want to stay inside, see the note above the oven. Either way, they are yummy, and easy, two things that are always welcome, winter, spring, summer or fall!

Asian Glazed Wings
2 lbs. chicken wings, separated into 2 pieces each
2 TBS all purpose seasoning, your favorite brand
2 TBS honey
2 TBS soy sauce
1 cup vegetable juice
1 tsp. ground ginger
Garlic Salt to taste
Salt and Pepper to taste
Cooking Spray

In a large bowl combine vegetable juice, honey, soy sauce and ginger. Set aside. Sprinkle wings with seasoning, garlic salt, salt and pepper. Allow to marinade for at least 30 minutes. When ready, preheat grill to medium-high. Spray wings with cooking spray. Sear on both sides, about 2 minutes. Reduce heat to medium-low and continue cooking for 15-20 minutes until cooked through. For the last 10 minutes baste with sauce on both sides many times. 
*NOTE* These can also be cooked in the oven. Follow directions, but roast on a baking sheet in 400 degree oven for 20 minutes, and then baste and cook for another 20 minutes, basting often.


Shared on The Country Cook September 27, 2013
Chicken at Very Good Recipes
reade more... Résuméabuiyad

Another Hooiser Blogger

This blogging community I belong to is so wide, so varied, and so big I never have to look far to find something new I want to try in my kitchen. I love introducing ya'll to bloggers I love to read, and maybe ones you aren't familiar with yet, especially when it's a fellow Hooiser!

That's right, my good buddy Cris over at Goodeness Gracious, lives right here in Indiana, and blogs about her life, food, her family...her site really is a one stop shop for all things GOODe! 

A couple weeks ago her and I were talking about the "good ole' days" of blogging, before we really knew what we were doing, and how we wished we could go back and fix some of the photos are young blogger selves took. (I've actually been doing this all year long. You know, those recipes I've re-blogged from the days when only Adam and my mom read EMM!) What can I say? You live and learn, and in the early days of food photography, you're just happy to get a shot, and not really worried about what it looks like. She shared this recipe with me as an example of her early days, and honestly, I wasn't even looking at the photo after seeing the food! Oh my blog! It sounded fan-freakin-tastic, and she actually described it as the BEST chicken EVER. With a description like that, and how much I love chicken on the grill, you know I had to try it. (Oh, and if you click on the link above, you can see Cris's original post she was telling me about, but don't be critical, remember she was a young food blogger!) 

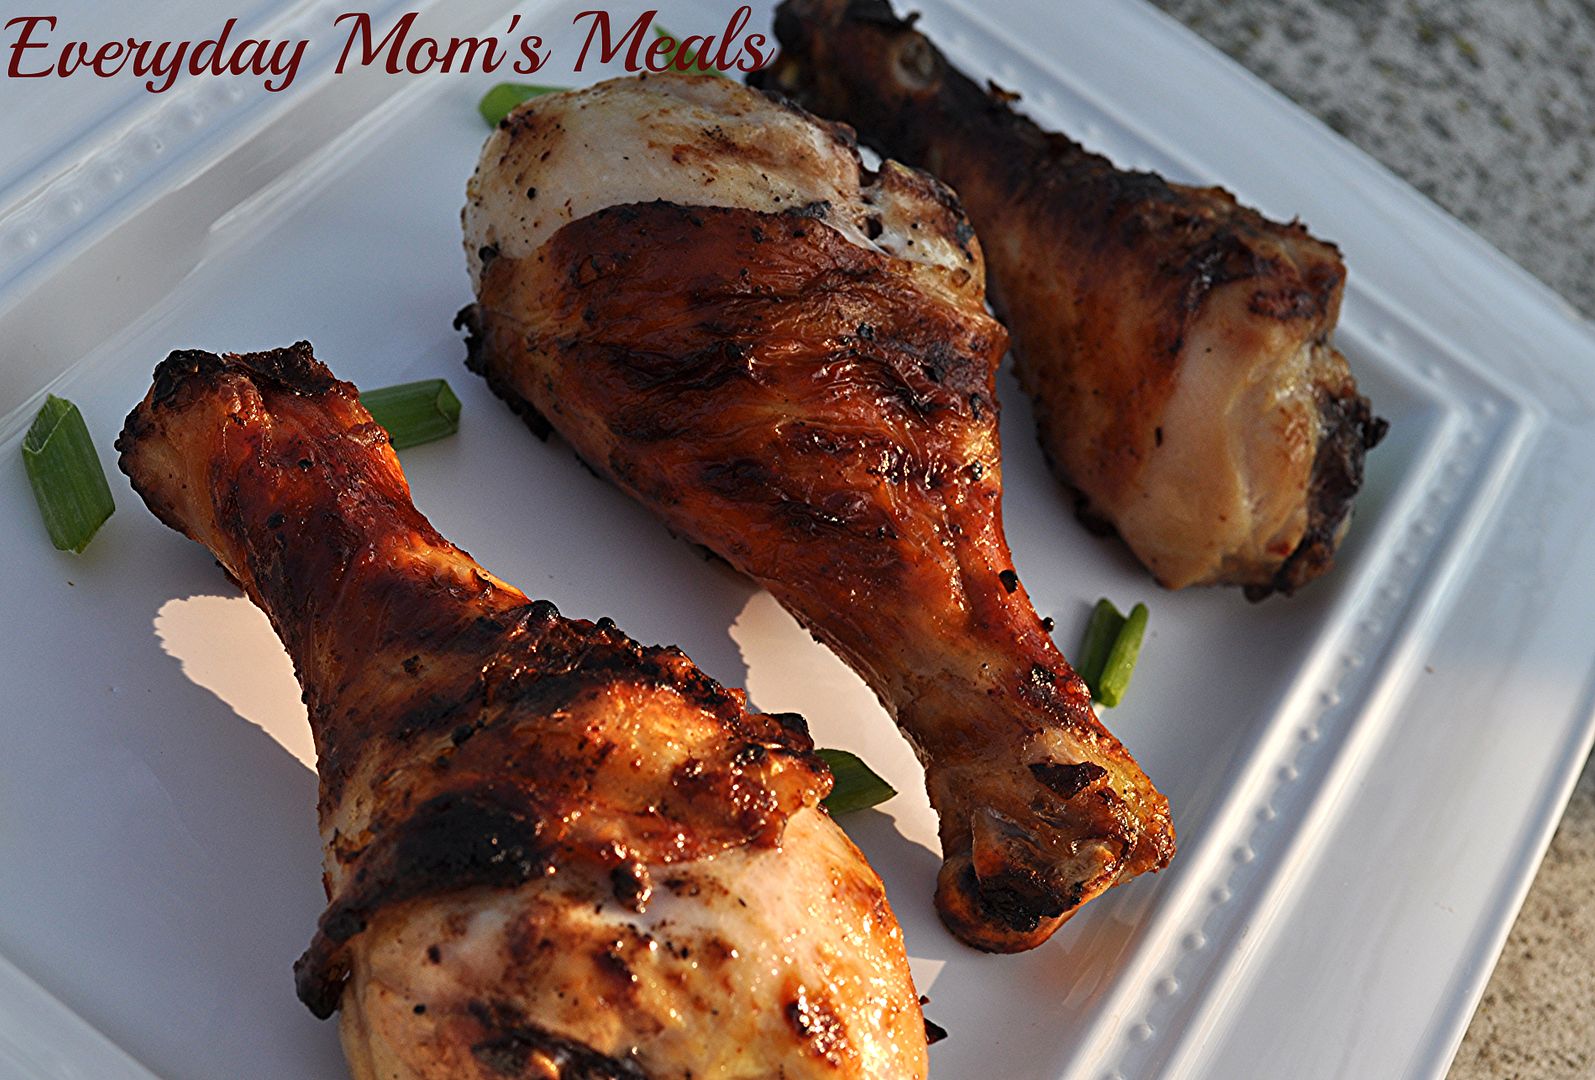
We grill year round, but if you're grilling season is winding down, do NOT let it close without making this! The marinade is so flavorful, and the chicken itself is juicy, tender and exactly what you want from grilled meat! And for those looking at it thinking "Oh, can I take the skin off?" You can, I'm not going to know, but I'm going to warn you, the skin is what absorbs the huge flavor of the marinade, gets crispy on the grill and makes this extra finger lickin'. But I realize it's not everyone's cup of tea, and I'm sure it would be delicious either way! 

If you aren't a reader of Cris's blog yet, I highly encourage you to become one. She always has something yummy cooking in her kitchen. We Hoosiers gotta stick together, and share some chicken when we can!


Grilled Beer and Mustard Chicken Inspired by Goodeness Gracious
10 chicken drumsticks, skin trimmed, but left on
1 (16 oz.) bottle beer (I used Bud Light)
1 bunch green onions, chopped
1/4 c. spicy brown mustard
1 TBS hot sauce
2 TBS Worcestershire sauce
1 1/2 TBS grill seasoning
4 cloves garlic, minced 
Cooking Spray for grilling

In a large bowl combine beer, onions, mustard, hot sauce, Worcestershire, garlic and grill seasoning. Mix well. Add chicken. Toss to coat. Cover and marinade in fridge or 6 hours. When ready preheat grill to high. Spray with cooking spray. Place chicken on grill to sear, about 2 minutes. Reduce heat to medium and continue cooking, turning every 5 minutes for 25-30 minutes until juices run clear. 


Shared on The Counry Cook Sept. 13, 2013
Chicken at Very Good Recipes
This blogging community I belong to is so wide, so varied, and so big I never have to look far to find something new I want to try in my kitchen. I love introducing ya'll to bloggers I love to read, and maybe ones you aren't familiar with yet, especially when it's a fellow Hooiser!

That's right, my good buddy Cris over at Goodeness Gracious, lives right here in Indiana, and blogs about her life, food, her family...her site really is a one stop shop for all things GOODe! 

A couple weeks ago her and I were talking about the "good ole' days" of blogging, before we really knew what we were doing, and how we wished we could go back and fix some of the photos are young blogger selves took. (I've actually been doing this all year long. You know, those recipes I've re-blogged from the days when only Adam and my mom read EMM!) What can I say? You live and learn, and in the early days of food photography, you're just happy to get a shot, and not really worried about what it looks like. She shared this recipe with me as an example of her early days, and honestly, I wasn't even looking at the photo after seeing the food! Oh my blog! It sounded fan-freakin-tastic, and she actually described it as the BEST chicken EVER. With a description like that, and how much I love chicken on the grill, you know I had to try it. (Oh, and if you click on the link above, you can see Cris's original post she was telling me about, but don't be critical, remember she was a young food blogger!) 

We grill year round, but if you're grilling season is winding down, do NOT let it close without making this! The marinade is so flavorful, and the chicken itself is juicy, tender and exactly what you want from grilled meat! And for those looking at it thinking "Oh, can I take the skin off?" You can, I'm not going to know, but I'm going to warn you, the skin is what absorbs the huge flavor of the marinade, gets crispy on the grill and makes this extra finger lickin'. But I realize it's not everyone's cup of tea, and I'm sure it would be delicious either way! 

If you aren't a reader of Cris's blog yet, I highly encourage you to become one. She always has something yummy cooking in her kitchen. We Hoosiers gotta stick together, and share some chicken when we can!


Grilled Beer and Mustard Chicken Inspired by Goodeness Gracious
10 chicken drumsticks, skin trimmed, but left on
1 (16 oz.) bottle beer (I used Bud Light)
1 bunch green onions, chopped
1/4 c. spicy brown mustard
1 TBS hot sauce
2 TBS Worcestershire sauce
1 1/2 TBS grill seasoning
4 cloves garlic, minced 
Cooking Spray for grilling

In a large bowl combine beer, onions, mustard, hot sauce, Worcestershire, garlic and grill seasoning. Mix well. Add chicken. Toss to coat. Cover and marinade in fridge or 6 hours. When ready preheat grill to high. Spray with cooking spray. Place chicken on grill to sear, about 2 minutes. Reduce heat to medium and continue cooking, turning every 5 minutes for 25-30 minutes until juices run clear. 


Shared on The Counry Cook Sept. 13, 2013
Chicken at Very Good Recipes
reade more... Résuméabuiyad

BBQ Chicken (or Shrimp!) and Grilled Pineapple Quesadillas


I love quesadillas - these veggie and black bean ones are one of my favorite, and I'm also very fond of chicken, bacon and avocado, but now they have to contend with these...what a cool combination of flavors this is! BBQ chicken (or shrimp!) with sweet grilled pineapple and a little kick of jalapeno...all encased in melty cheese and a crispy tortilla. These have already become a staple at my house, and I hope you enjoy them, too!

As the title implies, you can use chicken or shrimp - I've used both and loved them both equally.

Place the pineapple and jalapeno slices in a grill pan


and cook them over medium high heat until warm and fragrant, about 3-4 minutes. (Make sure you turn them once!)


Remove the pineapple and peppers to a plate; cut the pineapple into chunks and reduce the heat on the stove to medium low. Place one tortilla in the grill pan and sprinkle cheese on half of the tortilla. Top with the chicken,


then drizzle with the barbecue sauce and top with jalapeno slices,


then pineapple,


and sprinkle with another 1/4 cup cheese.


Fold down the top of the tortilla to cover the filling, and when the bottom layer of cheese is melted, flip the quesadilla over.


Press down on the tortilla with a spatula to help it all stick together, then cook for an additional 2-3 minutes or until the second layer of cheese is all melted. Slice into thirds to serve.


One year ago: Chipotle Crab Dip
Two years ago: Sloppy Joes
Three years ago: Cream Cheese Brownies
Four years ago: Orange Rice Medley

Find more great ideas at Mouthwatering Monday, Inspiration Monday, Mix it Up Monday, Melt in Your Mouth Monday, Recipe Sharing, Tasteful Tuesday, Tuesday Talent Show, Clever Chicks, Try a New Recipe, Share Your Stuff, All My Bloggy Friends, Hearth and Soul, Cast Party, What's Cooking.

BBQ Chicken and Grilled Pineapple Quesadillas

4 burrito-size (10 inches) flour tortillas
2 cups colby jack or Mexican-style shredded cheese
1 cup cooked, shredded chicken
2 jalapeno peppers, seeded and sliced
4 pineapple rings (fresh or canned)
6 Tbsp. barbecue sauce

In a grill pan over medium high heat, grill the pineapple slices and jalapeno slices until warmed through and fragrant, about 3-4 minutes. Remove the pineapple and peppers to a plate. Cut the pineapple into chunks.

Reduce heat to medium low, and place one tortilla in the grill pan. Sprinkle 1/4 cup cheese over half the tortilla, then layer with 1/4 cup chicken, 1 slice pineapple (cut into chunks), and 1/2 of one jalapeno pepper. Drizzle 1 1/2 tablespoons of barbecue sauce over the chicken mixture, then top with another 1/4 cup cheese.

Fold the top half of the tortilla over the filling ingredients and press down with a spatula. When the bottom layer of cheese is melted, carefully flip the quesadilla over and press down with the spatula. Cook an additional 2-3 minutes or until all the cheese is melted. Repeat with the remaining ingredients to make additional quesadillas.

Cut into three sections to serve. Serves 4-6.


I love quesadillas - these veggie and black bean ones are one of my favorite, and I'm also very fond of chicken, bacon and avocado, but now they have to contend with these...what a cool combination of flavors this is! BBQ chicken (or shrimp!) with sweet grilled pineapple and a little kick of jalapeno...all encased in melty cheese and a crispy tortilla. These have already become a staple at my house, and I hope you enjoy them, too!

As the title implies, you can use chicken or shrimp - I've used both and loved them both equally.

Place the pineapple and jalapeno slices in a grill pan


and cook them over medium high heat until warm and fragrant, about 3-4 minutes. (Make sure you turn them once!)


Remove the pineapple and peppers to a plate; cut the pineapple into chunks and reduce the heat on the stove to medium low. Place one tortilla in the grill pan and sprinkle cheese on half of the tortilla. Top with the chicken,


then drizzle with the barbecue sauce and top with jalapeno slices,


then pineapple,


and sprinkle with another 1/4 cup cheese.


Fold down the top of the tortilla to cover the filling, and when the bottom layer of cheese is melted, flip the quesadilla over.


Press down on the tortilla with a spatula to help it all stick together, then cook for an additional 2-3 minutes or until the second layer of cheese is all melted. Slice into thirds to serve.


One year ago: Chipotle Crab Dip
Two years ago: Sloppy Joes
Three years ago: Cream Cheese Brownies
Four years ago: Orange Rice Medley

Find more great ideas at Mouthwatering Monday, Inspiration Monday, Mix it Up Monday, Melt in Your Mouth Monday, Recipe Sharing, Tasteful Tuesday, Tuesday Talent Show, Clever Chicks, Try a New Recipe, Share Your Stuff, All My Bloggy Friends, Hearth and Soul, Cast Party, What's Cooking.

BBQ Chicken and Grilled Pineapple Quesadillas

4 burrito-size (10 inches) flour tortillas
2 cups colby jack or Mexican-style shredded cheese
1 cup cooked, shredded chicken
2 jalapeno peppers, seeded and sliced
4 pineapple rings (fresh or canned)
6 Tbsp. barbecue sauce

In a grill pan over medium high heat, grill the pineapple slices and jalapeno slices until warmed through and fragrant, about 3-4 minutes. Remove the pineapple and peppers to a plate. Cut the pineapple into chunks.

Reduce heat to medium low, and place one tortilla in the grill pan. Sprinkle 1/4 cup cheese over half the tortilla, then layer with 1/4 cup chicken, 1 slice pineapple (cut into chunks), and 1/2 of one jalapeno pepper. Drizzle 1 1/2 tablespoons of barbecue sauce over the chicken mixture, then top with another 1/4 cup cheese.

Fold the top half of the tortilla over the filling ingredients and press down with a spatula. When the bottom layer of cheese is melted, carefully flip the quesadilla over and press down with the spatula. Cook an additional 2-3 minutes or until all the cheese is melted. Repeat with the remaining ingredients to make additional quesadillas.

Cut into three sections to serve. Serves 4-6.

reade more... Résuméabuiyad

Oh Yes I Did!!

Are you grilling out this weekend? Tired of the same burger and dog routine? Want to jazz it up a little? Then you've come to the right place, because I'm about to blow your mind!

That was the exact reason why this recipe came to be. I always have hot dogs in the freezer. Anytime I see them on sale, I pick up a package, ignoring the fact I probably already have 2-3 packages at home. A good deal is a good deal, and they are something I can heat up quickly for Alex for lunch or plan a simple supper around. So a few weeks ago when I had thawed out a package for dinner that night, I challenged myself to come up with something new and fun to do with them.

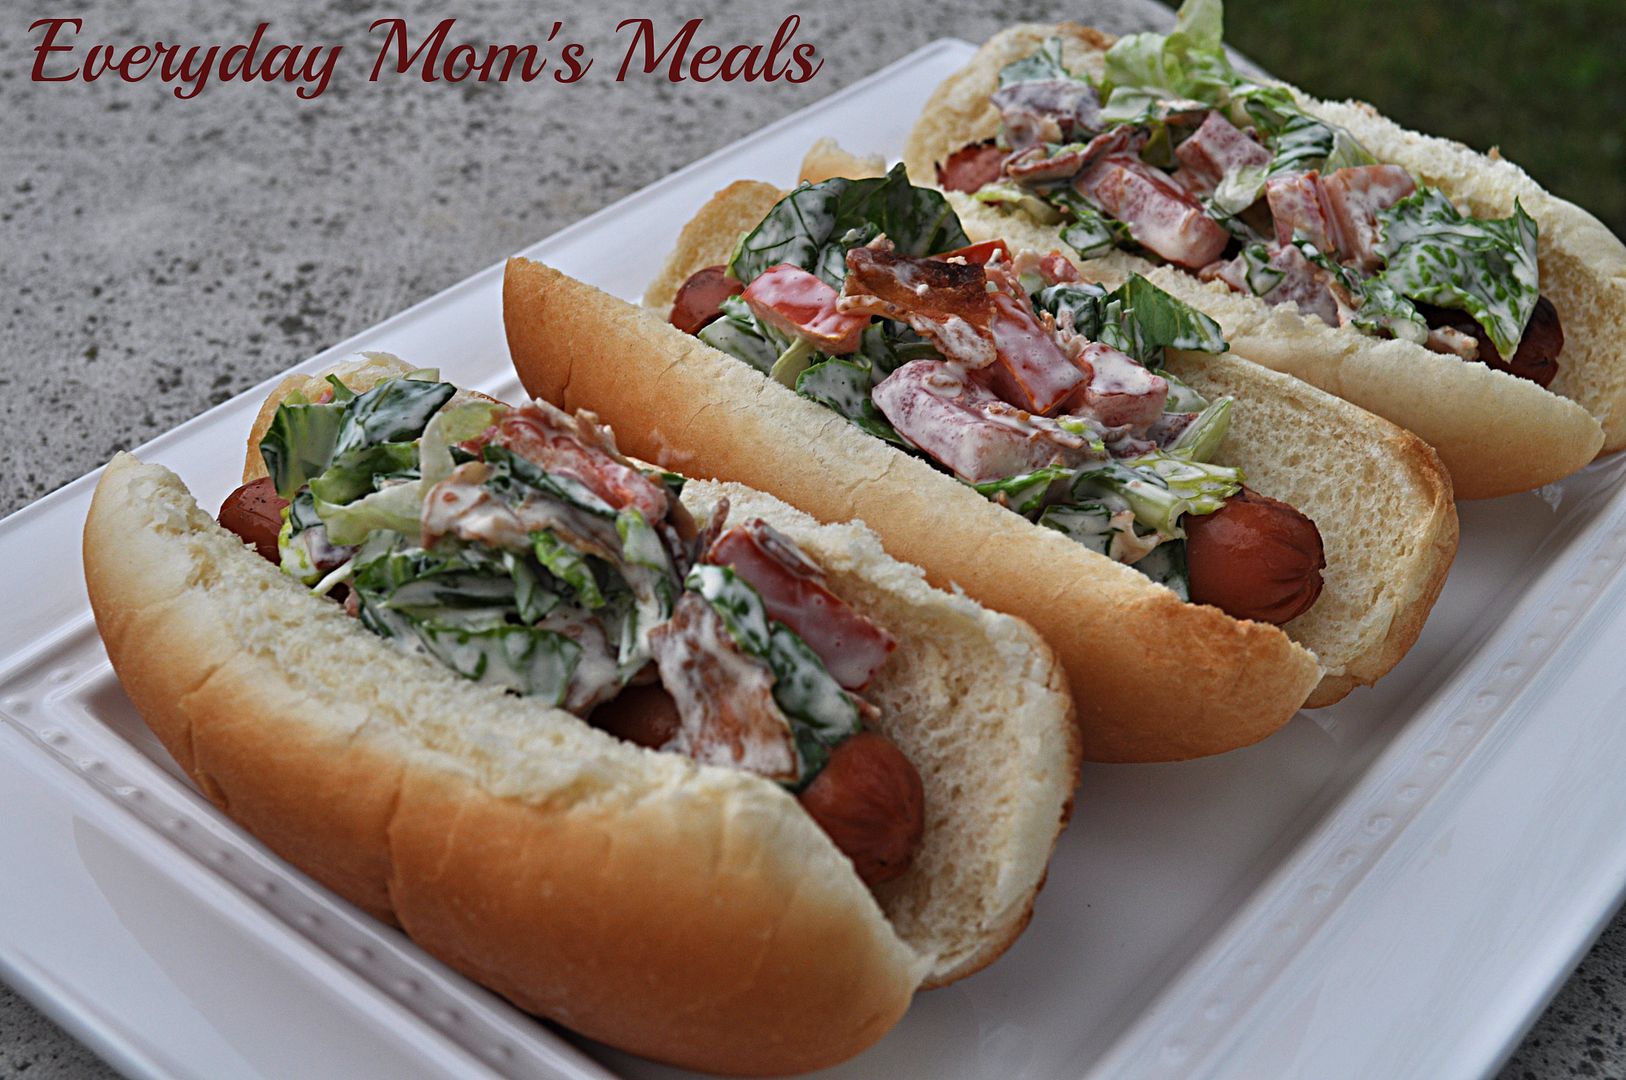
I've told you many times before how much we love a good BLT. I mean, what's not to love? Crisp lettuce, ripe tomato, delicious bacon...they are one of our favorites, hands down. So I began to wonder. What if I took all the things from a BLT that we love, mixed them together into a salad, or relish if you will, and slap that on top of a grilled dog?? Well, I am here to testify...that was one of more genius ideas I've had in my life!

There is no other way to describe these other than a hot dog and a BLT got drunk on tequila one night and had a baby HA HA HA!!! The flavor of the "relish" on to doesn't over power that of the hot dog, but you still get the creamy, bacon explosion you love from a BLT. It's like the perfect summer time bite!

If you are grilling up some dogs this weekend and want the standard ketchup, mustard, onions and relish, go ahead! There is nothing wrong with that, and they are perfectly yummy. But if you want to blow minds and taste buds away, try these instead! You won't regret it. Just be careful who you make them for because I promise they will keep coming back for more!

BLT Hot Dogs 
8 hot dogs, grilled to likeness
8 buns
3/4 c. chopped Romaine lettuce
2 small tomatoes, seeded and chopped
6 slices bacon, cooked crisp and chopped
1/3 c. mayo

In a small bowl combine lettuce, tomato, bacon and mayo. Stir well. Allow to sit at room temperature about 15-20 minutes to allow flavors to combine. Top hot dogs equally with mixture.


Shared on The Country Cook July 12, 2013
Shared on Make Ahead Meals July 15, 2013
Shared on Mandy's Recipe Box July 16, 2013

Hot Dogs at Very Good Recipes
Pin It
Are you grilling out this weekend? Tired of the same burger and dog routine? Want to jazz it up a little? Then you've come to the right place, because I'm about to blow your mind!

That was the exact reason why this recipe came to be. I always have hot dogs in the freezer. Anytime I see them on sale, I pick up a package, ignoring the fact I probably already have 2-3 packages at home. A good deal is a good deal, and they are something I can heat up quickly for Alex for lunch or plan a simple supper around. So a few weeks ago when I had thawed out a package for dinner that night, I challenged myself to come up with something new and fun to do with them.

I've told you many times before how much we love a good BLT. I mean, what's not to love? Crisp lettuce, ripe tomato, delicious bacon...they are one of our favorites, hands down. So I began to wonder. What if I took all the things from a BLT that we love, mixed them together into a salad, or relish if you will, and slap that on top of a grilled dog?? Well, I am here to testify...that was one of more genius ideas I've had in my life!

There is no other way to describe these other than a hot dog and a BLT got drunk on tequila one night and had a baby HA HA HA!!! The flavor of the "relish" on to doesn't over power that of the hot dog, but you still get the creamy, bacon explosion you love from a BLT. It's like the perfect summer time bite!

If you are grilling up some dogs this weekend and want the standard ketchup, mustard, onions and relish, go ahead! There is nothing wrong with that, and they are perfectly yummy. But if you want to blow minds and taste buds away, try these instead! You won't regret it. Just be careful who you make them for because I promise they will keep coming back for more!

BLT Hot Dogs 
8 hot dogs, grilled to likeness
8 buns
3/4 c. chopped Romaine lettuce
2 small tomatoes, seeded and chopped
6 slices bacon, cooked crisp and chopped
1/3 c. mayo

In a small bowl combine lettuce, tomato, bacon and mayo. Stir well. Allow to sit at room temperature about 15-20 minutes to allow flavors to combine. Top hot dogs equally with mixture.


Shared on The Country Cook July 12, 2013
Shared on Make Ahead Meals July 15, 2013
Shared on Mandy's Recipe Box July 16, 2013

Hot Dogs at Very Good Recipes
Pin It
reade more... Résuméabuiyad

It's Okay To Get Sticky

I will be the first person to admit, I'm not a fan of messy things. Sure, there is no way to eat things like barbecued ribs or corn on the cob without making a total mess of yourself, but for the most part, I haven't always been a person who is okay with a mess.

In fact, I'm pretty sure I had one of the cleanest babies on the face of the planet. Yep, I was the mom who was constantly busting out the handi-wipes to clean his face and hands. I'm the one that kept a wet rag beside us during high chair feeding to promptly clean up any spills. Yeah, so I was a little OCD about it. It's okay though. I accept about myself.

But as he's gotten a little older, I've accepted the fact he is a boy and will spend 99% of his life dirty, in one way or another. And honestly, I'm pretty okay with it. I don't mind it as much as he was a baby. Maybe part of it was the whole "trying to be the perfect 1st time mommy, with the baby who always looks neat and tidy" syndrome I was suffering from. Whatever it was, I'm glad it has eased up a tad, because with this boy...who is all boy...I would be driving myself crazy at this point trying to keep him clean!

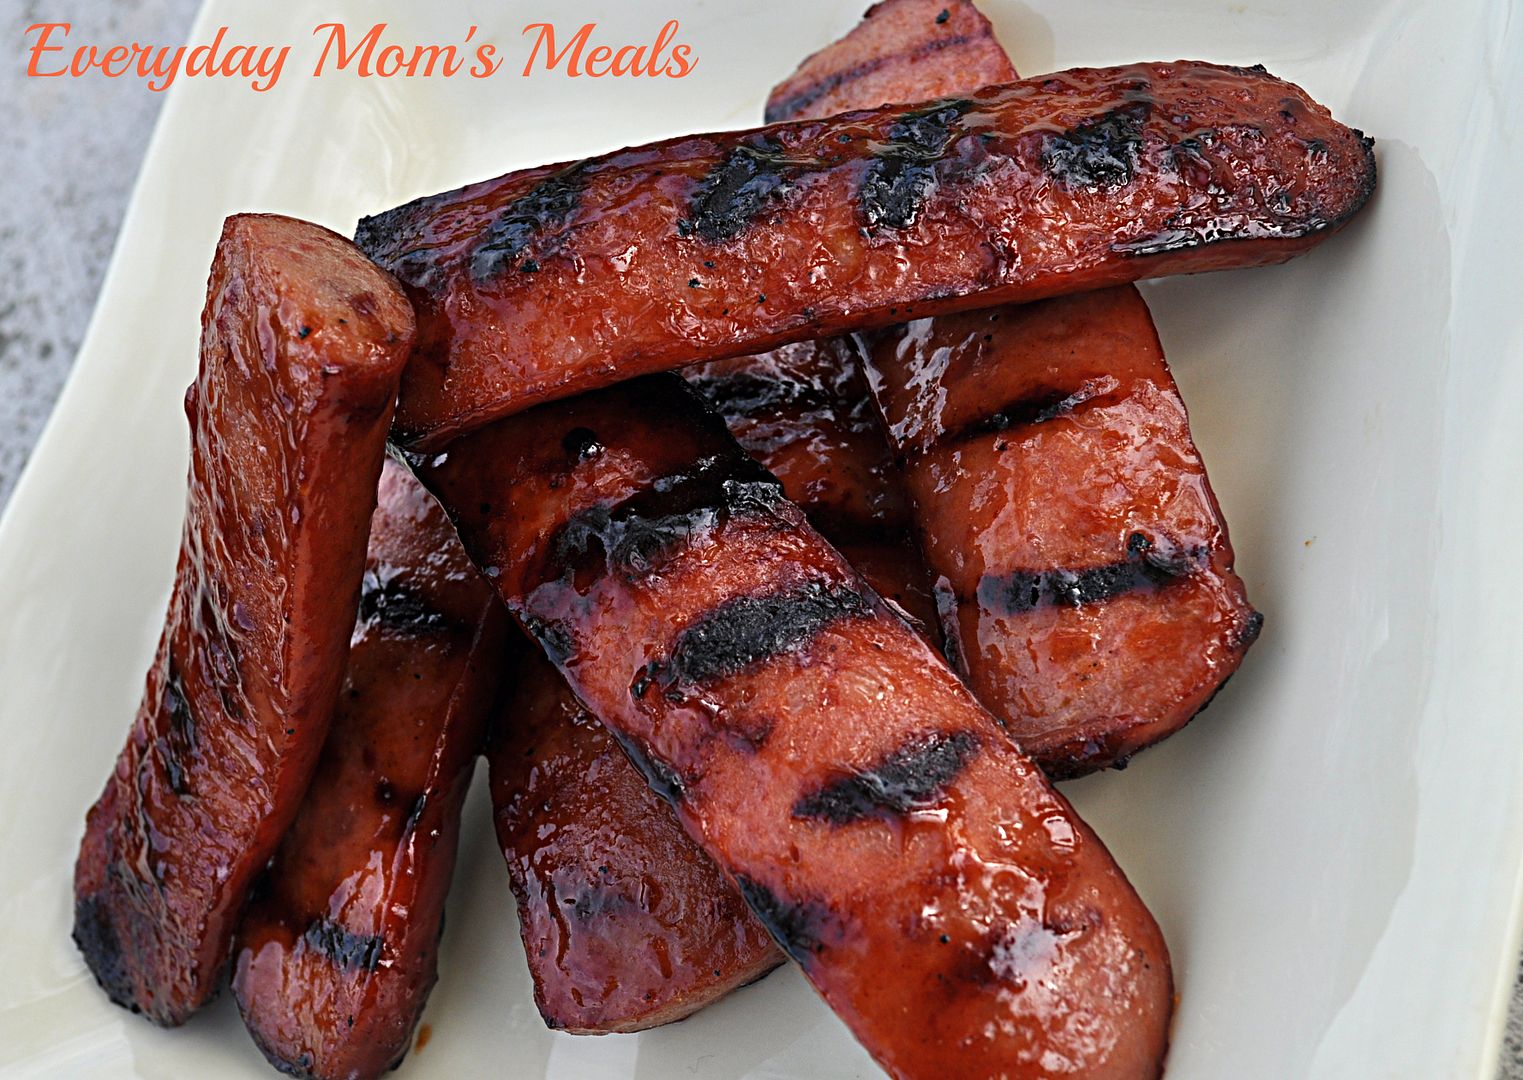
Like the ribs and corn mentioned above, this dish is one that even though it's eaten with a knife and fork, you're going to get a little sticky, a little messy eating it. But I guarantee it's totally worth it! I came up with when I had laid out smoked sausage for supper, not sure what I was going to do with it. Then I decided I would grill it and because of that, it needed a yummy sauce to be basted in. This makes for something sweet, tangy, sticky...and absolutely delicious.

I've accepted that I'm never going to be totally okay with messes in my life. But I've learned which ones are in need of prompt clean up (can't do flour all over the kitchen!) and those that make life more interesting, more fun, and in this case, much more mouth watering!

Sticky Grilled Smoked Sausage
1 lb. smoked sausage
1/3 c. barbecue sauce
1/4 c. packed brown sugar
3 TBS cider vinegar

Cut sausage into 4-5 inch pieces and slice lengthwise. In a small bowl combine barbecue sauce, sugar and vinegar. Whisk well. Preheat grill to high. Spray well with cooking spray. Brush sausage with glaze. Place on grill. Once seared, flip, baste again, and turn heat down to medium. Continue cooking and basting for about 10 minutes, turning often. *NOTE* Be careful! These will burn very easily. We like some "char" marks but they will turn black if you aren't watching!


Shared on The Country Cook July 12, 2013
Sausage at Very Good Recipes
Pin It
I will be the first person to admit, I'm not a fan of messy things. Sure, there is no way to eat things like barbecued ribs or corn on the cob without making a total mess of yourself, but for the most part, I haven't always been a person who is okay with a mess.

In fact, I'm pretty sure I had one of the cleanest babies on the face of the planet. Yep, I was the mom who was constantly busting out the handi-wipes to clean his face and hands. I'm the one that kept a wet rag beside us during high chair feeding to promptly clean up any spills. Yeah, so I was a little OCD about it. It's okay though. I accept about myself.

But as he's gotten a little older, I've accepted the fact he is a boy and will spend 99% of his life dirty, in one way or another. And honestly, I'm pretty okay with it. I don't mind it as much as he was a baby. Maybe part of it was the whole "trying to be the perfect 1st time mommy, with the baby who always looks neat and tidy" syndrome I was suffering from. Whatever it was, I'm glad it has eased up a tad, because with this boy...who is all boy...I would be driving myself crazy at this point trying to keep him clean!

Like the ribs and corn mentioned above, this dish is one that even though it's eaten with a knife and fork, you're going to get a little sticky, a little messy eating it. But I guarantee it's totally worth it! I came up with when I had laid out smoked sausage for supper, not sure what I was going to do with it. Then I decided I would grill it and because of that, it needed a yummy sauce to be basted in. This makes for something sweet, tangy, sticky...and absolutely delicious.

I've accepted that I'm never going to be totally okay with messes in my life. But I've learned which ones are in need of prompt clean up (can't do flour all over the kitchen!) and those that make life more interesting, more fun, and in this case, much more mouth watering!

Sticky Grilled Smoked Sausage
1 lb. smoked sausage
1/3 c. barbecue sauce
1/4 c. packed brown sugar
3 TBS cider vinegar

Cut sausage into 4-5 inch pieces and slice lengthwise. In a small bowl combine barbecue sauce, sugar and vinegar. Whisk well. Preheat grill to high. Spray well with cooking spray. Brush sausage with glaze. Place on grill. Once seared, flip, baste again, and turn heat down to medium. Continue cooking and basting for about 10 minutes, turning often. *NOTE* Be careful! These will burn very easily. We like some "char" marks but they will turn black if you aren't watching!


Shared on The Country Cook July 12, 2013
Sausage at Very Good Recipes
Pin It
reade more... Résuméabuiyad

A Little of This, A Little of That

Sometimes when I have chicken thawing in the fridge, the only thing I know for certain I'm going to do with it is cook it. Yep, I go into dinner without a definite battle plan. Now, I will be completely honest, if it were anything else besides chicken I might freak out a little, but let's face it, chicken happens to be one of the most versatile proteins out there; and it can be transformed from boring to tasty with only a few ingredients.

This was the exact scenario the evening this recipe was born. Boneless chicken breasts happened to be on sale the previous week so I bought them without really knowing why. So the night it was time to turn them into dinner, I began thinking about anything and everything I had in the fridge and pantry that could help me.

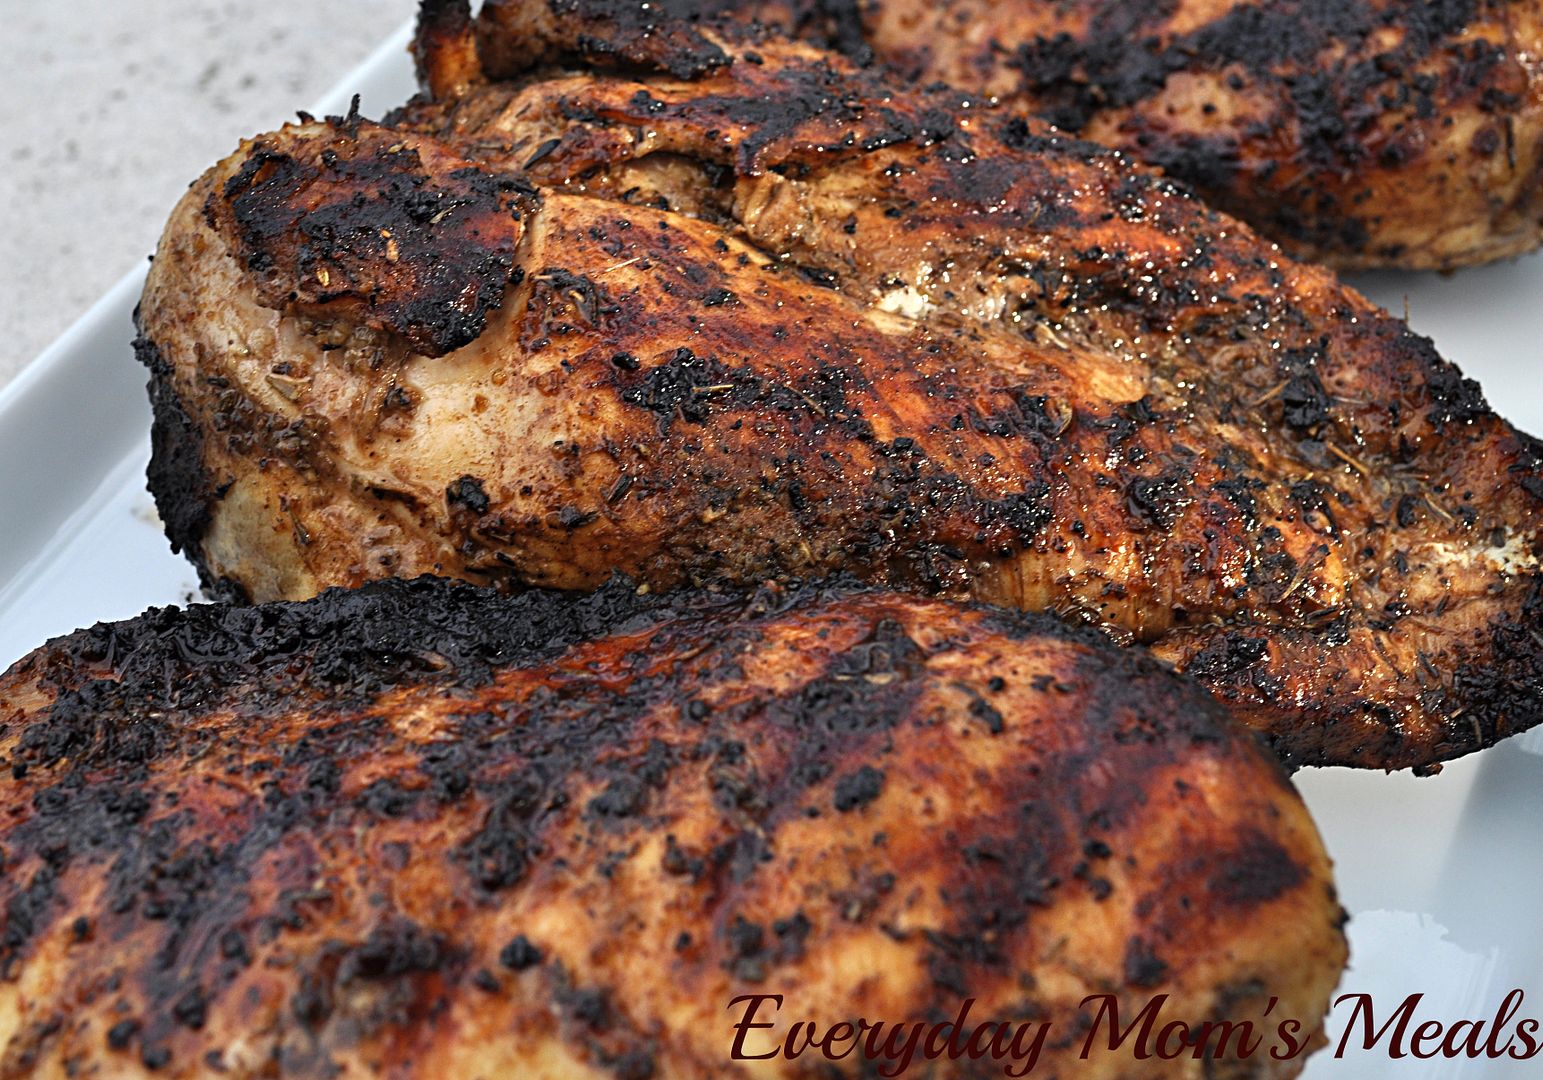
We love basin garlic and lemon chicken. It's one of the most used marinades in our house. I've been making it for years, and knew it might be a good base to build from. So I looked around for other flavors I knew would compliment the lemon well, and what I came up with turned out to be super tasty! The lemon helps to keep the meat juicy and tender, while the balsamic gives it a sweet glazed like texture. It makes the outside crispy while the inside stays succulent and flavorful.

If you find yourself in the kitchen with no real idea what to make with a certain meat one night, start playing around with what you have. You know what flavors your family loves, so start adding a "little of this, a little of that" until you get the perfect combination to turn your everyday meal into something special!

Grilled Balsamic Lemon Thyme Chicken
3 boneless chicken breasts
1/2 c. olive oil
3 TBS balsamic vinegar
1 lemon juiced
2 tsp. dried thyme
1 1/2 TBS Montreal Chicken Seasoning, plus a little extra
2 garlic cloves, minced
Salt and Pepper to taste

In a medium bowl, whisk together marinade ingredients. Place chicken in large container. Pour half the marinade over chicken and stir well. Place reserved marinade in fridge. Allow chicken to marinade in fridge for 4-5 hours, stirring half way through. Remove from marinade 1/2 hour before grilling time and allow meat to come up to room temperature. Sprinkle with extra Montreal Seasoning. When ready, preheat grill to high. Place chicken on grill, searing both sides for 2 minutes. Reduce heat to medium and continue cooking until cooked through, about 15-20 minutes. Use reserved marinade to baste chicken often during grilling.
*NOTE* Due to the sugars in the vinegar and the oil, this can burn very easily. We like our grilled chicken a little dark around the edges, but if you don't, watch it carefully.


Chicken at Very Good Recipes
Pin It
Sometimes when I have chicken thawing in the fridge, the only thing I know for certain I'm going to do with it is cook it. Yep, I go into dinner without a definite battle plan. Now, I will be completely honest, if it were anything else besides chicken I might freak out a little, but let's face it, chicken happens to be one of the most versatile proteins out there; and it can be transformed from boring to tasty with only a few ingredients.

This was the exact scenario the evening this recipe was born. Boneless chicken breasts happened to be on sale the previous week so I bought them without really knowing why. So the night it was time to turn them into dinner, I began thinking about anything and everything I had in the fridge and pantry that could help me.

We love basin garlic and lemon chicken. It's one of the most used marinades in our house. I've been making it for years, and knew it might be a good base to build from. So I looked around for other flavors I knew would compliment the lemon well, and what I came up with turned out to be super tasty! The lemon helps to keep the meat juicy and tender, while the balsamic gives it a sweet glazed like texture. It makes the outside crispy while the inside stays succulent and flavorful.

If you find yourself in the kitchen with no real idea what to make with a certain meat one night, start playing around with what you have. You know what flavors your family loves, so start adding a "little of this, a little of that" until you get the perfect combination to turn your everyday meal into something special!

Grilled Balsamic Lemon Thyme Chicken
3 boneless chicken breasts
1/2 c. olive oil
3 TBS balsamic vinegar
1 lemon juiced
2 tsp. dried thyme
1 1/2 TBS Montreal Chicken Seasoning, plus a little extra
2 garlic cloves, minced
Salt and Pepper to taste

In a medium bowl, whisk together marinade ingredients. Place chicken in large container. Pour half the marinade over chicken and stir well. Place reserved marinade in fridge. Allow chicken to marinade in fridge for 4-5 hours, stirring half way through. Remove from marinade 1/2 hour before grilling time and allow meat to come up to room temperature. Sprinkle with extra Montreal Seasoning. When ready, preheat grill to high. Place chicken on grill, searing both sides for 2 minutes. Reduce heat to medium and continue cooking until cooked through, about 15-20 minutes. Use reserved marinade to baste chicken often during grilling.
*NOTE* Due to the sugars in the vinegar and the oil, this can burn very easily. We like our grilled chicken a little dark around the edges, but if you don't, watch it carefully.


Chicken at Very Good Recipes
Pin It
reade more... Résuméabuiyad

Spring Break Barbecue

The first week of April was our Spring Break, and I have to admit, I was worried it wouldn't really feel like "spring" at all. Thankfully though, the sun came out, and it warmed up nicely...a couple days very nicely!

And by end of that week, with the warm sunshine on my face, the capri pants on my legs, flip flops on my feet and sun staying out until past 7:30 pm, I was ready to barbecue! Plus, my oven was still on the fritz, so it was good timing!

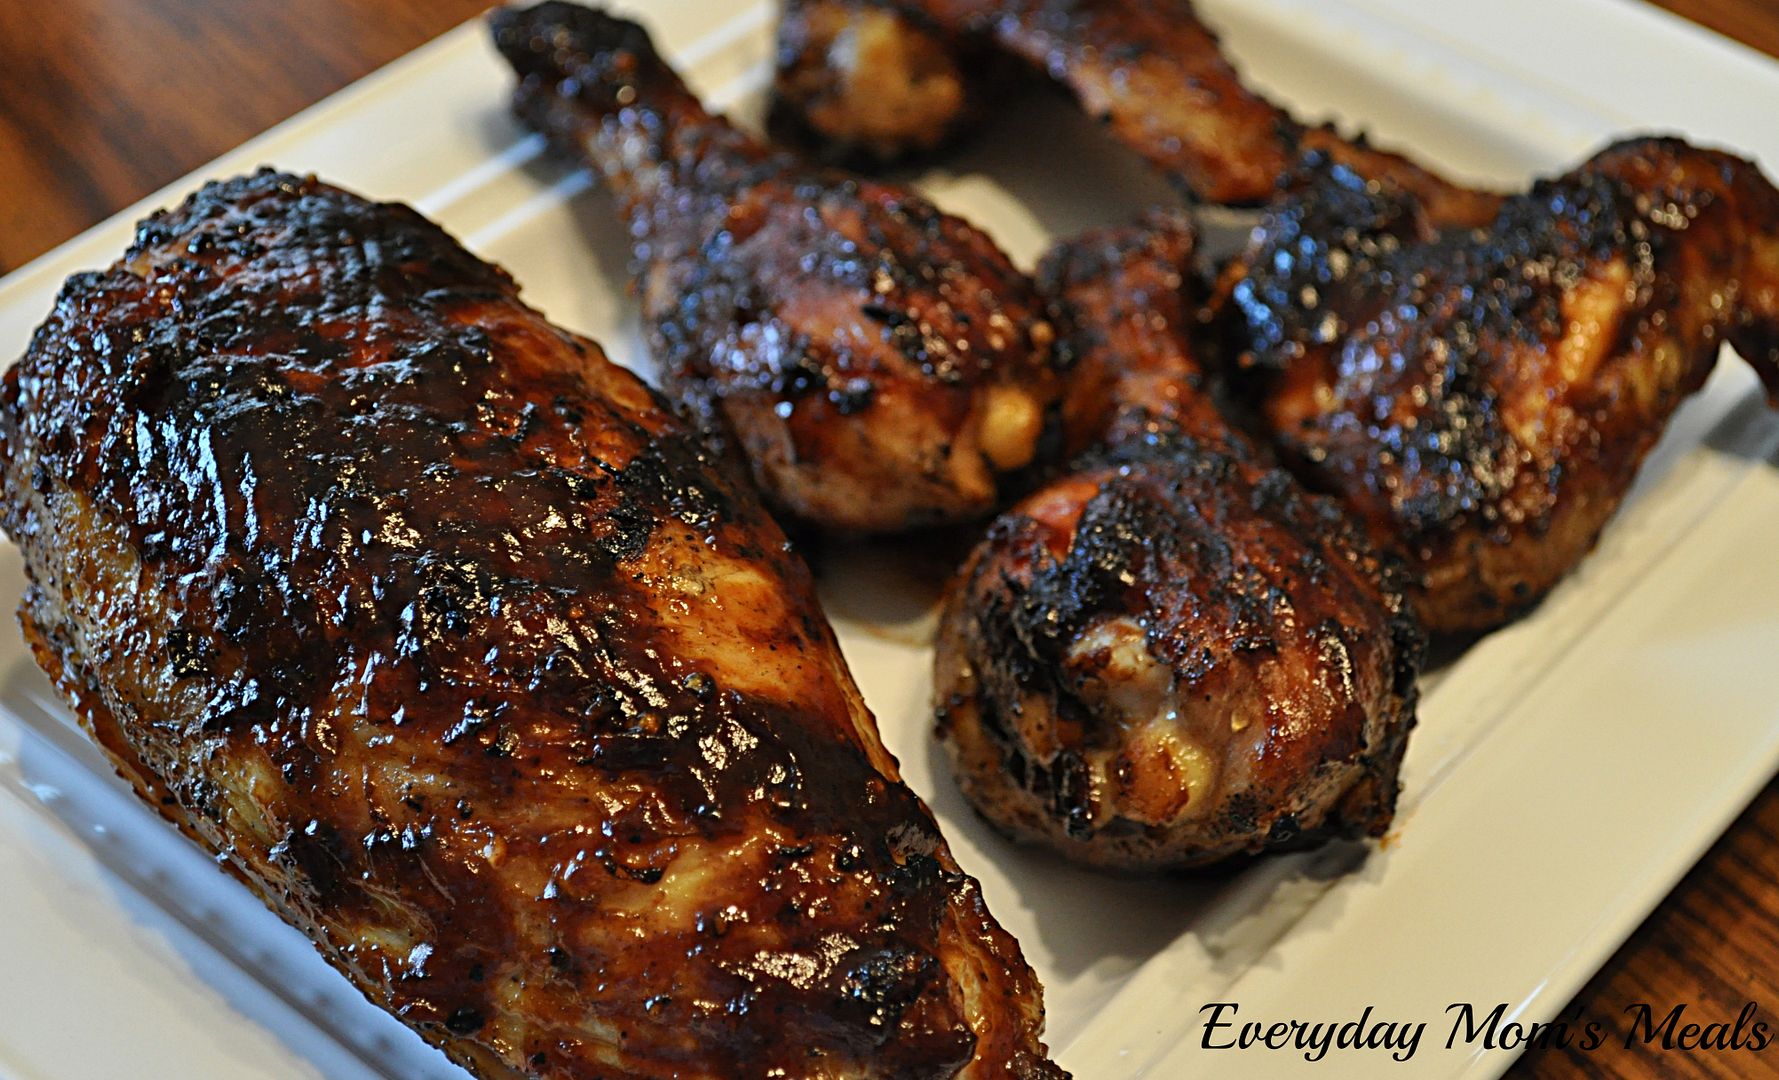
I will pretty much eat anything you slather in barbecue sauce. I'm not picky. Cooked over an open flame, covered in a sweet, smoky sauce...just the thought makes me drool. There are so many options when it comes to barbecue sauce, but for me, I want great flavor, not a lot of heat, and a good mix of sweet and savory; and this is the perfect combination of both. I chose to use it with chicken, but honestly, it would be delicious on pork or beef too. Heck, mix it with some ground beef, and make some of my Barbecue Burgers, another one of our summer time favorites. I guarantee whatever meat you choose to use it with, your family and your guests are going to love every bite.

If you enjoy a good barbecue like we do, be sure to save this for when the time comes. Or, join us in starting the season now, no matter what the weather is doing!

Jack Daniels Chicken
1 3-4 lb. whole chicken, cut into 8 pieces (skin left on)
1/2 c. canola oil
2 TBS grill seasoning
Salt and Pepper to taste

Sauce: From About.com
1/2-3/4 c. Jack Daniels, or to taste
1/2 c. onion, chopped
4 cloves garlic, minced
2 c. ketchup
1/3 c. vinegar
3 TBS Worcestershire sauce
1/2 c. brown sugar, firmly packed
3/4 c. molasses
1/2 tsp. pepper
1/2 TBS salt
1/4 c. tomato paste
1 tsp. Liquid Smoke
1/2 tsp. Tabasco sauce, or to taste


Combine onion, garlic and Jack Daniels in a 3 quart saucepan. Sauté until translucent, about 10 minutes. Add all remaining ingredients, bring to boil. Simmer uncovered until reduced and thickened, about 15 to 25 minutes. Add more Jack Daniels if a stronger flavor is desired.

In a large bowl combine chicken, oil, grill seasoning, salt and pepper. Allow to sit at room temperature about 20 minutes. Preheat grill to high. Spray with cooking spray well. Sear chicken on each side for 2 minutes. Reduce heat to medium and continue cooking for about 25 minutes turning every 3-4 minutes to crisp both sides. Baste with barbecue sauce and continue cooking for 6-7 minutes, turning often and re-basting.


Shared on The Country Cook Apr. 26, 2013
Shared on Make Ahead Meals Apr. 29, 2013
Shared on Mandy's Recipe Box Apr. 30, 2013
Chicken at Very Good Recipes
Pin It
The first week of April was our Spring Break, and I have to admit, I was worried it wouldn't really feel like "spring" at all. Thankfully though, the sun came out, and it warmed up nicely...a couple days very nicely!

And by end of that week, with the warm sunshine on my face, the capri pants on my legs, flip flops on my feet and sun staying out until past 7:30 pm, I was ready to barbecue! Plus, my oven was still on the fritz, so it was good timing!

I will pretty much eat anything you slather in barbecue sauce. I'm not picky. Cooked over an open flame, covered in a sweet, smoky sauce...just the thought makes me drool. There are so many options when it comes to barbecue sauce, but for me, I want great flavor, not a lot of heat, and a good mix of sweet and savory; and this is the perfect combination of both. I chose to use it with chicken, but honestly, it would be delicious on pork or beef too. Heck, mix it with some ground beef, and make some of my Barbecue Burgers, another one of our summer time favorites. I guarantee whatever meat you choose to use it with, your family and your guests are going to love every bite.

If you enjoy a good barbecue like we do, be sure to save this for when the time comes. Or, join us in starting the season now, no matter what the weather is doing!

Jack Daniels Chicken
1 3-4 lb. whole chicken, cut into 8 pieces (skin left on)
1/2 c. canola oil
2 TBS grill seasoning
Salt and Pepper to taste

Sauce: From About.com
1/2-3/4 c. Jack Daniels, or to taste
1/2 c. onion, chopped
4 cloves garlic, minced
2 c. ketchup
1/3 c. vinegar
3 TBS Worcestershire sauce
1/2 c. brown sugar, firmly packed
3/4 c. molasses
1/2 tsp. pepper
1/2 TBS salt
1/4 c. tomato paste
1 tsp. Liquid Smoke
1/2 tsp. Tabasco sauce, or to taste


Combine onion, garlic and Jack Daniels in a 3 quart saucepan. Sauté until translucent, about 10 minutes. Add all remaining ingredients, bring to boil. Simmer uncovered until reduced and thickened, about 15 to 25 minutes. Add more Jack Daniels if a stronger flavor is desired.

In a large bowl combine chicken, oil, grill seasoning, salt and pepper. Allow to sit at room temperature about 20 minutes. Preheat grill to high. Spray with cooking spray well. Sear chicken on each side for 2 minutes. Reduce heat to medium and continue cooking for about 25 minutes turning every 3-4 minutes to crisp both sides. Baste with barbecue sauce and continue cooking for 6-7 minutes, turning often and re-basting.


Shared on The Country Cook Apr. 26, 2013
Shared on Make Ahead Meals Apr. 29, 2013
Shared on Mandy's Recipe Box Apr. 30, 2013
Chicken at Very Good Recipes
Pin It
reade more... Résuméabuiyad

Black Bean and Veggie Quesadillas


I started making these a few years ago after having them at a local restaurant. They're incredibly versatile, because you can use whatever veggies you like or have on hand! I especially love the combination of zucchini and mushrooms with black beans, but red pepper, onion, or your favorite grilled veggies are great additions. These quesadillas also freeze well - if you can't use all 4, freeze them for a quick lunch later.

I start by chopping the zucchini and then seasoning them with a garlic blend. If you don't have a favorite garlic blend, just use some garlic salt, or salt and pepper, or whatever seasoning you like and have on hand.


Heat your grill pan over medium high heat, then toss in the zucchini and cook them, stirring once in a while, until they're tender and have those delicious grill marks.


Now add in the sliced mushrooms


and cook and stir until the mushrooms are tender, about 3 minutes. Remove the vegetables to a bowl. Now you can wipe out the skillet you just used, and return the pan to the heat - reduce the heat to medium. Place a tortilla in the skillet and top with a handful of cheese on one half.


Add the zucchini and mushrooms,


then spoon on some black beans.


Top with another handful of cheese.


Now flip the "blank" side over on top of the cheese


and press down lightly to help seal it. Then carefully turn it over


and cook on this side for 2 minutes or until the cheese is completely melted. Repeat with remaining tortillas and serve with salsa and your favorite fixings.

One year ago: Crispy Orange Beef
Two years ago: Banana Sherbet
Three years ago: Peanut Butter Banana Cream Pie

Get more great ideas at Mangia Monday, Menu Monday, My Meatless Mondays, Mop it up Monday, Seasonal Inspiration, Mix it up Monday, Melt in Your Mouth Monday, Tasty Tuesday, Tuesday at the Table, Tasty Tuesday (#2), Tempt my Tummy Tuesday, Totally Tasty Tuesday, Tasty Tuesday (#3), A Little Birdie Told Me, Tuesday Talent Show, Hearth and Soul, Cast Party Wednesday, What's Cooking Wednesday, Whole Food Wednesday, Whatcha Whipped Up Wednesday.

Black Bean and Veggie Quesadillas

1 medium zucchini, cut into quarters lengthwise then sliced crosswise
1 tsp. garlic - herb seasoning blend
1 cup sliced mushrooms
1 cup black beans (if from a can, rinsed and drained)
4 whole wheat tortillas
2 cups shredded Mexican cheese blend

Season the zucchini with the garlic-herb seasoning. Heat a grill pan to medium high heat, and add the zucchini. Cook for 3-4 minutes, stirring occasionally, until zucchini is almost tender. Add the sliced mushrooms and cook for an additional 2 minutes. Remove the vegetables to a bowl.

Wipe out the grill pan and return it to the heat; reduce heat to medium. Place a tortilla in the pan and place a few tablespoons of cheese on one half. Add about 1/4 cup of black beans and about 1/2 cup of vegetables on top of the cheese, and cover with another few tablespoons of cheese.

Fold the blank half of the tortilla over the filling and press it down lightly with a spatula to help it seal. Carefully turn over the quesadilla and cook on this side for about 2 minutes or until the cheese is melted. Repeat with the remaining tortillas.

Leftover quesadillas can be wrapped in foil and frozen, then reheated in a toaster oven or microwave. Serves 4.


I started making these a few years ago after having them at a local restaurant. They're incredibly versatile, because you can use whatever veggies you like or have on hand! I especially love the combination of zucchini and mushrooms with black beans, but red pepper, onion, or your favorite grilled veggies are great additions. These quesadillas also freeze well - if you can't use all 4, freeze them for a quick lunch later.

I start by chopping the zucchini and then seasoning them with a garlic blend. If you don't have a favorite garlic blend, just use some garlic salt, or salt and pepper, or whatever seasoning you like and have on hand.


Heat your grill pan over medium high heat, then toss in the zucchini and cook them, stirring once in a while, until they're tender and have those delicious grill marks.


Now add in the sliced mushrooms


and cook and stir until the mushrooms are tender, about 3 minutes. Remove the vegetables to a bowl. Now you can wipe out the skillet you just used, and return the pan to the heat - reduce the heat to medium. Place a tortilla in the skillet and top with a handful of cheese on one half.


Add the zucchini and mushrooms,


then spoon on some black beans.


Top with another handful of cheese.


Now flip the "blank" side over on top of the cheese


and press down lightly to help seal it. Then carefully turn it over


and cook on this side for 2 minutes or until the cheese is completely melted. Repeat with remaining tortillas and serve with salsa and your favorite fixings.

One year ago: Crispy Orange Beef
Two years ago: Banana Sherbet
Three years ago: Peanut Butter Banana Cream Pie

Get more great ideas at Mangia Monday, Menu Monday, My Meatless Mondays, Mop it up Monday, Seasonal Inspiration, Mix it up Monday, Melt in Your Mouth Monday, Tasty Tuesday, Tuesday at the Table, Tasty Tuesday (#2), Tempt my Tummy Tuesday, Totally Tasty Tuesday, Tasty Tuesday (#3), A Little Birdie Told Me, Tuesday Talent Show, Hearth and Soul, Cast Party Wednesday, What's Cooking Wednesday, Whole Food Wednesday, Whatcha Whipped Up Wednesday.

Black Bean and Veggie Quesadillas

1 medium zucchini, cut into quarters lengthwise then sliced crosswise
1 tsp. garlic - herb seasoning blend
1 cup sliced mushrooms
1 cup black beans (if from a can, rinsed and drained)
4 whole wheat tortillas
2 cups shredded Mexican cheese blend

Season the zucchini with the garlic-herb seasoning. Heat a grill pan to medium high heat, and add the zucchini. Cook for 3-4 minutes, stirring occasionally, until zucchini is almost tender. Add the sliced mushrooms and cook for an additional 2 minutes. Remove the vegetables to a bowl.

Wipe out the grill pan and return it to the heat; reduce heat to medium. Place a tortilla in the pan and place a few tablespoons of cheese on one half. Add about 1/4 cup of black beans and about 1/2 cup of vegetables on top of the cheese, and cover with another few tablespoons of cheese.

Fold the blank half of the tortilla over the filling and press it down lightly with a spatula to help it seal. Carefully turn over the quesadilla and cook on this side for about 2 minutes or until the cheese is melted. Repeat with the remaining tortillas.

Leftover quesadillas can be wrapped in foil and frozen, then reheated in a toaster oven or microwave. Serves 4.
reade more... Résuméabuiyad

Marinated London Broil


Today, we're traveling back in time to a recipe from two summers ago. This is such a great grilling recipe that I wanted to bring it up to the front - plus, it's fun to go back and revisit old favorites to give them a little more "airtime."


This delicious and inexpensive cut of beef sits in a savory marinade overnight, so plan ahead. The marinade flavors the meat beautifully and the short grilling time means you can have supper on the table quickly. (Any leftovers make delicious sandwiches too!)


This is a recipe repeat. If you want a complete step by step, visit the original post.


Find more ideas at Cast Party Wednesday, Foodie Wednesday, These Chicks Cooked, Made it on Monday, What's on your plate?, Real Food Wednesday, What's Cooking Wednesday, It's a Keeper, Full Plate Thursday, Turning the table Thursday, Recipe Swap Thursday, Pennywise Platter, Let's Do Brunch.


Marinated London Broil


3 Tbsp. soy sauce

2 Tbsp. brown sugar

2 Tbsp. dijon mustard

2 Tbsp. Oriental sesame oil

1 small onion, chopped

2 large cloves garlic, minced

1 tsp. chopped, pared fresh ginger

1/4 tsp. pepper

1 round steak for London Broil (2 pounds)


Combine the soy sauce, sugar, mustard, oil, onion, ginger, garlic and pepper in a blender. Whirl until combined. Place steak in a shallow baking dish or other container that you can cover. Pour marinade over steak and refrigerate for at least three hours or overnight.


Grill or broil steak for 6-7 minutes each side for rare. Let stand 5 minutes before slicing. Serves 6.


Today, we're traveling back in time to a recipe from two summers ago. This is such a great grilling recipe that I wanted to bring it up to the front - plus, it's fun to go back and revisit old favorites to give them a little more "airtime."


This delicious and inexpensive cut of beef sits in a savory marinade overnight, so plan ahead. The marinade flavors the meat beautifully and the short grilling time means you can have supper on the table quickly. (Any leftovers make delicious sandwiches too!)


This is a recipe repeat. If you want a complete step by step, visit the original post.


Find more ideas at Cast Party Wednesday, Foodie Wednesday, These Chicks Cooked, Made it on Monday, What's on your plate?, Real Food Wednesday, What's Cooking Wednesday, It's a Keeper, Full Plate Thursday, Turning the table Thursday, Recipe Swap Thursday, Pennywise Platter, Let's Do Brunch.


Marinated London Broil


3 Tbsp. soy sauce

2 Tbsp. brown sugar

2 Tbsp. dijon mustard

2 Tbsp. Oriental sesame oil

1 small onion, chopped

2 large cloves garlic, minced

1 tsp. chopped, pared fresh ginger

1/4 tsp. pepper

1 round steak for London Broil (2 pounds)


Combine the soy sauce, sugar, mustard, oil, onion, ginger, garlic and pepper in a blender. Whirl until combined. Place steak in a shallow baking dish or other container that you can cover. Pour marinade over steak and refrigerate for at least three hours or overnight.


Grill or broil steak for 6-7 minutes each side for rare. Let stand 5 minutes before slicing. Serves 6.
reade more... Résuméabuiyad

Spicy Grilled Pork Tenderloin


Don't let the title scare you - this pork doesn't taste spicy hot - but it does have a lot of spices!


Start by combining all the spices in a small bowl. First, the brown sugar, salt, thyme, onion powder, garlic powder and ground mustard,


then the cumin and oregano,


allspice and pepper. Stir it up well to blend. Place the pork in a shallow dish and then rub the spice mixture over the pork.


Cover the meat and refrigerate for 8 hours or overnight. When ready to grill, first make the sauce; in a small bowl, combine the brown sugar, cinnamon, chili powder


and cola. (it's ok to use diet coke!)


Grill the pork, covered, over indirect heat for 25 minutes or until a meat thermometer reads 160. Baste occasionally with the sauce. Let stand 5 minutes before slicing.


Get more great ideas at This Week's Cravings, Tempt my Tummy Tuesday, Tasty Tuesday and Tuesday at the Table.


Spicy Grilled Pork Tenderloin


2 Tbsp. brown sugar

3/4 tsp. salt

3/4 tsp. dried thyme

1/4 tsp. onion powder

1/4 tsp. garlic powder

1/4 tsp. ground mustard

1/4 tsp. cumin

1/4 tsp. dried oregano

1/4 tsp. allspice

1/4 tsp. pepper

1 pork tenderloin (1 pound)


Sauce:

1/2 cup cola

1 Tbsp. brown sugar

1/4 tsp. cinnamon

1/4 tsp. chili powder


Combine the first 10 ingredients; rub over pork. Cover and refrigerate for 8 hours or overnight.


In a small bowl, combine the sauce ingredients. Grill pork, covered, over indirect medium-hot heat for 25 minutes or until internal temperature reaches 160, basting occasionally with the sauce. Let stand 5 minutes before slicing. Serves 4


Don't let the title scare you - this pork doesn't taste spicy hot - but it does have a lot of spices!


Start by combining all the spices in a small bowl. First, the brown sugar, salt, thyme, onion powder, garlic powder and ground mustard,


then the cumin and oregano,


allspice and pepper. Stir it up well to blend. Place the pork in a shallow dish and then rub the spice mixture over the pork.


Cover the meat and refrigerate for 8 hours or overnight. When ready to grill, first make the sauce; in a small bowl, combine the brown sugar, cinnamon, chili powder


and cola. (it's ok to use diet coke!)


Grill the pork, covered, over indirect heat for 25 minutes or until a meat thermometer reads 160. Baste occasionally with the sauce. Let stand 5 minutes before slicing.


Get more great ideas at This Week's Cravings, Tempt my Tummy Tuesday, Tasty Tuesday and Tuesday at the Table.


Spicy Grilled Pork Tenderloin


2 Tbsp. brown sugar

3/4 tsp. salt

3/4 tsp. dried thyme

1/4 tsp. onion powder

1/4 tsp. garlic powder

1/4 tsp. ground mustard

1/4 tsp. cumin

1/4 tsp. dried oregano

1/4 tsp. allspice

1/4 tsp. pepper

1 pork tenderloin (1 pound)


Sauce:

1/2 cup cola

1 Tbsp. brown sugar

1/4 tsp. cinnamon

1/4 tsp. chili powder


Combine the first 10 ingredients; rub over pork. Cover and refrigerate for 8 hours or overnight.


In a small bowl, combine the sauce ingredients. Grill pork, covered, over indirect medium-hot heat for 25 minutes or until internal temperature reaches 160, basting occasionally with the sauce. Let stand 5 minutes before slicing. Serves 4
reade more... Résuméabuiyad

Asian Grilled Green Beans


Do you need a new treatment for green beans? This flavorful Asian-inspired dish will really sock it to your tastebuds. And it can grill right alongside your favorite meat. Surely, there are a few grilling days left this fall!

To make the sauce, combine the brown sugar, sesame oil, soy sauce, garlic and red pepper flakes in a small bowl.


Whisk well to combine.

Then toss the beans, onion and mushrooms in a large bowl.


Pour the sauce over and stir the vegetables well to evenly coat them.


The beans are going to go in foil packets – to make them, tear a large piece of foil and then fold it over to make it double strength. Put half of the vegetables on one piece of foil,


and the other half on the other piece.


Fold the corners up.


Seal them tightly.


Grill the beans about 18-20 minutes or until they’re tender. Be careful when you open the packets as there will be lots of steam!

Get more great ideas at Mouthwatering Mondays, Tuesdays at the Table, Tasty Tuesday, Tempt my Tummy Tuesday and Cultural Connections.


Asian Grilled Green Beans


1 Tbsp. brown sugar
1 Tbsp. sesame oil
1 Tbsp. soy sauce
2 garlic cloves, minced
1/2 tsp. crushed red pepper flakes
1 1/2 pounds fresh green beans, trimmed
1 medium red onion, halved and thinly sliced
8 medium fresh mushrooms, quartered, or 1 1/2 cups sliced mushrooms

In a small bowl, combine sugar, oil, soy sauce, garlic and red pepper flakes. Whisk well to combine. In a large bowl, combine the beans, onions and mushrooms. Pour the sauce over the vegetables and stir well to coat.

Place half of the vegetables on a double thickness of heavy duty foil (about 18 inches square), fold foil around vegetables and seal tightly. Repeat with other half of vegetables.

Grill, covered, for 18-20 minutes or until beans are tender. Open packages carefully to let steam escape.

Do you need a new treatment for green beans? This flavorful Asian-inspired dish will really sock it to your tastebuds. And it can grill right alongside your favorite meat. Surely, there are a few grilling days left this fall!

To make the sauce, combine the brown sugar, sesame oil, soy sauce, garlic and red pepper flakes in a small bowl.


Whisk well to combine.

Then toss the beans, onion and mushrooms in a large bowl.


Pour the sauce over and stir the vegetables well to evenly coat them.


The beans are going to go in foil packets – to make them, tear a large piece of foil and then fold it over to make it double strength. Put half of the vegetables on one piece of foil,


and the other half on the other piece.


Fold the corners up.


Seal them tightly.


Grill the beans about 18-20 minutes or until they’re tender. Be careful when you open the packets as there will be lots of steam!

Get more great ideas at Mouthwatering Mondays, Tuesdays at the Table, Tasty Tuesday, Tempt my Tummy Tuesday and Cultural Connections.


Asian Grilled Green Beans


1 Tbsp. brown sugar
1 Tbsp. sesame oil
1 Tbsp. soy sauce
2 garlic cloves, minced
1/2 tsp. crushed red pepper flakes
1 1/2 pounds fresh green beans, trimmed
1 medium red onion, halved and thinly sliced
8 medium fresh mushrooms, quartered, or 1 1/2 cups sliced mushrooms

In a small bowl, combine sugar, oil, soy sauce, garlic and red pepper flakes. Whisk well to combine. In a large bowl, combine the beans, onions and mushrooms. Pour the sauce over the vegetables and stir well to coat.

Place half of the vegetables on a double thickness of heavy duty foil (about 18 inches square), fold foil around vegetables and seal tightly. Repeat with other half of vegetables.

Grill, covered, for 18-20 minutes or until beans are tender. Open packages carefully to let steam escape.
reade more... Résuméabuiyad

Honey-Garlic Pork Chops


When I first started cooking in earnest (just before getting married 10 years ago) this was one of the first recipes I tried. This recipe is courtesy of the pork producers and I can see why they would give out this recipe: you will want to buy more and more pork so you can keep making this! I served it for my family that summer and my parents immediately declared it their "summer specialty" and made it for all their guests that summer.

It's tasty, easy, and quick - it only takes a few minutes to throw together the marinade, and then you're done until it's grilling time.

I measure the marinade into a glass measuring cup - that way there's only one dirty dish!

Combine the lemon juice and soy sauce.


Then add the honey. If you do it in this order, the honey won't stick!


Next add the minced garlic, and stir well to mix all the ingredients. Place the pork chops in a large zip top plastic bag, and pour the marinade over the chops. Seal the bag, and then shake it up to make sure the chops are covered with the marinade.


Place the bag in the refrigerator and let the meat marinate for 4-24 hours.

Grill the pork chops for 12-15 minutes, turning once. (You could also broil them.)


Get more great recipes at This Week's Cravings, Mouthwatering Monday, Tempt my Tummy Tuesday, Tasty Tuesday, Tuesdays at the Table and Simple Saturdays.

Honey-Garlic Pork Chops

4 boneless center cut pork chops
1/4 cup lemon juice
2 Tbsp. soy sauce
1/4 cup honey
3 garlic cloves, minced

Combine the lemon juice, soy sauce, honey and garlic in a small measuring cup. Place the pork chops in a large zip top plastic bag. Stir the marinade well and then pour it over the chops in the bag. Marinate in the refrigerator for 4-24 hours. Grill for 12-15 minutes, turning once.

When I first started cooking in earnest (just before getting married 10 years ago) this was one of the first recipes I tried. This recipe is courtesy of the pork producers and I can see why they would give out this recipe: you will want to buy more and more pork so you can keep making this! I served it for my family that summer and my parents immediately declared it their "summer specialty" and made it for all their guests that summer.

It's tasty, easy, and quick - it only takes a few minutes to throw together the marinade, and then you're done until it's grilling time.

I measure the marinade into a glass measuring cup - that way there's only one dirty dish!

Combine the lemon juice and soy sauce.


Then add the honey. If you do it in this order, the honey won't stick!


Next add the minced garlic, and stir well to mix all the ingredients. Place the pork chops in a large zip top plastic bag, and pour the marinade over the chops. Seal the bag, and then shake it up to make sure the chops are covered with the marinade.


Place the bag in the refrigerator and let the meat marinate for 4-24 hours.

Grill the pork chops for 12-15 minutes, turning once. (You could also broil them.)


Get more great recipes at This Week's Cravings, Mouthwatering Monday, Tempt my Tummy Tuesday, Tasty Tuesday, Tuesdays at the Table and Simple Saturdays.

Honey-Garlic Pork Chops

4 boneless center cut pork chops
1/4 cup lemon juice
2 Tbsp. soy sauce
1/4 cup honey
3 garlic cloves, minced

Combine the lemon juice, soy sauce, honey and garlic in a small measuring cup. Place the pork chops in a large zip top plastic bag. Stir the marinade well and then pour it over the chops in the bag. Marinate in the refrigerator for 4-24 hours. Grill for 12-15 minutes, turning once.
reade more... Résuméabuiyad

Chicken Fajitas


I love fajitas. I was so excited when I found this marinade for the chicken that is absolutely delicious, has a little kick, and uses ingredients that I always have on hand!

Combine all the marinade ingredients in a small bowl.


Then spread over chicken to coat completely. I did this in a tupperware dish since I was short on time (I was actually grilling the chicken within MINUTES of marinating it - not recommended!), but I think it would work best to use a plastic bag so the marinade coats both sides of the chicken. Let the chicken marinate for at least a couple hours, in the refrigerator.


These fajitas can be made on the grill, or using a pan on the stove if it's not grilling weather. In this case we were grilling.

The next step is to slice up the peppers and onions. I used red, green and orange peppers this time - but any color combination works. I placed these in a grill basket for grilling.


If you don't have a basket or wok for grilling vegetables, you can put the peppers and onions in a foil packet. Simply use a doubled-up piece of foil, place vegetables in the middle, and bring the corners together to seal. You can place this directly on the grill. The vegetables won't get grill marks but they will get hot and softened. Another options is to place halved peppers and onions directly on the grill grates, and then slice them after grilling.

Place the chicken on the grill over medium heat and cook for 6-8 minutes per side until juices run clear. Grill the vegetables until they are tender, 10-15 minutes.

Slice up the chicken and place in a serving dish.


Put the vegetables in a separate dish.


Warm the tortillas in the microwave for about 30 seconds for a stack of 6-8. Serve with cheese, salsa, sour cream, or your favorite fajita fixings!

Get more healthy and good food ideas at Healthy Helpings and Overwhelmed with Joy's Favorite Ingredient Friday, healthy eating edition!

Chicken Fajitas

Marinade:
1 clove garlic, minced
1 1/2 tsp. seasoned salt
1 1/2 tsp. cumin
1/2 tsp. chili powder
1/2 tsp. crushed red pepper
1 Tbsp. olive oil
2 Tbsp. lime juice

2 pounds skinless, boneless chicken breast
3-4 bell peppers, sliced
2 medium onions, sliced
Flour tortillas
Shredded Mexican cheese
Sour Cream
Salsa

Combine all marinade ingredients in a small bowl. Place chicken in a large resealable plastic bag; add marinade and toss to coat well. Refrigerate for at least three hours.

Prepare grill for grilling over medium heat.

Place peppers and onions in a grill basket or foil packet. Grill chicken for 6-8 minutes per side or until juices run clear. Grill vegetables for 10-15 minutes until tender.

Warm tortillas in microwave for 30 seconds. Serve sliced chicken and vegetables with tortillas, cheese, salsa and sour cream.

I love fajitas. I was so excited when I found this marinade for the chicken that is absolutely delicious, has a little kick, and uses ingredients that I always have on hand!

Combine all the marinade ingredients in a small bowl.


Then spread over chicken to coat completely. I did this in a tupperware dish since I was short on time (I was actually grilling the chicken within MINUTES of marinating it - not recommended!), but I think it would work best to use a plastic bag so the marinade coats both sides of the chicken. Let the chicken marinate for at least a couple hours, in the refrigerator.


These fajitas can be made on the grill, or using a pan on the stove if it's not grilling weather. In this case we were grilling.

The next step is to slice up the peppers and onions. I used red, green and orange peppers this time - but any color combination works. I placed these in a grill basket for grilling.


If you don't have a basket or wok for grilling vegetables, you can put the peppers and onions in a foil packet. Simply use a doubled-up piece of foil, place vegetables in the middle, and bring the corners together to seal. You can place this directly on the grill. The vegetables won't get grill marks but they will get hot and softened. Another options is to place halved peppers and onions directly on the grill grates, and then slice them after grilling.

Place the chicken on the grill over medium heat and cook for 6-8 minutes per side until juices run clear. Grill the vegetables until they are tender, 10-15 minutes.

Slice up the chicken and place in a serving dish.


Put the vegetables in a separate dish.


Warm the tortillas in the microwave for about 30 seconds for a stack of 6-8. Serve with cheese, salsa, sour cream, or your favorite fajita fixings!

Get more healthy and good food ideas at Healthy Helpings and Overwhelmed with Joy's Favorite Ingredient Friday, healthy eating edition!

Chicken Fajitas

Marinade:
1 clove garlic, minced
1 1/2 tsp. seasoned salt
1 1/2 tsp. cumin
1/2 tsp. chili powder
1/2 tsp. crushed red pepper
1 Tbsp. olive oil
2 Tbsp. lime juice

2 pounds skinless, boneless chicken breast
3-4 bell peppers, sliced
2 medium onions, sliced
Flour tortillas
Shredded Mexican cheese
Sour Cream
Salsa

Combine all marinade ingredients in a small bowl. Place chicken in a large resealable plastic bag; add marinade and toss to coat well. Refrigerate for at least three hours.

Prepare grill for grilling over medium heat.

Place peppers and onions in a grill basket or foil packet. Grill chicken for 6-8 minutes per side or until juices run clear. Grill vegetables for 10-15 minutes until tender.

Warm tortillas in microwave for 30 seconds. Serve sliced chicken and vegetables with tortillas, cheese, salsa and sour cream.
reade more... Résuméabuiyad