Pages

Showing posts with label Nuts. Show all posts

Soul Food Saturday #20

Happy Labor Day weekend! I hope you have something fun, or maybe relaxing, planned for this 3 day gateway to fall. Okay, so I'm not wishing summer away by any means, but with September coming in less than 24 hours, I'm trying to embrace the fact the hot, sunny days are going to become further and farther between. But I'm sure we still have some beautiful weather ahead of us, and hopefully you'll get out and enjoy some this weekend! Bekki is here with the perfect holiday dessert, especially if you're having guests. It takes one of my all time favorite ice cream parlor treats and put a new spin on it!


I saved the best for last. Since most of us have a 3 day weekend and are celebrating Labor Day, we can’t leave out the dessert. This pie transforms banana split toppings into one delicious slice. After having a nice cookout this is a perfect way to end the meal. Super easy to prepare and in advance so it doesn't get in the way of other celebrating that must be had this weekend. This is one you’ll want to keep around, because someone is going to want your secret recipe. Enjoy!


Banana Split Pie {Adapted from Valley View Women’s club Cookbook}
 2 graham cracker crusts
2 cups confectioners’ sugar
1 stick unsalted butter
2 tbs. vanilla
1 8oz. package Cream Cheese, softened
6-7 bananas, sliced
1 large can crushed pineapple, drained
1 tub whipped topping
1 c. Maraschino cherries
1 c. macadamia nuts, chopped
 
In a large bowl, cream together butter, sugar, vanilla and cream cheese. Pour half of    mixture into each pie crust. Layer bananas on top of filling and press them in gently. Then layer pineapple on top of bananas. Lastly finish each pie with a layer of whipped topping, and top with cherries and nuts.


Happy Labor Day weekend! I hope you have something fun, or maybe relaxing, planned for this 3 day gateway to fall. Okay, so I'm not wishing summer away by any means, but with September coming in less than 24 hours, I'm trying to embrace the fact the hot, sunny days are going to become further and farther between. But I'm sure we still have some beautiful weather ahead of us, and hopefully you'll get out and enjoy some this weekend! Bekki is here with the perfect holiday dessert, especially if you're having guests. It takes one of my all time favorite ice cream parlor treats and put a new spin on it!


I saved the best for last. Since most of us have a 3 day weekend and are celebrating Labor Day, we can’t leave out the dessert. This pie transforms banana split toppings into one delicious slice. After having a nice cookout this is a perfect way to end the meal. Super easy to prepare and in advance so it doesn't get in the way of other celebrating that must be had this weekend. This is one you’ll want to keep around, because someone is going to want your secret recipe. Enjoy!


Banana Split Pie {Adapted from Valley View Women’s club Cookbook}
 2 graham cracker crusts
2 cups confectioners’ sugar
1 stick unsalted butter
2 tbs. vanilla
1 8oz. package Cream Cheese, softened
6-7 bananas, sliced
1 large can crushed pineapple, drained
1 tub whipped topping
1 c. Maraschino cherries
1 c. macadamia nuts, chopped
 
In a large bowl, cream together butter, sugar, vanilla and cream cheese. Pour half of    mixture into each pie crust. Layer bananas on top of filling and press them in gently. Then layer pineapple on top of bananas. Lastly finish each pie with a layer of whipped topping, and top with cherries and nuts.


reade more... Résuméabuiyad

Tropical Holiday

As I have shared with you before, but will once again for those just tuning in, my "boys" are lime crazy!  Anything and everything made with the little green gems is a favorite of theirs. From Cilantro Lime Rice to Key Lime Pie, they just can't get enough. So when I saw this recipe in my new Gooseberry Patch cookbook, The Christmas Table I knew it would one of the new holiday treats I tried this year. Oh sure, we have our favorites...the ones I make every year, but each year when the tree goes up, and usually before, I start to compile a list of new and fun things I've seen to try, and possibly add to our holiday traditions. I couldn't believe this when I saw it. I had never even thought of it, but it's pretty genius! Especially for those of us who love all the Christmas candies, but sometimes find a few to be too heavy. It's not so much that this is "lighter" than other fudge, but the lime flavor makes it so refreshing, and it gives your mouth a burst of flavor. If you have tried either my Peanut Butter or Easy Chocolate Fudge, you will love this too because once again, it's a simple method and you do NOT have to be a candy maker expert to be successful. Believe me, if I can make it, you can! I've had some candy disasters in the kitchen, but these easy fudge recipes never let me down! I hope I've found something yummy for you to include in your holiday baking extravaganza too, after all those neighbors and teachers gifts can always use something new and fun!

Key Lime Fudge From Gooseberry Patch
3 c. white chocolate chips
1 (14 oz) can sweet condensed milk
2 tsp. key lime zest, a little reserved for top
2 TBS key lime juice
1 c. chopped macadamia nuts, a few reserved for top

In a medium saucepan on low heat, combine chocolate chips and milk. Stir and cook until melted together. Remove from heat. Stir in zest and juice. Add in nuts. Stir well to combine. Line a 8x8 baking pan with foil, with enough covering over edges for easy lifting.  Grease foil well. Pour into prepared pan and spread evenly. Sprinkle with extra nuts and zest. Gently. pat to adhere. Chill 2 hours in fridge. Remove from pan by lifting on foil and then removing. Cut into squares. Store in fridge.


Shared on Mandy's Recipe Box Dec. 11, 2012
Shared on Lady Behind The Curtain Dec. 12, 2012
Shared on Miz Helen's Country Cottage Dec. 13, 2012
Shared on The Country Cook Dec. 14, 2012


Lime at Very Good Recipes
Pin It
As I have shared with you before, but will once again for those just tuning in, my "boys" are lime crazy!  Anything and everything made with the little green gems is a favorite of theirs. From Cilantro Lime Rice to Key Lime Pie, they just can't get enough. So when I saw this recipe in my new Gooseberry Patch cookbook, The Christmas Table I knew it would one of the new holiday treats I tried this year. Oh sure, we have our favorites...the ones I make every year, but each year when the tree goes up, and usually before, I start to compile a list of new and fun things I've seen to try, and possibly add to our holiday traditions. I couldn't believe this when I saw it. I had never even thought of it, but it's pretty genius! Especially for those of us who love all the Christmas candies, but sometimes find a few to be too heavy. It's not so much that this is "lighter" than other fudge, but the lime flavor makes it so refreshing, and it gives your mouth a burst of flavor. If you have tried either my Peanut Butter or Easy Chocolate Fudge, you will love this too because once again, it's a simple method and you do NOT have to be a candy maker expert to be successful. Believe me, if I can make it, you can! I've had some candy disasters in the kitchen, but these easy fudge recipes never let me down! I hope I've found something yummy for you to include in your holiday baking extravaganza too, after all those neighbors and teachers gifts can always use something new and fun!

Key Lime Fudge From Gooseberry Patch
3 c. white chocolate chips
1 (14 oz) can sweet condensed milk
2 tsp. key lime zest, a little reserved for top
2 TBS key lime juice
1 c. chopped macadamia nuts, a few reserved for top

In a medium saucepan on low heat, combine chocolate chips and milk. Stir and cook until melted together. Remove from heat. Stir in zest and juice. Add in nuts. Stir well to combine. Line a 8x8 baking pan with foil, with enough covering over edges for easy lifting.  Grease foil well. Pour into prepared pan and spread evenly. Sprinkle with extra nuts and zest. Gently. pat to adhere. Chill 2 hours in fridge. Remove from pan by lifting on foil and then removing. Cut into squares. Store in fridge.


Shared on Mandy's Recipe Box Dec. 11, 2012
Shared on Lady Behind The Curtain Dec. 12, 2012
Shared on Miz Helen's Country Cottage Dec. 13, 2012
Shared on The Country Cook Dec. 14, 2012


Lime at Very Good Recipes
Pin It
reade more... Résuméabuiyad

Weekend Company {Guest Blogger Colleen}

Whew....it's December 1st! Can you believe it? I am still in disbelief myself, because I'm pretty sure Labor Day was just yesterday, but alas the calendar doesn't lie. However, I will say with the hustle and bustle of the holiday season upon us, it's nice to know ALL of my Christmas shopping is not only DONE, but also WRAPPED!!! (I realize some of you are leaving now in disgust, and I apologize.)

I hope you had a great week, and are ready for something yummy for the weekend. The is perfect for a brunch, or keep it bookmarked (or pinned) for those family visits that are just around the corner! Please welcome Colleen back to EMM~


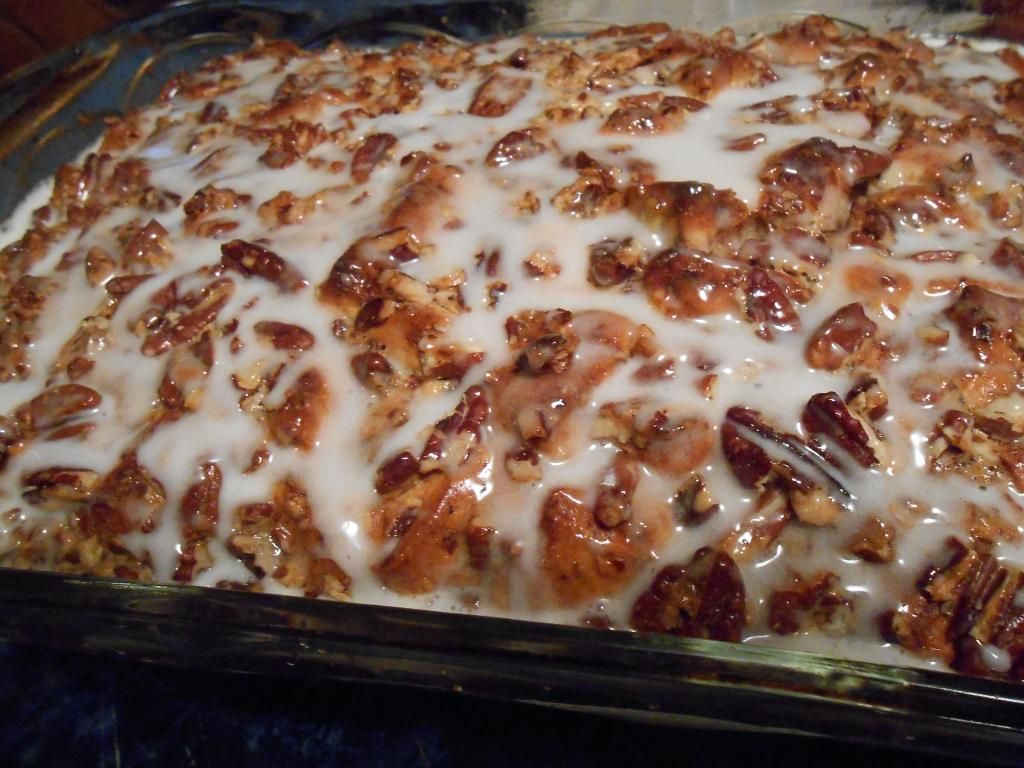
Hi Everyone! I'm Colleen and I'm so happy to be back doing a guest spot at my favorite foodie blog. The recipe I'm going to share with you was given to me fairly recently by my dear friend, Shawna. When I told her that we were going to have a wedding rehearsal brunch for my son's upcoming wedding, she said "I've got just the recipe for you!" I was so impressed with this one that I immediately took pictures knowing that I would one day want to share it. This dish got rave reviews for the rehearsal brunch. I hope you all give it a try and enjoy it as much as we all did. I think it would make a great holiday brunch item, as well. Or maybe you could just liven up your weekend and serve this to your family one morning! They'd be thanking you all day.   

By the way, just in case you're wondering, the wedding rehearsal went great and was followed a couple days later by a beautiful wedding. The newlyweds have been married almost 2 months now and are doing very well. I'm happy to have them living just down the street from me and enjoy having them pop in now and then ... even though it's mostly to raid my refrigerator. LOL! The picture I'm including is of me with the happy new couple on their wedding day. :)

French Toast Casserole
2 tubes of refrigerated cinnamon rolls
1 cup maple syrup
6 eggs
1/2 c. heavy whipping cream
2 tsp. vanilla
1 tsp cinnamon (or to taste)
1 - 2 cups chopped nuts (optional)

Preheat oven to the temp listed on the package of cinnamon rolls (they can sometimes be different) and grease a 9 x 13 casserole dish.

Cut the cinnamon rolls into bite size pieces, reserving the icing packets for later. Place all the cut up pieces of cinnamon rolls into the buttered casserole dish. Pour the maple syrup over top of the cinnamon rolls covering as much area as you can.

In a bowl, beat the eggs and whipping cream just until it all comes together nicely. Add in the vanilla and cinnamon and mix thoroughly. Pour this mixture over the cinnamon roll mixture.
Add the chopped nuts to the top, if you are using.
Bake for about 35-40 minutes until the mixture doesn't jiggle when you shake the pan slightly.  When you take it out of the oven, open the reserved packets of icing mixture and drizzle them over the casserole. Serve warm.

Notes: This is best done in a glass casserole dish but if you do bake it in a metal or foil pan, don't add the nuts to the top until halfway through the baking process to avoid burning them. You can also bake this the day before you want to eat it. Just leave off the icing and refrigerate the casserole overnight. The next morning, heat it in a moderate oven just to re-warm it and then top with the icing after warming.


Thanks to Mrs. Everyday for allowing me to come by and share with you all once again. I hope you all have a very happy weekend full of family, love and good food. :)  


Pin It
Whew....it's December 1st! Can you believe it? I am still in disbelief myself, because I'm pretty sure Labor Day was just yesterday, but alas the calendar doesn't lie. However, I will say with the hustle and bustle of the holiday season upon us, it's nice to know ALL of my Christmas shopping is not only DONE, but also WRAPPED!!! (I realize some of you are leaving now in disgust, and I apologize.)

I hope you had a great week, and are ready for something yummy for the weekend. The is perfect for a brunch, or keep it bookmarked (or pinned) for those family visits that are just around the corner! Please welcome Colleen back to EMM~


Hi Everyone! I'm Colleen and I'm so happy to be back doing a guest spot at my favorite foodie blog. The recipe I'm going to share with you was given to me fairly recently by my dear friend, Shawna. When I told her that we were going to have a wedding rehearsal brunch for my son's upcoming wedding, she said "I've got just the recipe for you!" I was so impressed with this one that I immediately took pictures knowing that I would one day want to share it. This dish got rave reviews for the rehearsal brunch. I hope you all give it a try and enjoy it as much as we all did. I think it would make a great holiday brunch item, as well. Or maybe you could just liven up your weekend and serve this to your family one morning! They'd be thanking you all day.   

By the way, just in case you're wondering, the wedding rehearsal went great and was followed a couple days later by a beautiful wedding. The newlyweds have been married almost 2 months now and are doing very well. I'm happy to have them living just down the street from me and enjoy having them pop in now and then ... even though it's mostly to raid my refrigerator. LOL! The picture I'm including is of me with the happy new couple on their wedding day. :)

French Toast Casserole
2 tubes of refrigerated cinnamon rolls
1 cup maple syrup
6 eggs
1/2 c. heavy whipping cream
2 tsp. vanilla
1 tsp cinnamon (or to taste)
1 - 2 cups chopped nuts (optional)

Preheat oven to the temp listed on the package of cinnamon rolls (they can sometimes be different) and grease a 9 x 13 casserole dish.

Cut the cinnamon rolls into bite size pieces, reserving the icing packets for later. Place all the cut up pieces of cinnamon rolls into the buttered casserole dish. Pour the maple syrup over top of the cinnamon rolls covering as much area as you can.

In a bowl, beat the eggs and whipping cream just until it all comes together nicely. Add in the vanilla and cinnamon and mix thoroughly. Pour this mixture over the cinnamon roll mixture.
Add the chopped nuts to the top, if you are using.
Bake for about 35-40 minutes until the mixture doesn't jiggle when you shake the pan slightly.  When you take it out of the oven, open the reserved packets of icing mixture and drizzle them over the casserole. Serve warm.

Notes: This is best done in a glass casserole dish but if you do bake it in a metal or foil pan, don't add the nuts to the top until halfway through the baking process to avoid burning them. You can also bake this the day before you want to eat it. Just leave off the icing and refrigerate the casserole overnight. The next morning, heat it in a moderate oven just to re-warm it and then top with the icing after warming.


Thanks to Mrs. Everyday for allowing me to come by and share with you all once again. I hope you all have a very happy weekend full of family, love and good food. :)  


Pin It
reade more... Résuméabuiyad

Marshmallow Inspired

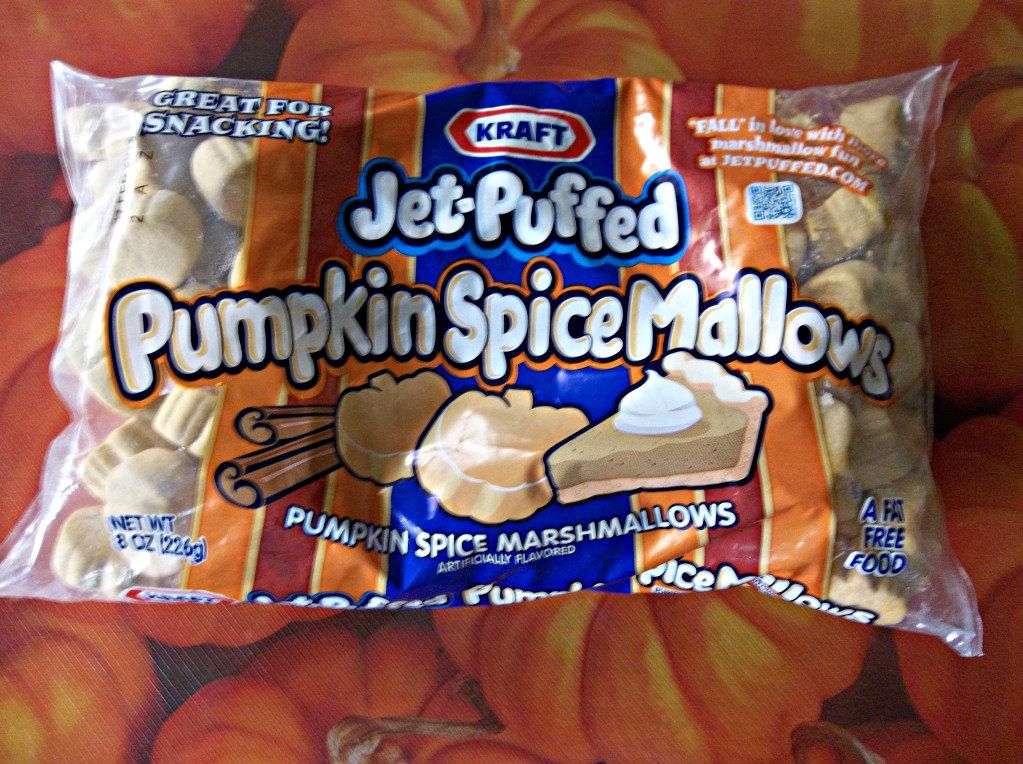
So a few weeks ago I was rushing through Meijer trying to pick up a few last minute items I had actually forgotten the previous day when I was grocery shopping when all of a sudden an "end-cap" display stopped me dead in my tracks. What could have caught my attention so much you ask? Well, it was something I had never seen before and instantly knew would be going home with me...Pumpkin Spiced Marshmallows.

 Have you seen them at your store? I just love all these creative & yummy flavors they are coming out with! Last year we discovered the Peppermint ones at Christmas time (so delicious in hot cocoa!), and then this summer I used the Mint Chocolate ones for my first s'mores ever! And now the perfect ones for autumn! I wasn't even sure what I would do with them but I knew I had to come up with something!

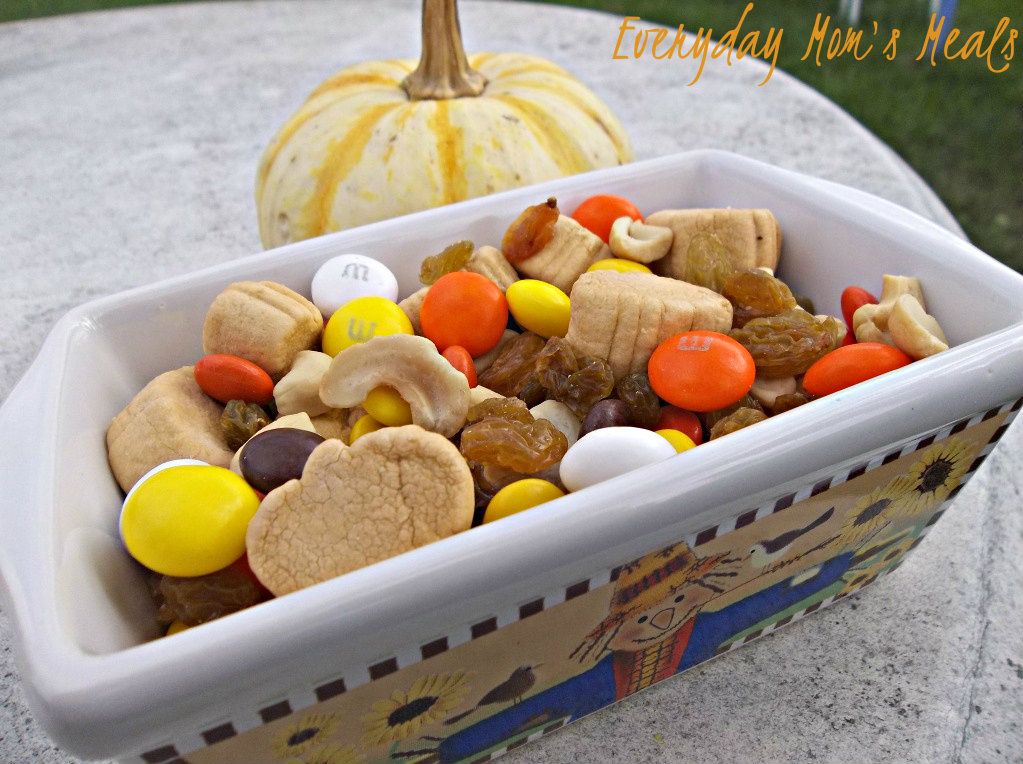
After about a week of sitting in my cupboard I finally knew what I wanted to do. A snack mix, of course. I just love trail mixes and coming up with different combos is both challenging for me, and fun for Alex. Last Halloween I shared with you my Goblin Mix and then more recently Monkey Munch I served at his birthday party. They just make such great party foods, or even after school snacks. For this one, I wanted every ingredient to be fall colored, so it took a little extra effort, but the result is both pretty and yummy! If your child's class is having a fall party, put some of this in cute treat sacks and the kiddies will love it! And be sure to be on the lookout for new flavors of marshmallows coming to a baking aisle near you!

Pumpkin Spice Snack Mix
1 (8oz) package pumpkin spice marshmallows
1 c. cashew halves
1 c. golden raisins
1 (9.9oz) package White Chocolate Candy Corn M&Ms
1 (14.5oz) package Reece's Pieces Candy

In a large bowl, combine all and mix well. Store in airtight container.


Shared on The Country Cook Oct. 12, 2012
Shared on Make Ahead Meals Oct. 15, 2012
Shared on Mandy's Recipe Box Oct. 16, 2012

Snacks at Very Good Recipes
Pin It
So a few weeks ago I was rushing through Meijer trying to pick up a few last minute items I had actually forgotten the previous day when I was grocery shopping when all of a sudden an "end-cap" display stopped me dead in my tracks. What could have caught my attention so much you ask? Well, it was something I had never seen before and instantly knew would be going home with me...Pumpkin Spiced Marshmallows.

 Have you seen them at your store? I just love all these creative & yummy flavors they are coming out with! Last year we discovered the Peppermint ones at Christmas time (so delicious in hot cocoa!), and then this summer I used the Mint Chocolate ones for my first s'mores ever! And now the perfect ones for autumn! I wasn't even sure what I would do with them but I knew I had to come up with something!

After about a week of sitting in my cupboard I finally knew what I wanted to do. A snack mix, of course. I just love trail mixes and coming up with different combos is both challenging for me, and fun for Alex. Last Halloween I shared with you my Goblin Mix and then more recently Monkey Munch I served at his birthday party. They just make such great party foods, or even after school snacks. For this one, I wanted every ingredient to be fall colored, so it took a little extra effort, but the result is both pretty and yummy! If your child's class is having a fall party, put some of this in cute treat sacks and the kiddies will love it! And be sure to be on the lookout for new flavors of marshmallows coming to a baking aisle near you!

Pumpkin Spice Snack Mix
1 (8oz) package pumpkin spice marshmallows
1 c. cashew halves
1 c. golden raisins
1 (9.9oz) package White Chocolate Candy Corn M&Ms
1 (14.5oz) package Reece's Pieces Candy

In a large bowl, combine all and mix well. Store in airtight container.


Shared on The Country Cook Oct. 12, 2012
Shared on Make Ahead Meals Oct. 15, 2012
Shared on Mandy's Recipe Box Oct. 16, 2012

Snacks at Very Good Recipes
Pin It
reade more... Résuméabuiyad