Pages

Showing posts with label Mushrooms. Show all posts

Soul Food Saturday #27

Hello, and welcome to the weekend! We actually have a 3 day one because yesterday was Fall Break from school, so this house is especially cheerful! I hope you have some autumn fun planned over the next couple days. Bekki is in the kitchen today with a great Mexican meal that has had me drooling from the minute I first saw them!


After being under the weather for almost a week my sweetheart finally got his appetite back. He turns to me and says, "This is going to sound strange, but I'm hungry and I really want some MEAT, and anyway we have it is fine by me." So I suggested pepper steak burritos. This is a go to recipe that hits the spot every time I make it. With y­­our favorite toppings along side, you can get the perfect burrito for each person. Today we used fresh cooked salsa, shredded cheese and sour cream. You can customize this to your family and friends preferences.
 
 
Pepper Steak Burritos
2 large chuck steaks (approx. 3c.) cubed
2 red bell peppers, chopped
2 small onions, chopped
5 oz. mushrooms, sliced
2 jalapenos, chopped
1 envelope taco seasoning
2 tbs. olive oil
1 tsp. garlic powder
1 c. cilantro
8-super burrito size flour tortillas
 
In a large sauté pan, add oil, steak cubes, and garlic powder. Cook until all edges are browned.  Add onions, bell peppers and jalapenos, mushrooms, and taco seasoning. Stir to combine, cover and allow veggies to soften, stirring occasionally.
 
When ready to serve, warm your tortillas on a griddle pan or in the microwave. And have your favorite condiments ready, enjoy!


Hello, and welcome to the weekend! We actually have a 3 day one because yesterday was Fall Break from school, so this house is especially cheerful! I hope you have some autumn fun planned over the next couple days. Bekki is in the kitchen today with a great Mexican meal that has had me drooling from the minute I first saw them!


After being under the weather for almost a week my sweetheart finally got his appetite back. He turns to me and says, "This is going to sound strange, but I'm hungry and I really want some MEAT, and anyway we have it is fine by me." So I suggested pepper steak burritos. This is a go to recipe that hits the spot every time I make it. With y­­our favorite toppings along side, you can get the perfect burrito for each person. Today we used fresh cooked salsa, shredded cheese and sour cream. You can customize this to your family and friends preferences.
 
 
Pepper Steak Burritos
2 large chuck steaks (approx. 3c.) cubed
2 red bell peppers, chopped
2 small onions, chopped
5 oz. mushrooms, sliced
2 jalapenos, chopped
1 envelope taco seasoning
2 tbs. olive oil
1 tsp. garlic powder
1 c. cilantro
8-super burrito size flour tortillas
 
In a large sauté pan, add oil, steak cubes, and garlic powder. Cook until all edges are browned.  Add onions, bell peppers and jalapenos, mushrooms, and taco seasoning. Stir to combine, cover and allow veggies to soften, stirring occasionally.
 
When ready to serve, warm your tortillas on a griddle pan or in the microwave. And have your favorite condiments ready, enjoy!


reade more... Résuméabuiyad

Our Veggie Bin

Last week I told you about our experience with Green BEAN Delivery; and how much we enjoyed the fresh produce we were provided. If you missed that review, or are totally intrigued, you can read about it here.

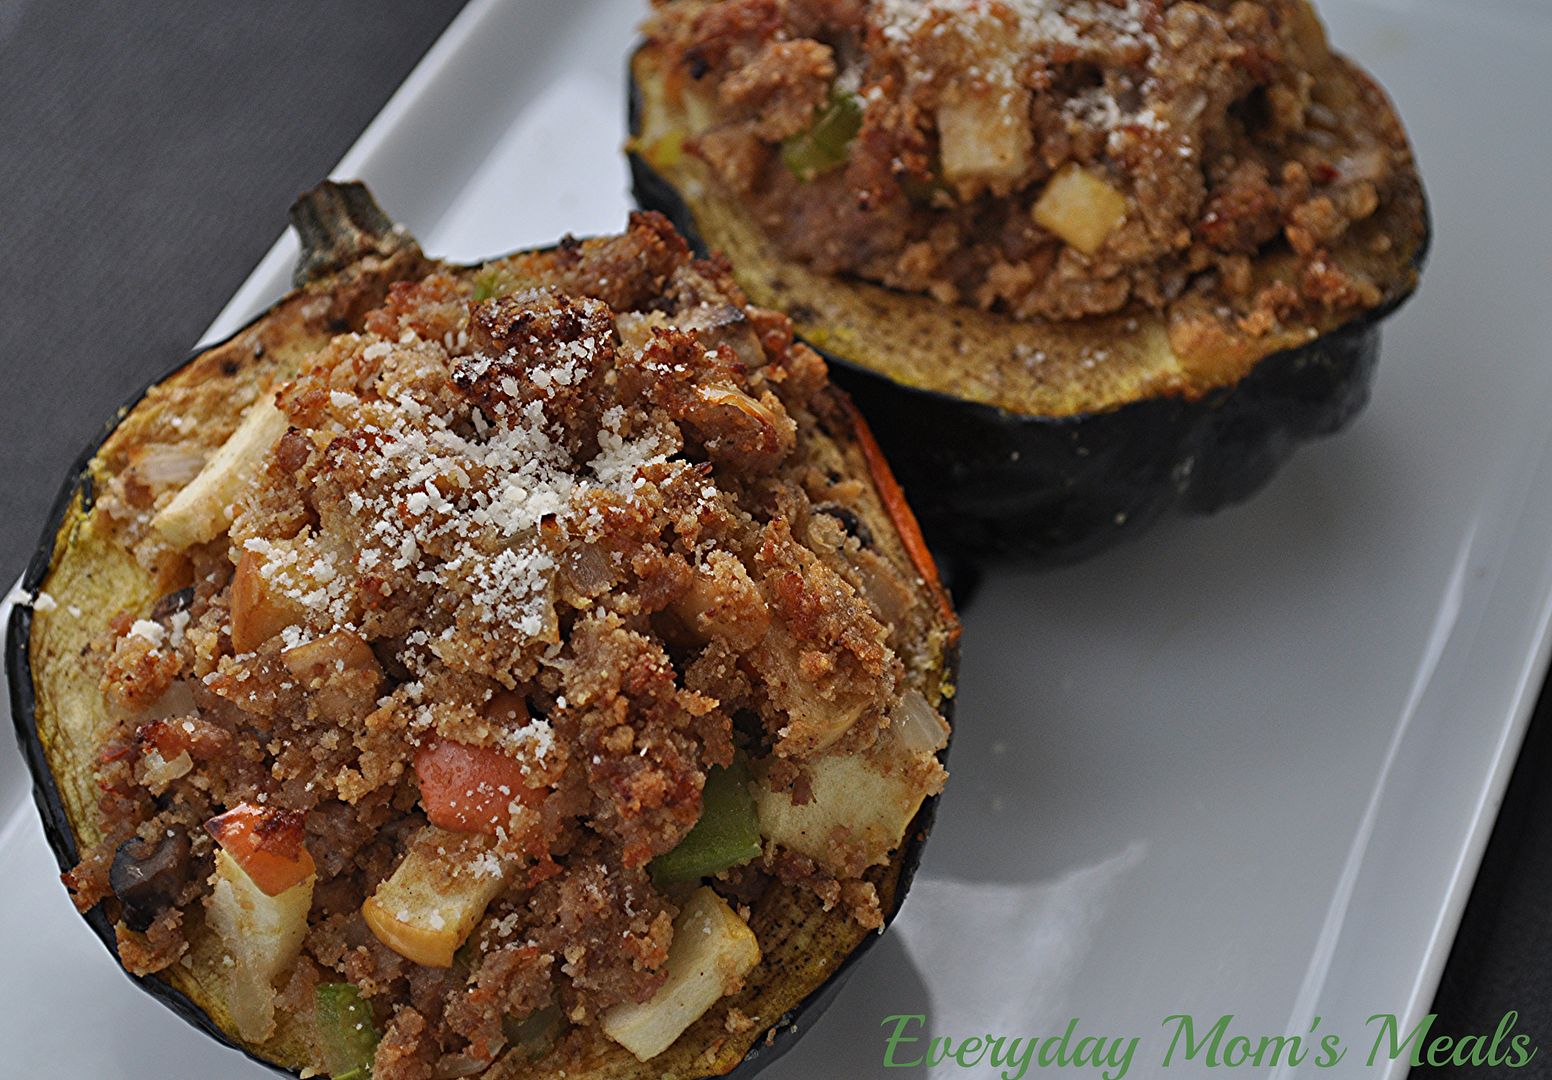
One of the things I added to our bin that wasn't initially included was acorn squash. We love all kinds of squash, and we love to eat it year round, but to me, there is just something about enjoying fresh squash during the fall months. Maybe it stems from my childhood when my dad used to have a pretty impressive garden, and the squash were always ready to be picked about the time the leaves were falling from the trees. Maybe it's simply because squash reminds me of pumpkin. Whatever the reason, this time of year is when squash begins to makes an appearance on our table more frequently.

I'm telling you, this recipe looks like autumn on a plate! From the squash to another of fall's best gifts, apples, this looks, smells and tastes like a celebration of the season! These would make a great Sunday supper on a brisk, fall day, or even a weeknight meal if you have a little extra time on your hands. (Don't let that scare you. It's not a difficult recipe, the squash just needs some time in the oven to get tender and delicious.)

If you are looking for more meals that include autumn's bounty, make sure to save this one. Celebrate the changing of the seasons with fresh ingredients that come together in a beautiful and tasty way!

Sausage and Apple Stuffed Acorn Squash
2 Acorn Squash, cut in half and seeded
1 lb. pork sausage
1 TBS butter, melted
1/4 tsp. garlic salt
3/4 tsp. ground sage, divided
1/2 c. onion, finely chopped
1 celery rib, finely chopped
6 button mushrooms, finely chopped
2 apples, cored and finely chopped
1 c. bread crumbs
1 egg, beaten
Salt and Pepper to taste
Grated Parmesan cheese for garnish

Preheat oven to 400. Place cut squash, cut side up, in a 9x13 baking dish. In a small bowl combine melted butter, garlic salt and 1/4 tsp. sage. Mix well. Brush the cavity of each squash with butter mixture, coating it well. Bake for 1 hour until squash is tender, but holds shape.

While squash is roasting, brown sausage over medium heat in a large skillet. Drain, reserving 2 TBS of drippings. Place drippings back in pan. Add onion, celery, and mushrooms. Saute for 4 minutes. Add apples and saute 2 more minutes. In a large bowl combine browned sausage, veggies, 1/2 tsp. sage, salt, pepper, bread crumbs and egg. Mix well to combine. Remove squash from oven. Fill each with sausage mixture, mounding slightly. Bake for 20 additional minutes until browned. Sprinkle with cheese before serving.


Shared on The Country Cook Oct. 18, 2013


Squash at Very Good Recipes
Last week I told you about our experience with Green BEAN Delivery; and how much we enjoyed the fresh produce we were provided. If you missed that review, or are totally intrigued, you can read about it here.

One of the things I added to our bin that wasn't initially included was acorn squash. We love all kinds of squash, and we love to eat it year round, but to me, there is just something about enjoying fresh squash during the fall months. Maybe it stems from my childhood when my dad used to have a pretty impressive garden, and the squash were always ready to be picked about the time the leaves were falling from the trees. Maybe it's simply because squash reminds me of pumpkin. Whatever the reason, this time of year is when squash begins to makes an appearance on our table more frequently.

I'm telling you, this recipe looks like autumn on a plate! From the squash to another of fall's best gifts, apples, this looks, smells and tastes like a celebration of the season! These would make a great Sunday supper on a brisk, fall day, or even a weeknight meal if you have a little extra time on your hands. (Don't let that scare you. It's not a difficult recipe, the squash just needs some time in the oven to get tender and delicious.)

If you are looking for more meals that include autumn's bounty, make sure to save this one. Celebrate the changing of the seasons with fresh ingredients that come together in a beautiful and tasty way!

Sausage and Apple Stuffed Acorn Squash
2 Acorn Squash, cut in half and seeded
1 lb. pork sausage
1 TBS butter, melted
1/4 tsp. garlic salt
3/4 tsp. ground sage, divided
1/2 c. onion, finely chopped
1 celery rib, finely chopped
6 button mushrooms, finely chopped
2 apples, cored and finely chopped
1 c. bread crumbs
1 egg, beaten
Salt and Pepper to taste
Grated Parmesan cheese for garnish

Preheat oven to 400. Place cut squash, cut side up, in a 9x13 baking dish. In a small bowl combine melted butter, garlic salt and 1/4 tsp. sage. Mix well. Brush the cavity of each squash with butter mixture, coating it well. Bake for 1 hour until squash is tender, but holds shape.

While squash is roasting, brown sausage over medium heat in a large skillet. Drain, reserving 2 TBS of drippings. Place drippings back in pan. Add onion, celery, and mushrooms. Saute for 4 minutes. Add apples and saute 2 more minutes. In a large bowl combine browned sausage, veggies, 1/2 tsp. sage, salt, pepper, bread crumbs and egg. Mix well to combine. Remove squash from oven. Fill each with sausage mixture, mounding slightly. Bake for 20 additional minutes until browned. Sprinkle with cheese before serving.


Shared on The Country Cook Oct. 18, 2013


Squash at Very Good Recipes
reade more... Résuméabuiyad

Soul Food Saturday #26

Good Morning! Thanks for taking a minute out of your weekend and stopping by the EMM kitchen. Today Bekki has taken one of our favorite side dishes and jazzed it up a little, for a whole new flavor. Have a great day, and eat something yummy for us!


Just about a year ago I was introduced to a recipe done by Mrs. Everyday, Fried Cabbage and Noodles. We love cabbage so much we make it often. But in the fall it seems to show its face much more often. I have added crab and made it into a full meal, and left out the noodles and made it as just a basic side. This time I added bacon and mushrooms. Boy was it good. Along side a grilled steak or a piece of fried chicken. This one is going to be a winner.
Fried Cabbage with Bacon and Mushrooms
1 small head of cabbage, chopped
6 slices thick cut bacon, chopped
1 small onion, chopped
2 c. sliced mushrooms
1 jalapeno, diced
1 tbs. olive oil
1 tsp granulated garlic
Salt and pepper to taste
In a medium sauté pan, heat olive oil. Add onion, jalapeno, mushrooms, and bacon. Cook until onions are clear and bacon is cooked through. Add cabbage, garlic and salt and pepper. Cover and cook for 10-12 minutes. Stirring occasionally, until cabbage is tender. Serve hot with your favorite meat or fish. Enjoy!


Good Morning! Thanks for taking a minute out of your weekend and stopping by the EMM kitchen. Today Bekki has taken one of our favorite side dishes and jazzed it up a little, for a whole new flavor. Have a great day, and eat something yummy for us!


Just about a year ago I was introduced to a recipe done by Mrs. Everyday, Fried Cabbage and Noodles. We love cabbage so much we make it often. But in the fall it seems to show its face much more often. I have added crab and made it into a full meal, and left out the noodles and made it as just a basic side. This time I added bacon and mushrooms. Boy was it good. Along side a grilled steak or a piece of fried chicken. This one is going to be a winner.
Fried Cabbage with Bacon and Mushrooms
1 small head of cabbage, chopped
6 slices thick cut bacon, chopped
1 small onion, chopped
2 c. sliced mushrooms
1 jalapeno, diced
1 tbs. olive oil
1 tsp granulated garlic
Salt and pepper to taste
In a medium sauté pan, heat olive oil. Add onion, jalapeno, mushrooms, and bacon. Cook until onions are clear and bacon is cooked through. Add cabbage, garlic and salt and pepper. Cover and cook for 10-12 minutes. Stirring occasionally, until cabbage is tender. Serve hot with your favorite meat or fish. Enjoy!


reade more... Résuméabuiyad

Healthier Take Out Fake Out {A Review of San-J Sauces}

I love making our favorite take out dishes at home, using ingredients that I know exactly where they came from and exactly what is in them. And now I can do that easier, with a little help from my friends at San-J.

San-J is dedicated to manufacturing premium Tamari soy sauce and quality Asian inspired products. Their Mongolian Cooking Sauce is the perfect blend of sweet and savory, and works equally well with beef, chicken, shrimp or tofu. It's made from their Tamari sauce, containing 100% soybeans and no wheat content. Plus, it's certified gluten free and verified Non-GMO. It's great tasting and includes no guilt!


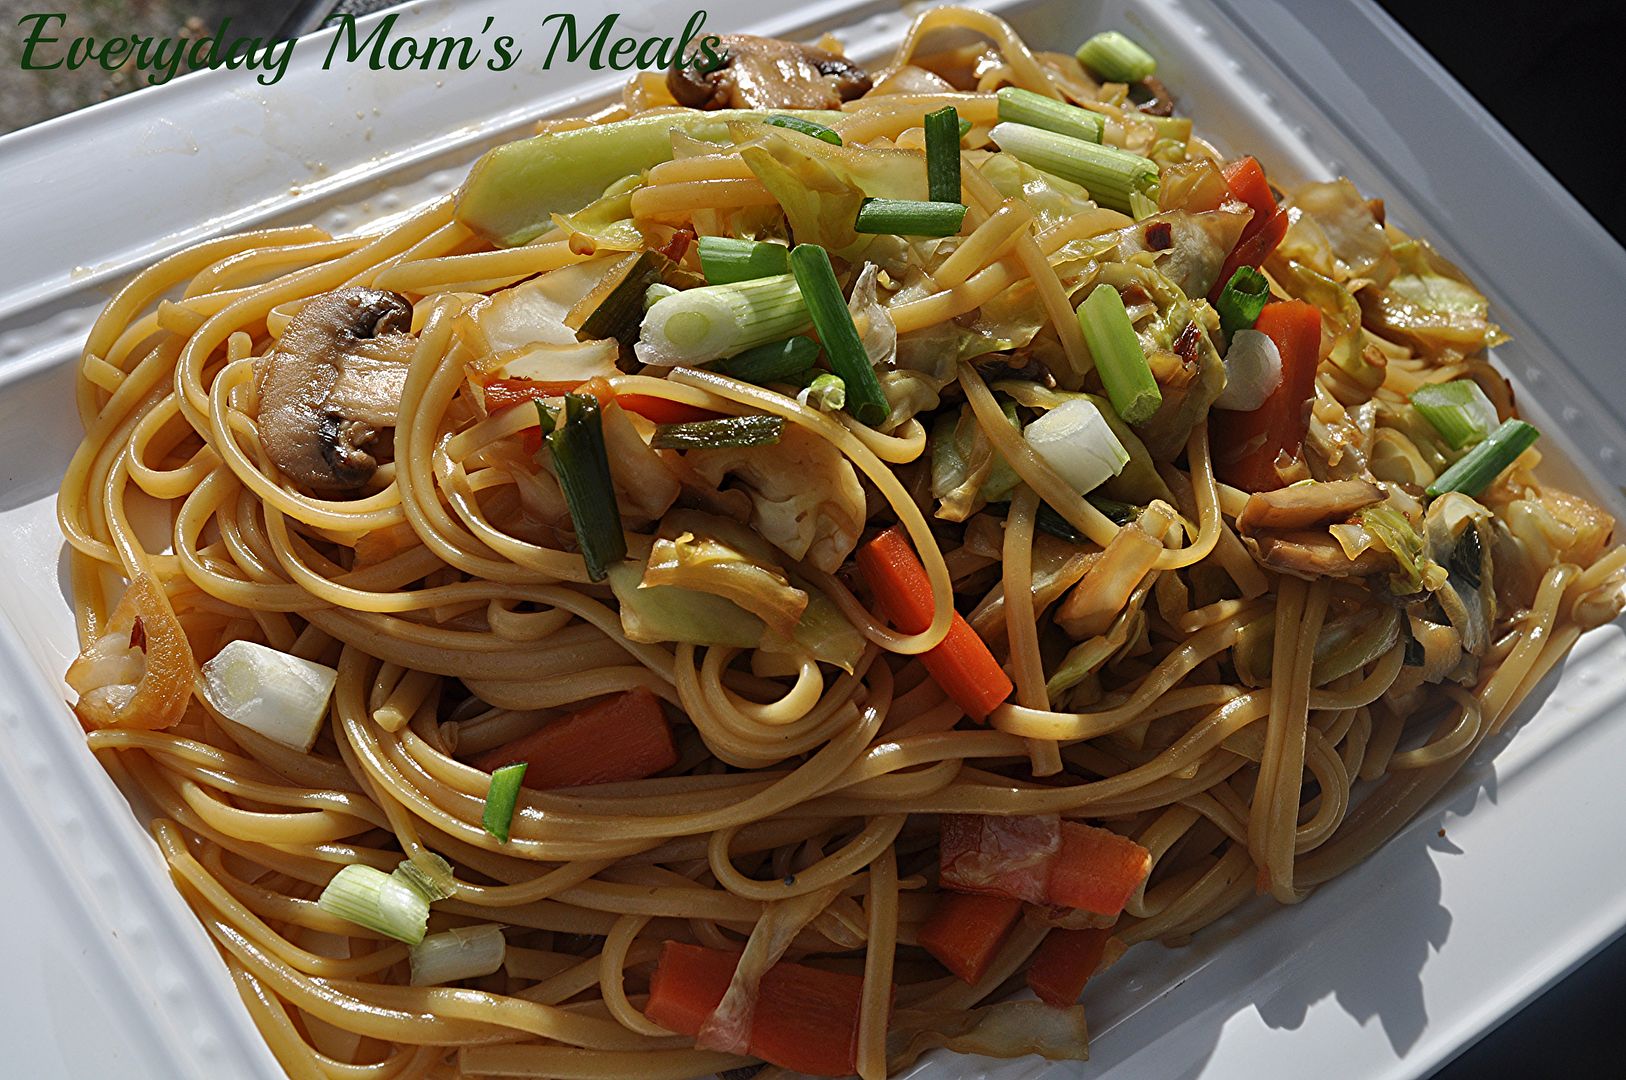
When I found this recipe on their website, I couldn't wait to try it. My favorite Asian take out treat is noodles, with meat, veggies, or both, in a sweet sauce, covering every bite! And these reminded me of those with every ingredient.

If you enjoy Asian food, and really love making it at home, you need to try San-J products today. They will give you the flavor and deliciousness you are looking for, without wondering what you are putting into your body. And if you're looking for a new side dish, try these noodles tonight!

Mongolian Noodles Adapted from San-J
1 lb. linguine, cooked and drained
8 oz. button mushrooms, sliced
1 bunch green onions, chopped, few reserved for garnish
2 medium carrots, jullienned
3 TBS vegetable oil
1 small head cabbage, sliced thin
1/2 tsp. red pepper flakes
1/2 c. San-J Mongolian Sauce

While pasta cooks, in a large skillet heat vegetable oil over medium heat. Add mushrooms and carrots. Cook for 5-7 minutes until mushrooms are brown and soft. Add red pepper flakes, cabbage and green onions. Saute for 5 minutes until cabbage begins to wilt. Add cooking sauce. Bring to a boil. Reduce heat to low and simmer for 2-3 minutes until slightly thickened. When pasta is cooked, drain well. Put in a large bowl. Add veggie and sauce mixture. Stir well to combine. Garnish with remaining green onions.


Shared on The Country Cook Oct. 4, 2013
Asian at Very Good Recipes

*Disclaimer* I was provided with free product for this review. All thoughts and opinions are my own.
I love making our favorite take out dishes at home, using ingredients that I know exactly where they came from and exactly what is in them. And now I can do that easier, with a little help from my friends at San-J.

San-J is dedicated to manufacturing premium Tamari soy sauce and quality Asian inspired products. Their Mongolian Cooking Sauce is the perfect blend of sweet and savory, and works equally well with beef, chicken, shrimp or tofu. It's made from their Tamari sauce, containing 100% soybeans and no wheat content. Plus, it's certified gluten free and verified Non-GMO. It's great tasting and includes no guilt!


When I found this recipe on their website, I couldn't wait to try it. My favorite Asian take out treat is noodles, with meat, veggies, or both, in a sweet sauce, covering every bite! And these reminded me of those with every ingredient.

If you enjoy Asian food, and really love making it at home, you need to try San-J products today. They will give you the flavor and deliciousness you are looking for, without wondering what you are putting into your body. And if you're looking for a new side dish, try these noodles tonight!

Mongolian Noodles Adapted from San-J
1 lb. linguine, cooked and drained
8 oz. button mushrooms, sliced
1 bunch green onions, chopped, few reserved for garnish
2 medium carrots, jullienned
3 TBS vegetable oil
1 small head cabbage, sliced thin
1/2 tsp. red pepper flakes
1/2 c. San-J Mongolian Sauce

While pasta cooks, in a large skillet heat vegetable oil over medium heat. Add mushrooms and carrots. Cook for 5-7 minutes until mushrooms are brown and soft. Add red pepper flakes, cabbage and green onions. Saute for 5 minutes until cabbage begins to wilt. Add cooking sauce. Bring to a boil. Reduce heat to low and simmer for 2-3 minutes until slightly thickened. When pasta is cooked, drain well. Put in a large bowl. Add veggie and sauce mixture. Stir well to combine. Garnish with remaining green onions.


Shared on The Country Cook Oct. 4, 2013
Asian at Very Good Recipes

*Disclaimer* I was provided with free product for this review. All thoughts and opinions are my own.
reade more... Résuméabuiyad

Dairy At The State Fair {Dairy Ambassador #WinnersDrinkMilk}

The Indiana State Fair is in full swing, and Indiana Dairy wants to make sure you enjoy what they have to offer at the fair grounds.

Anyone who has ever visited the State Fair can't help but notice the Dairy Barn, which happens to be a must on our fair agenda every single year. From the gooey grilled cheese to the thick and delicious milkshakes, we also treat ourselves to a yummy stop at the Dairy Barn.

I am especially looking forward to it this year because I've heard they have a new milkshake flavor...lemon! Ya'll know how much of a lemon freak I am...and I have to believe that will taste so refreshing during a sunny, warm day at the fair!

Plus another thing I love about the Dairy Barn is the reasonable prices! They really allow a family to enjoy some fair staples without emptying the wallet. Just take a look at this year's menu:

Open weekdays from 7 am-9 pm and weekends from 7 am- 10 pm, they also serve breakfast daily until 10 am. This year their featured sandwich is the Blue Moo- slices of blue and American cheese on sourdough bread. (I love that name! Too cute!) If you're looking for something a little healthier for the little ones at the fair, the Dairy Barn also offers the Fuel Up to Play 60 Kid's Meal-a great choice inspired by the Dairy Council's school health and wellness program. Plus, parents with babies with bottles can stop by the Dairy Barn anytime and they will fill them with milk for free!!

In addition, Indiana Dairy also sponsors the Cheese Sculpture, which will be unveiled August 7th, in the Dupont Food Pavilion. The sculpture this year will highlight the importance of childhood nutrition and starting your day with an energizing breakfast. And every day at 2 pm, also in the Dupont Food Pavilion, let Indiana Dairy's master chef show you how to prepare some delicious recipes. Plus, during one of the highlights of our visit every year, the daily parade at 6:30 pm, you can catch the dairy float rolling through the fairgrounds. 

To celebrate our upcoming trip to the fair, I decided to highlight dairy by combining two favorites in our family. I've already told you how much we love the dairy barn and all of it's yummy offerings, but at the top of the list is definitely their grilled cheese sandwiches. Seriously, they are the best ones I've ever had in my life! And the other one is pizza at the fair. While they don't offer it at the Dairy Barn, we always seem to find more than one vendor offering huge slices of pizza, perfect for a certain little boy! Actually last year, he had a Dairy Barn meal, complete with grilled cheese and milk, for lunch and pizza for supper. So I figured why not take both of Alex's favorites and turn them into one tasty, easy sandwich, perfect for a simple summer supper. 

If you are heading down to the State Fair, please include the Dairy Barn in your visit. You won't regret it! And be sure to have a grilled cheese and lemon milkshake for me!!

Pizza Grilled Cheese
Sliced mozzarella cheese
Sliced Pepperoni
Sliced White Button Mushrooms
Garlic and Herb Italian Bread, sliced medium
Pizza Sauce for dipping

Spread bread slices on one side each with butter or margarine. On bottom piece of bread layer cheese, pepperoni, mushrooms, and another slice of cheese. Top with another slice of bread, butter side up. Cook in a large skillet over medium heat until both sides are golden brown. Serve with pizza sauce on side. *NOTE* I found my bread in the bakery section at Walmart. If you can't find it, regular Italian or French bread would also work. Or even some sliced garlic bread!


Shared on Lady Behind The Curtain Aug. 7, 2013
Shared on The Country Cook Aug. 9, 2013
Sandwich at Very Good Recipes

The Indiana State Fair is in full swing, and Indiana Dairy wants to make sure you enjoy what they have to offer at the fair grounds.

Anyone who has ever visited the State Fair can't help but notice the Dairy Barn, which happens to be a must on our fair agenda every single year. From the gooey grilled cheese to the thick and delicious milkshakes, we also treat ourselves to a yummy stop at the Dairy Barn.

I am especially looking forward to it this year because I've heard they have a new milkshake flavor...lemon! Ya'll know how much of a lemon freak I am...and I have to believe that will taste so refreshing during a sunny, warm day at the fair!

Plus another thing I love about the Dairy Barn is the reasonable prices! They really allow a family to enjoy some fair staples without emptying the wallet. Just take a look at this year's menu:

Open weekdays from 7 am-9 pm and weekends from 7 am- 10 pm, they also serve breakfast daily until 10 am. This year their featured sandwich is the Blue Moo- slices of blue and American cheese on sourdough bread. (I love that name! Too cute!) If you're looking for something a little healthier for the little ones at the fair, the Dairy Barn also offers the Fuel Up to Play 60 Kid's Meal-a great choice inspired by the Dairy Council's school health and wellness program. Plus, parents with babies with bottles can stop by the Dairy Barn anytime and they will fill them with milk for free!!

In addition, Indiana Dairy also sponsors the Cheese Sculpture, which will be unveiled August 7th, in the Dupont Food Pavilion. The sculpture this year will highlight the importance of childhood nutrition and starting your day with an energizing breakfast. And every day at 2 pm, also in the Dupont Food Pavilion, let Indiana Dairy's master chef show you how to prepare some delicious recipes. Plus, during one of the highlights of our visit every year, the daily parade at 6:30 pm, you can catch the dairy float rolling through the fairgrounds. 

To celebrate our upcoming trip to the fair, I decided to highlight dairy by combining two favorites in our family. I've already told you how much we love the dairy barn and all of it's yummy offerings, but at the top of the list is definitely their grilled cheese sandwiches. Seriously, they are the best ones I've ever had in my life! And the other one is pizza at the fair. While they don't offer it at the Dairy Barn, we always seem to find more than one vendor offering huge slices of pizza, perfect for a certain little boy! Actually last year, he had a Dairy Barn meal, complete with grilled cheese and milk, for lunch and pizza for supper. So I figured why not take both of Alex's favorites and turn them into one tasty, easy sandwich, perfect for a simple summer supper. 

If you are heading down to the State Fair, please include the Dairy Barn in your visit. You won't regret it! And be sure to have a grilled cheese and lemon milkshake for me!!

Pizza Grilled Cheese
Sliced mozzarella cheese
Sliced Pepperoni
Sliced White Button Mushrooms
Garlic and Herb Italian Bread, sliced medium
Pizza Sauce for dipping

Spread bread slices on one side each with butter or margarine. On bottom piece of bread layer cheese, pepperoni, mushrooms, and another slice of cheese. Top with another slice of bread, butter side up. Cook in a large skillet over medium heat until both sides are golden brown. Serve with pizza sauce on side. *NOTE* I found my bread in the bakery section at Walmart. If you can't find it, regular Italian or French bread would also work. Or even some sliced garlic bread!


Shared on Lady Behind The Curtain Aug. 7, 2013
Shared on The Country Cook Aug. 9, 2013
Sandwich at Very Good Recipes

reade more... Résuméabuiyad

100% Stovetop

An entire cookbook of nothing but stovetop meals. Sound too good to be true? Well, it's not! Put away those oven mitts ladies and gents, because you won't be needing them for this recipe, or any of  those in Gooseberry Patch's 101 Stovetop Suppers. 

Ya'll know my love of all things Gooseberry Patch, and most of you probably already know why I'm especially fond of this cookbook. Yep, because I am in it!! That's right! Another one of my recipes made it's way into my favorite line of cookbooks. I couldn't be more excited or proud. (In case you're wondering, it is Beef and Bean Tostadas...and they are super yummy!) And one of the greatest things about GP choosing to use your recipe is that you receive a free copy of the book too! 

So you can imagine how excited I was to come home from vacation at the beginning of July and find not one, not two, but three Gooseberry Patch books waiting for me...because indeed I have recipes in all three! (The other two are harvest and holiday...so there will be recipes coming from them in the near future!) I couldn't wait to start thumbing through the pages! First because I love seeing my name in print next to food I created. It's like showing of a child to the world. Secondly, I knew there were other delicious recipes just waiting for me to try.

This is one of those I found and couldn't wait to make for my family. You know how much we love pasta, but probably about 90% of the recipes I have are for baked versions. I have others too, but looking through my collection, most come out of the oven. Sure, they start stovetop but eventually find their way into the oven to finish. So I was super excited to have this one cook entirely on the stove, especially since the day I made it the thermometer was reading about 95 with what I think was 400% humidity.

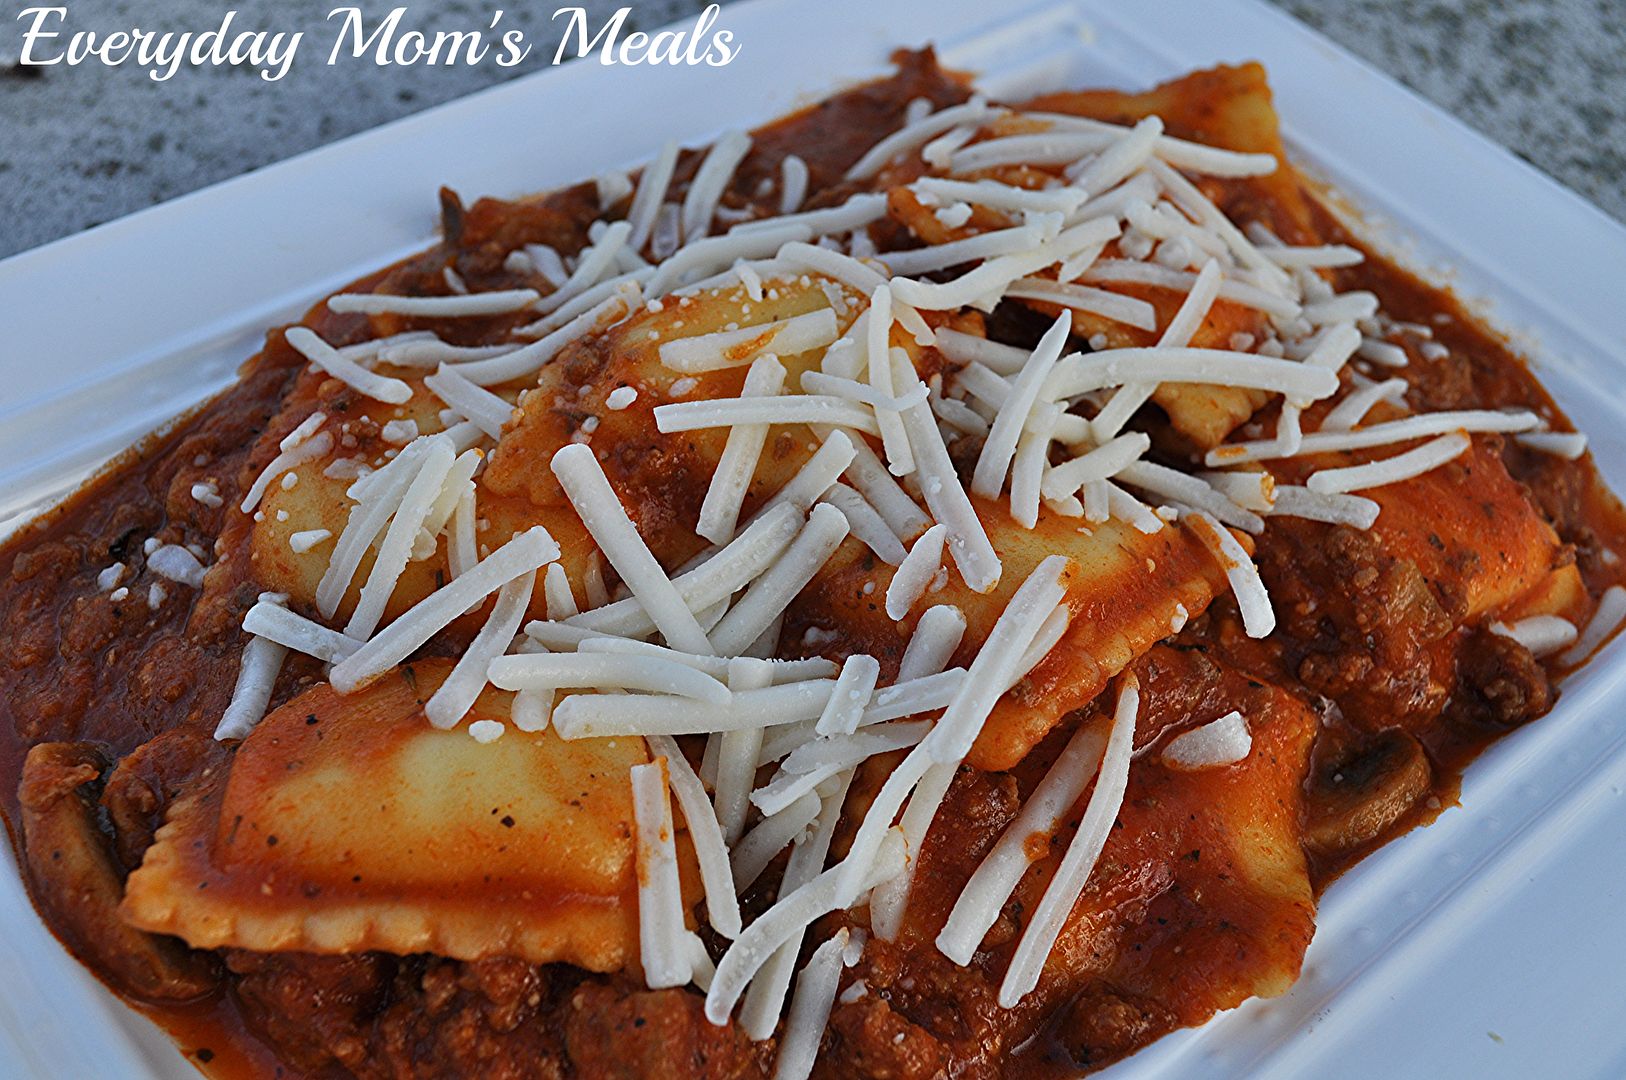
This recipe could not be easier, and it even takes a little help from the store using frozen ravioli. (The original called for refrigerated, but my store doesn't carry it, so I adapted.) Plus, it cooks right in the sauce, allowing each piece to wrap itself in the flavorful sauce. It is a simply yet delicious Italian supper you can have on the table in no time.

If you are looking for more recipes that don't include the oven, this is just for you. And if you love it, maybe you can get a copy of 101 Stovetop Suppers for yourself. And be sure to check out that tostada recipe from that woman in Indiana....it's pretty tasty and I hear she's a real sweetie too!

Stovetop Ravioli Adapted from Gooseberry Patch
1 (23 oz.) bag frozen four cheese ravioli, thawed
2 (24 oz.) jars Garlic and Herb spaghetti sauce
1 1/4 c. water
1 lb. ground beef
2 TBS olive oil
8 oz. button mushrooms, sliced
1/2 tsp. garlic powder
1 TBS Italian Seasoning
1/4. tsp. red pepper flakes, crushed
Salt and pepper, to taste
3/4 c. grated Parmesan cheese
1 c. mozzarella cheese

In a large pot over medium heat add olive oil. When warm, add ground beef. Break apart and brown until almost fully cooked. Add salt, pepper, garlic powder, Italian seasoning and red pepper flakes. Stir and continue to brown until no longer pink. Add mushrooms and cook about 5 minutes, stirring often until mushrooms begin to brown. Add sauce, water and ravioli. Stir to combine. Increase heat to high and bring to a boil. Add Parmesan cheese and then reduce heat to simmer. Cook for 15-20 minutes, stirring often, until ravioli is cooked through. Remove ravioli from pot to individual plates using a slotted spoon. Ladle sauce over each one. Sprinkle with mozzarella cheese.


Shared on The Country Cook Aug. 2, 2013
Shared on Mandy's Recipe Box Aug. 6, 2013
Shared on Lady Behind The Curtain Aug. 7, 2013
Pasta at Very Good Recipes
An entire cookbook of nothing but stovetop meals. Sound too good to be true? Well, it's not! Put away those oven mitts ladies and gents, because you won't be needing them for this recipe, or any of  those in Gooseberry Patch's 101 Stovetop Suppers. 

Ya'll know my love of all things Gooseberry Patch, and most of you probably already know why I'm especially fond of this cookbook. Yep, because I am in it!! That's right! Another one of my recipes made it's way into my favorite line of cookbooks. I couldn't be more excited or proud. (In case you're wondering, it is Beef and Bean Tostadas...and they are super yummy!) And one of the greatest things about GP choosing to use your recipe is that you receive a free copy of the book too! 

So you can imagine how excited I was to come home from vacation at the beginning of July and find not one, not two, but three Gooseberry Patch books waiting for me...because indeed I have recipes in all three! (The other two are harvest and holiday...so there will be recipes coming from them in the near future!) I couldn't wait to start thumbing through the pages! First because I love seeing my name in print next to food I created. It's like showing of a child to the world. Secondly, I knew there were other delicious recipes just waiting for me to try.

This is one of those I found and couldn't wait to make for my family. You know how much we love pasta, but probably about 90% of the recipes I have are for baked versions. I have others too, but looking through my collection, most come out of the oven. Sure, they start stovetop but eventually find their way into the oven to finish. So I was super excited to have this one cook entirely on the stove, especially since the day I made it the thermometer was reading about 95 with what I think was 400% humidity.

This recipe could not be easier, and it even takes a little help from the store using frozen ravioli. (The original called for refrigerated, but my store doesn't carry it, so I adapted.) Plus, it cooks right in the sauce, allowing each piece to wrap itself in the flavorful sauce. It is a simply yet delicious Italian supper you can have on the table in no time.

If you are looking for more recipes that don't include the oven, this is just for you. And if you love it, maybe you can get a copy of 101 Stovetop Suppers for yourself. And be sure to check out that tostada recipe from that woman in Indiana....it's pretty tasty and I hear she's a real sweetie too!

Stovetop Ravioli Adapted from Gooseberry Patch
1 (23 oz.) bag frozen four cheese ravioli, thawed
2 (24 oz.) jars Garlic and Herb spaghetti sauce
1 1/4 c. water
1 lb. ground beef
2 TBS olive oil
8 oz. button mushrooms, sliced
1/2 tsp. garlic powder
1 TBS Italian Seasoning
1/4. tsp. red pepper flakes, crushed
Salt and pepper, to taste
3/4 c. grated Parmesan cheese
1 c. mozzarella cheese

In a large pot over medium heat add olive oil. When warm, add ground beef. Break apart and brown until almost fully cooked. Add salt, pepper, garlic powder, Italian seasoning and red pepper flakes. Stir and continue to brown until no longer pink. Add mushrooms and cook about 5 minutes, stirring often until mushrooms begin to brown. Add sauce, water and ravioli. Stir to combine. Increase heat to high and bring to a boil. Add Parmesan cheese and then reduce heat to simmer. Cook for 15-20 minutes, stirring often, until ravioli is cooked through. Remove ravioli from pot to individual plates using a slotted spoon. Ladle sauce over each one. Sprinkle with mozzarella cheese.


Shared on The Country Cook Aug. 2, 2013
Shared on Mandy's Recipe Box Aug. 6, 2013
Shared on Lady Behind The Curtain Aug. 7, 2013
Pasta at Very Good Recipes
reade more... Résuméabuiyad

Childhood Camping

When I was a little girl, one of the highlights to my summer vacation was the trip my mom and I made "back home" each July. For two weeks we would head east to Pennsylvania to spend some much needed quality time with my grandparents and uncle. And oh what a fun filled two weeks they were! 

One of our favorite things to do during that time was to load up the Winnebago and head to Pymatuning State Park and spend a few days in the great outdoors, sitting around the campfire, filling each day with more memories than the one before. Some of those memories are ones I hold most dear from my childhood. Like the time a mother skunk and her babies "camped out" under our camper! Yep, true story!

And two things that stick in my mind most of all about those camping trips are both food related. One, my grandma always had a fridge full of Grape Faygo pop (my favorite at the time) and it was such a treat! The second is this dish... a super simple supper, that to this day is still a family favorite. It was something grandma could easily make out of the canned goods stocked in the camper, and was especially nice if we had a rainy day and grandpa wasn't able to cook outside. Not to mention it always makes a huge amount, and the leftovers make great lunches for a couple days. 

If you love simple "thrown together" meals that can be ready in no time, I'm sure this will be right up your alley. Or maybe your family enjoys camping trips too, and this can go with you on your next excursion. Either way, I'm happy to share just a little bit of my childhood, and hope it leads to happy memories for you too!

Campfire Skillet Casserole
2 large Russet potatoes, baked and cooled
2 (15 oz.) cans green beans, drained
1 (16 oz.) package smoky link sausage, cut into small pieces
1 (11 oz.) can mushroom pieces and stems, drained
3 TBS butter
Salt and Pepper to taste
Dried Parsley for garnish

Preheat electric skillet to 350. (If using stove top, medium-high) Cut potatoes int large bite sized chunks. Add butter to skillet. Once melted, add potatoes. Season liberally with salt and pepper. Allow potatoes to cook, stirring often until slightly golden around edges, about 5-7 minutes. Add green beans, mushrooms and smoky links. Stir to combine. Reduce heat to 325. Cover and allow to cook 20 minutes,  stirring occasionally. Adjust salt and pepper. Garnish with parsley. 
*NOTE* As much as we enjoy very crispy potatoes, for this recipes I don't let them get too crisp. Why? Because that's the way grandma did it....and I don't mess with a good thing! 


Shared on Make Ahead Meals June 17, 2013
Casseroles at Very Good Recipes
Pin It
When I was a little girl, one of the highlights to my summer vacation was the trip my mom and I made "back home" each July. For two weeks we would head east to Pennsylvania to spend some much needed quality time with my grandparents and uncle. And oh what a fun filled two weeks they were! 

One of our favorite things to do during that time was to load up the Winnebago and head to Pymatuning State Park and spend a few days in the great outdoors, sitting around the campfire, filling each day with more memories than the one before. Some of those memories are ones I hold most dear from my childhood. Like the time a mother skunk and her babies "camped out" under our camper! Yep, true story!

And two things that stick in my mind most of all about those camping trips are both food related. One, my grandma always had a fridge full of Grape Faygo pop (my favorite at the time) and it was such a treat! The second is this dish... a super simple supper, that to this day is still a family favorite. It was something grandma could easily make out of the canned goods stocked in the camper, and was especially nice if we had a rainy day and grandpa wasn't able to cook outside. Not to mention it always makes a huge amount, and the leftovers make great lunches for a couple days. 

If you love simple "thrown together" meals that can be ready in no time, I'm sure this will be right up your alley. Or maybe your family enjoys camping trips too, and this can go with you on your next excursion. Either way, I'm happy to share just a little bit of my childhood, and hope it leads to happy memories for you too!

Campfire Skillet Casserole
2 large Russet potatoes, baked and cooled
2 (15 oz.) cans green beans, drained
1 (16 oz.) package smoky link sausage, cut into small pieces
1 (11 oz.) can mushroom pieces and stems, drained
3 TBS butter
Salt and Pepper to taste
Dried Parsley for garnish

Preheat electric skillet to 350. (If using stove top, medium-high) Cut potatoes int large bite sized chunks. Add butter to skillet. Once melted, add potatoes. Season liberally with salt and pepper. Allow potatoes to cook, stirring often until slightly golden around edges, about 5-7 minutes. Add green beans, mushrooms and smoky links. Stir to combine. Reduce heat to 325. Cover and allow to cook 20 minutes,  stirring occasionally. Adjust salt and pepper. Garnish with parsley. 
*NOTE* As much as we enjoy very crispy potatoes, for this recipes I don't let them get too crisp. Why? Because that's the way grandma did it....and I don't mess with a good thing! 


Shared on Make Ahead Meals June 17, 2013
Casseroles at Very Good Recipes
Pin It
reade more... Résuméabuiyad

Last Day Celebration

That's right! It's finally here! The day we've waited 180 days for...THE LAST DAY OF SCHOOL! Yep, 2nd grade is now behind us, and we have a summer full of fun planned before we even start to think about 3rd grade! Okay, I guess I should correct that. Alex is excited to be a 3rd grader in about 2 1/2 months...Mommy is in total denial. Third Grade? That's not possible. I'm pretty sure he just started walking last week, and learned his ABCs two days ago. But I guess I have the next couple months to get used to the idea, or at least pretend to.

So in honor of Alex's "graduation" day, I'm sharing a delicious new salad I made a few weeks ago that he absolutely loved. I mean he gobbled it up as fast as I could scoop it into his bowl. I can't say I blame him though. It is quite yummy. Full of big mushroom flavor, that is complimented by tangy, briny olives and capers, it's fresh, light and perfect for summer.

This would be a great idea for an outdoor party or picnic. No mayo means you can be a little less careful with it out in the heat! Now, don't go sitting it in the 90 degree sun for 8 hours, and then come back here telling me how your guests ended up in the ER with food poisoning! I'm just saying without any mayo or sour cream, unlike many of our summer salads, this one is a little more element friendly.

It is great with steaks, burgers, seafood, chicken....pretty much any protein that tickles your fancy. It's simple to prepare, making it even taste even better!

Congrats to my little man for yet another fantastic school year. We couldn't be more proud of your academic accomplishments  And those are only topped by the loving, considerate, oh so special person you are growing into every single day!

Marinated Mushroom Salad Adapted from Serious Eats
1 lb. white button mushrooms, halved or quartered depending on size
1/2 c. grape tomatoes, halved
1/3 c. pitted kalamata olives, halved
2 TBS. capers
1/4 c. olive oil
2 TBS white vinegar
1 TBS Dijon mustard
1 tsp. dried oregano
2 tsp. dried parsley, extra for garnish
Salt and Pepper to taste

In a small bowl whisk together oil, vinegar, mustard, oregano, parsley, salt and pepper. Mix well to combine. In a large bowl toss together mushrooms, tomatoes, olives and capers. Pour dressing over top. Mix well to coat. Chill for 2 hours before serving. Garnish with extra parsley.


Shared on The Country Cook June 7, 2013
Shared on Make Ahead Meals June 10, 2013
Shared on Mandy's Recipe Box June 11, 2013
Mushrooms at Very Good Recipes
Pin It
That's right! It's finally here! The day we've waited 180 days for...THE LAST DAY OF SCHOOL! Yep, 2nd grade is now behind us, and we have a summer full of fun planned before we even start to think about 3rd grade! Okay, I guess I should correct that. Alex is excited to be a 3rd grader in about 2 1/2 months...Mommy is in total denial. Third Grade? That's not possible. I'm pretty sure he just started walking last week, and learned his ABCs two days ago. But I guess I have the next couple months to get used to the idea, or at least pretend to.

So in honor of Alex's "graduation" day, I'm sharing a delicious new salad I made a few weeks ago that he absolutely loved. I mean he gobbled it up as fast as I could scoop it into his bowl. I can't say I blame him though. It is quite yummy. Full of big mushroom flavor, that is complimented by tangy, briny olives and capers, it's fresh, light and perfect for summer.

This would be a great idea for an outdoor party or picnic. No mayo means you can be a little less careful with it out in the heat! Now, don't go sitting it in the 90 degree sun for 8 hours, and then come back here telling me how your guests ended up in the ER with food poisoning! I'm just saying without any mayo or sour cream, unlike many of our summer salads, this one is a little more element friendly.

It is great with steaks, burgers, seafood, chicken....pretty much any protein that tickles your fancy. It's simple to prepare, making it even taste even better!

Congrats to my little man for yet another fantastic school year. We couldn't be more proud of your academic accomplishments  And those are only topped by the loving, considerate, oh so special person you are growing into every single day!

Marinated Mushroom Salad Adapted from Serious Eats
1 lb. white button mushrooms, halved or quartered depending on size
1/2 c. grape tomatoes, halved
1/3 c. pitted kalamata olives, halved
2 TBS. capers
1/4 c. olive oil
2 TBS white vinegar
1 TBS Dijon mustard
1 tsp. dried oregano
2 tsp. dried parsley, extra for garnish
Salt and Pepper to taste

In a small bowl whisk together oil, vinegar, mustard, oregano, parsley, salt and pepper. Mix well to combine. In a large bowl toss together mushrooms, tomatoes, olives and capers. Pour dressing over top. Mix well to coat. Chill for 2 hours before serving. Garnish with extra parsley.


Shared on The Country Cook June 7, 2013
Shared on Make Ahead Meals June 10, 2013
Shared on Mandy's Recipe Box June 11, 2013
Mushrooms at Very Good Recipes
Pin It
reade more... Résuméabuiyad

Mom's New Side Dish

When I have my mom over for dinner, sometimes I run into a little bit of a challenge. I've shared before how she has many dietary needs, and while we are all accustomed to them, I do like to find new things she can have to treat her with. She always gets so tickled when I am able to find something yummy the rest of us will love, that she can enjoy too. When you can't eat as much as she can't, you really do savor the things you can, especially when they aren't on the "old stand by" list. 

So a few weeks ago when I was making one of her favorites, Grilled Shrimp Skewers, I wanted side dishes that all of us good eat as well. It's easy enough to make something the 3 of us can eat, and then simply make her something different, but this time I wanted one meal for all. I knew Parsley Red Potatoes would be one thing she could enjoy, but the other I wanted to be something brand new. I started thinking of the veggies she could have and what I could do to jazz them up, but still following her dietary guidelines. Mushrooms came to mind because while she loves them, she can only have them cooked, and normally when I do them I simply saute' them in a little butter, salt and pepper. So, I decided to expand on that same idea and see what I could find. I was so excited when I came across this recipe because I knew I could make it for all of us, and she would be so excited. 

These make a great side dish. Kind of like the ones you find in a good steakhouse. The depth of flavor you get from allowing them to get super brown will make any mushroom lover's taste buds drool! Plus, they are light yet satisfying, making them a great dish for the warm summer months, when we are all eating a little lighter.

I am so lucky to be able to use my skills in the kitchen to come up with new treats for mom. When you are on a restricted diet you truly do savor the most simple of things and appreciate what you can eat and enjoy all the more!

Sauteed White Button Mushrooms Adpated from Food Network
1 1/2 lbs. white button mushrooms, wiped clean
5 cloves garlic, minced
1 1/2 tsp. dried thyme
1 tsp. dried parsley, extra for garnish
1/2 c. beef broth
2 TBS lemon juice
6 TBS olive oil
3 TBS butter
Salt and Pepper to taste

Heat olive oil in large skillet over high heat. Carefully place mushrooms in oil, top side down. DO NOT move. Cook for 2 minutes. (If you move them too early, they will release liquid and not brown) After 2 minutes when mushrooms are caramelized, toss and continue cooking for 5 minutes. Add butter, toss to coat and cook for 5 minutes more until completely browned. Season with garlic, thyme, parsley, salt and pepper. Stir well and saute another 2 minutes. Add broth and lemon juice. Reduce heat to simmer and cook until some liquid evaporates and sauce thickens slightly. Remove mushrooms with slotted spoon to serving dish. Spoon sauce over top. 


Shared on Lady Behind The Curtain May 29, 2013
Shared on The Country Cook May 31, 2013
Mushrooms at Very Good Recipes
Pin It
When I have my mom over for dinner, sometimes I run into a little bit of a challenge. I've shared before how she has many dietary needs, and while we are all accustomed to them, I do like to find new things she can have to treat her with. She always gets so tickled when I am able to find something yummy the rest of us will love, that she can enjoy too. When you can't eat as much as she can't, you really do savor the things you can, especially when they aren't on the "old stand by" list. 

So a few weeks ago when I was making one of her favorites, Grilled Shrimp Skewers, I wanted side dishes that all of us good eat as well. It's easy enough to make something the 3 of us can eat, and then simply make her something different, but this time I wanted one meal for all. I knew Parsley Red Potatoes would be one thing she could enjoy, but the other I wanted to be something brand new. I started thinking of the veggies she could have and what I could do to jazz them up, but still following her dietary guidelines. Mushrooms came to mind because while she loves them, she can only have them cooked, and normally when I do them I simply saute' them in a little butter, salt and pepper. So, I decided to expand on that same idea and see what I could find. I was so excited when I came across this recipe because I knew I could make it for all of us, and she would be so excited. 

These make a great side dish. Kind of like the ones you find in a good steakhouse. The depth of flavor you get from allowing them to get super brown will make any mushroom lover's taste buds drool! Plus, they are light yet satisfying, making them a great dish for the warm summer months, when we are all eating a little lighter.

I am so lucky to be able to use my skills in the kitchen to come up with new treats for mom. When you are on a restricted diet you truly do savor the most simple of things and appreciate what you can eat and enjoy all the more!

Sauteed White Button Mushrooms Adpated from Food Network
1 1/2 lbs. white button mushrooms, wiped clean
5 cloves garlic, minced
1 1/2 tsp. dried thyme
1 tsp. dried parsley, extra for garnish
1/2 c. beef broth
2 TBS lemon juice
6 TBS olive oil
3 TBS butter
Salt and Pepper to taste

Heat olive oil in large skillet over high heat. Carefully place mushrooms in oil, top side down. DO NOT move. Cook for 2 minutes. (If you move them too early, they will release liquid and not brown) After 2 minutes when mushrooms are caramelized, toss and continue cooking for 5 minutes. Add butter, toss to coat and cook for 5 minutes more until completely browned. Season with garlic, thyme, parsley, salt and pepper. Stir well and saute another 2 minutes. Add broth and lemon juice. Reduce heat to simmer and cook until some liquid evaporates and sauce thickens slightly. Remove mushrooms with slotted spoon to serving dish. Spoon sauce over top. 


Shared on Lady Behind The Curtain May 29, 2013
Shared on The Country Cook May 31, 2013
Mushrooms at Very Good Recipes
Pin It
reade more... Résuméabuiyad
He Loves The Box

The blue one. That says Kraft on it. With the mac and cheese inside of it. And to be honest, I can't say I blame him. Sometimes, I need transported back in time to my childhood and enjoy a classic. No, it's not as good as homemade. No, it's not that great for me. But I can't help myself, sometimes I just gotta have it. 

Most of the time when I satisfy his craving, or indulge myself, it's as a side dish...easy and quick...exactly what I need sometimes. But a few years ago when a friend shared this with me, I was pleasantly surprised that with just a few ingredients I could make that classic into something new, and a filling main dish, perfect for a busy weeknight when I'm rushing around trying to get supper on the table, along with about a hundred other things.

Now, if you prefer a homemade version, and stay away from the pre-packaged version all together, kudos to you! Seriously, you have much more will power than I do. This could easily be made with a creamy "from scratch" version, just be sure your end product results in about a pound of pasta. Then simply add the rest of the ingredients. Either way you make it, your kids are going to love it! Mac n Cheese and Pizza in one delicious dish...they will think you are a genius!!

Every once in awhile it's okay to treat ourselves to one of life's simple pleasure. For our family that means mac and cheese out of a certain blue box. But at least this way I get to "jazz" it up a little and give my little guy two things he loves in one simple dish.

Pizza Style Mac n Cheese
2 (7.5 oz) boxes mac n cheese
1/2 stick butter (NOTE this is a different amount than listed on box)
1/2 cup milk
1 (15 oz.) jar pizza sauce
3/4 c. pepperoni, chopped
1 (6.5 oz) can sliced mushrooms, drained
1 (3.5 oz) can sliced black olives, drained, a few reserved for garnish
2 TBS Italian Seasoning, extra for garnish

Bring a large pot of water to a boil. Cook macaroni until done. Put back on hot pan over low heat. Add milk, butter and cheese packet. Stir until well combined. Add pizza sauce. Stir and cook on low until some liquid evaporates. Add pepperoni, mushrooms, olives and seasoning. Stir well to combine. Cook on low for 10-15 minutes to allow flavors to combine, stirring often. Garnish with extra black olives and seasoning. 


Shared on Lady Behind The Curtain May 15, 2013
Shared on The Country Cook May 17, 2013
Pasta at Very Good Recipes
Pin It
The blue one. That says Kraft on it. With the mac and cheese inside of it. And to be honest, I can't say I blame him. Sometimes, I need transported back in time to my childhood and enjoy a classic. No, it's not as good as homemade. No, it's not that great for me. But I can't help myself, sometimes I just gotta have it. 

Most of the time when I satisfy his craving, or indulge myself, it's as a side dish...easy and quick...exactly what I need sometimes. But a few years ago when a friend shared this with me, I was pleasantly surprised that with just a few ingredients I could make that classic into something new, and a filling main dish, perfect for a busy weeknight when I'm rushing around trying to get supper on the table, along with about a hundred other things.

Now, if you prefer a homemade version, and stay away from the pre-packaged version all together, kudos to you! Seriously, you have much more will power than I do. This could easily be made with a creamy "from scratch" version, just be sure your end product results in about a pound of pasta. Then simply add the rest of the ingredients. Either way you make it, your kids are going to love it! Mac n Cheese and Pizza in one delicious dish...they will think you are a genius!!

Every once in awhile it's okay to treat ourselves to one of life's simple pleasure. For our family that means mac and cheese out of a certain blue box. But at least this way I get to "jazz" it up a little and give my little guy two things he loves in one simple dish.

Pizza Style Mac n Cheese
2 (7.5 oz) boxes mac n cheese
1/2 stick butter (NOTE this is a different amount than listed on box)
1/2 cup milk
1 (15 oz.) jar pizza sauce
3/4 c. pepperoni, chopped
1 (6.5 oz) can sliced mushrooms, drained
1 (3.5 oz) can sliced black olives, drained, a few reserved for garnish
2 TBS Italian Seasoning, extra for garnish

Bring a large pot of water to a boil. Cook macaroni until done. Put back on hot pan over low heat. Add milk, butter and cheese packet. Stir until well combined. Add pizza sauce. Stir and cook on low until some liquid evaporates. Add pepperoni, mushrooms, olives and seasoning. Stir well to combine. Cook on low for 10-15 minutes to allow flavors to combine, stirring often. Garnish with extra black olives and seasoning. 


Shared on Lady Behind The Curtain May 15, 2013
Shared on The Country Cook May 17, 2013
Pasta at Very Good Recipes
Pin It
reade more... Résuméabuiyad

My Boys' Favorite

I am never shy about sharing favorites of mine with all of you. Heck, that's why I am here! To bring things I love into your home, and hope maybe you will love them too! But today I'm actually sharing a favorite of my "boys". Something they will both gobble down, rather it's my version or the original.

See, this is also a copycat recipe. I've told you before how our favorite Italian restaurant here in Fort Wayne is the family owned Casa's. (Plus, it is where Adam took me on our very first date, almost 16 years ago!) With a menu containing countless delicious dishes, sometimes it is hard to choose only one...or at least it is for me. I have 3-4 favorites that I usually alternate between each time we visit. But if you were to walk up to our table any given time we are eating, 9 times out of 10 you would find this dish in front of my husband. This wasn't something he always ordered, but once he did, it quickly became his favorite. And when Alex was little and still ordering off the kids' menu, Daddy was always nice enough to share a few bites with him. But now, as Alex has gotten older, and eats even more, he orders his own plate. 

They serve this dish with the option of mushrooms, olives, or both. Well, for my guys there is no question...it is always both! The salty, briny flavor of the olives compliments the deep flavor of the mushrooms and sauce so well, it is a match made in heaven. And while this isn't something I order there (I have too many other faves to add another!) I really love the flavor too.

Copycat recipes are so incredibly fun, not to mention affordable. Now I can make something I know my boys' adore, any night of the week, save a little money and treat them to a special meal without leaving our kitchen!

Cappellini con Pomodoro
1 lb. angel hair pasta, cooked according to package directions and drained
7 oz. jar pitted kalamata olives, drained and lightly chopped
8 oz. button mushrooms, thinly sliced
3 cloves garlic, minced
2 TBS butter
Salt and Pepper to taste

Sauce:
28 oz. can whole peeled tomatoes
1/2 c. olive oil
2 garlic cloves, minced
1/4 tsp. sugar
Salt to taste


Pulse tomatoes with juices in a food processor until pureed but still thick. Heat oil in a medium saucepan over medium heat. Add garlic and cook, stirring often, until beginning to brown, about 2 minutes. Add tomatoes,sugar and season with salt. Bring to a boil, reduce heat, and simmer gently until sauce is slightly thickened, 10-15 minutes. In a separate skillet, heat butter on medium. Add mushrooms and garlic and cook until starts to brown, about 5 minutes. Add olives, salt and pepper. Cook and stir until mushrooms are completely cooked, about 5 minutes more. Add mushroom mixture to sauce. When pasta is cooked, drain well. In a large bowl combine sauce and pasta. Toss to coat well. Garnish with dried parsley if desired.
*NOTE* I use angel hair because I can't find true cappellini. Also, this sauce recipe makes about 3 cups. For an even easier version, use 3 cups of your favorite spaghetti sauce.


Shared on Make Ahead Meals Apr. 29, 2013
Shared on Mandy's Recipe Box Apr. 30, 2013
Shared on Lady Behind The Curtain May 2, 2013
Shared on Miz Helen's Country Cottage May 2, 2013
Shared on The Country Cook May 3, 2013
Pasta at Very Good Recipes
Pin It

I am never shy about sharing favorites of mine with all of you. Heck, that's why I am here! To bring things I love into your home, and hope maybe you will love them too! But today I'm actually sharing a favorite of my "boys". Something they will both gobble down, rather it's my version or the original.

See, this is also a copycat recipe. I've told you before how our favorite Italian restaurant here in Fort Wayne is the family owned Casa's. (Plus, it is where Adam took me on our very first date, almost 16 years ago!) With a menu containing countless delicious dishes, sometimes it is hard to choose only one...or at least it is for me. I have 3-4 favorites that I usually alternate between each time we visit. But if you were to walk up to our table any given time we are eating, 9 times out of 10 you would find this dish in front of my husband. This wasn't something he always ordered, but once he did, it quickly became his favorite. And when Alex was little and still ordering off the kids' menu, Daddy was always nice enough to share a few bites with him. But now, as Alex has gotten older, and eats even more, he orders his own plate. 

They serve this dish with the option of mushrooms, olives, or both. Well, for my guys there is no question...it is always both! The salty, briny flavor of the olives compliments the deep flavor of the mushrooms and sauce so well, it is a match made in heaven. And while this isn't something I order there (I have too many other faves to add another!) I really love the flavor too.

Copycat recipes are so incredibly fun, not to mention affordable. Now I can make something I know my boys' adore, any night of the week, save a little money and treat them to a special meal without leaving our kitchen!

Cappellini con Pomodoro
1 lb. angel hair pasta, cooked according to package directions and drained
7 oz. jar pitted kalamata olives, drained and lightly chopped
8 oz. button mushrooms, thinly sliced
3 cloves garlic, minced
2 TBS butter
Salt and Pepper to taste

Sauce:
28 oz. can whole peeled tomatoes
1/2 c. olive oil
2 garlic cloves, minced
1/4 tsp. sugar
Salt to taste


Pulse tomatoes with juices in a food processor until pureed but still thick. Heat oil in a medium saucepan over medium heat. Add garlic and cook, stirring often, until beginning to brown, about 2 minutes. Add tomatoes,sugar and season with salt. Bring to a boil, reduce heat, and simmer gently until sauce is slightly thickened, 10-15 minutes. In a separate skillet, heat butter on medium. Add mushrooms and garlic and cook until starts to brown, about 5 minutes. Add olives, salt and pepper. Cook and stir until mushrooms are completely cooked, about 5 minutes more. Add mushroom mixture to sauce. When pasta is cooked, drain well. In a large bowl combine sauce and pasta. Toss to coat well. Garnish with dried parsley if desired.
*NOTE* I use angel hair because I can't find true cappellini. Also, this sauce recipe makes about 3 cups. For an even easier version, use 3 cups of your favorite spaghetti sauce.


Shared on Make Ahead Meals Apr. 29, 2013
Shared on Mandy's Recipe Box Apr. 30, 2013
Shared on Lady Behind The Curtain May 2, 2013
Shared on Miz Helen's Country Cottage May 2, 2013
Shared on The Country Cook May 3, 2013
Pasta at Very Good Recipes
Pin It

reade more... Résuméabuiyad

Loving My Crock Pot Even More

As I am typing this, I have now been without an oven for almost two weeks! (Now remember, I blog ahead, so hopefully by the time this actually posts, that problem will be a thing of the past. But knowing repair shops, and the time it takes to order parts, and time to install it, etc, I'm not going to hold my breath!)

So you can imagine my frustration when I decided to create a recipe based on Stuffed Peppers, but pizza inspired, and then realized I would have to figure out how to slow cook them instead of bake, because let's face it...those aren't fitting in the toaster oven!

Luckily I was able to take my ideas, add a few from another recipe I found, and use their cooking instructions to develop them for the Crock Pot.

If your family loves stuffed peppers like mine, they will flip for these! Think all the flavors of a supreme pizza stuffed inside a pepper for easy access! Not to mention, it's a fantastic recipe to adapt for the number of people in your family. And if your kids normally turn their noses up at stuffed peppers...then maybe, just maybe these will pass inspection a little easier since you can tell them they taste like pizza, just without the crust; and let's face it, a lot of little ones don't eat the crust any way, so they won't even miss it!

I am always a huge fan of my Crock Pot, but without a working oven, it's quickly becoming an even better friend to me. If it weren't for it...I might just be ordering take out every night. Mmmm....maybe the Crock Pot should hide for a bit...that sounds a bit like a cooking vacation! Just kidding...

 Crock Pot Pizza Stuffed Peppers Adapted from Betty Crocker
4 large green bell peppers
1/2 c. orzo pasta, cooked to package directions an drained
5 large white button mushrooms, diced
1 lb. Italian sausage
2 tsp. Italian seasoning
1 (15 oz.) can pizza sauce
1 1/2 c. mozzarella cheese
1/2 c. water
Salt and Pepper to taste

In a large skillet, brown sausage until no longer pink. When sausage is almost done, add mushrooms and brown. Drain if necessary. Add in pizza sauce, orzo, seasoning and 1 c. cheese. Stir until mixed well. Cut tops off peppers and set aside. Remove seeds and ribs from peppers and rinse. (If they won't stand up on their own, slice a tiny bit off bottom to make flat.) Fill peppers with filling and replace tops. Spray Crock Pot with cooking spray. Add water. Place peppers in, standing up. Cook on LOW 4-5 hours. In the last 10 minutes, remove tops, and sprinkle with remaining cheese. Cook until cheese is melted. To remove, carefully use a slotted spoon and tongs, but do not squeeze.


Shared on Lady Behind The Curtain Apr. 24, 2013
Shared on Miz Helen's Country Cottage Apr. 25, 2013
Shared on The Country Cook Apr. 26, 2013

Peppers at Very Good Recipes
Pin It
As I am typing this, I have now been without an oven for almost two weeks! (Now remember, I blog ahead, so hopefully by the time this actually posts, that problem will be a thing of the past. But knowing repair shops, and the time it takes to order parts, and time to install it, etc, I'm not going to hold my breath!)

So you can imagine my frustration when I decided to create a recipe based on Stuffed Peppers, but pizza inspired, and then realized I would have to figure out how to slow cook them instead of bake, because let's face it...those aren't fitting in the toaster oven!

Luckily I was able to take my ideas, add a few from another recipe I found, and use their cooking instructions to develop them for the Crock Pot.

If your family loves stuffed peppers like mine, they will flip for these! Think all the flavors of a supreme pizza stuffed inside a pepper for easy access! Not to mention, it's a fantastic recipe to adapt for the number of people in your family. And if your kids normally turn their noses up at stuffed peppers...then maybe, just maybe these will pass inspection a little easier since you can tell them they taste like pizza, just without the crust; and let's face it, a lot of little ones don't eat the crust any way, so they won't even miss it!

I am always a huge fan of my Crock Pot, but without a working oven, it's quickly becoming an even better friend to me. If it weren't for it...I might just be ordering take out every night. Mmmm....maybe the Crock Pot should hide for a bit...that sounds a bit like a cooking vacation! Just kidding...

 Crock Pot Pizza Stuffed Peppers Adapted from Betty Crocker
4 large green bell peppers
1/2 c. orzo pasta, cooked to package directions an drained
5 large white button mushrooms, diced
1 lb. Italian sausage
2 tsp. Italian seasoning
1 (15 oz.) can pizza sauce
1 1/2 c. mozzarella cheese
1/2 c. water
Salt and Pepper to taste

In a large skillet, brown sausage until no longer pink. When sausage is almost done, add mushrooms and brown. Drain if necessary. Add in pizza sauce, orzo, seasoning and 1 c. cheese. Stir until mixed well. Cut tops off peppers and set aside. Remove seeds and ribs from peppers and rinse. (If they won't stand up on their own, slice a tiny bit off bottom to make flat.) Fill peppers with filling and replace tops. Spray Crock Pot with cooking spray. Add water. Place peppers in, standing up. Cook on LOW 4-5 hours. In the last 10 minutes, remove tops, and sprinkle with remaining cheese. Cook until cheese is melted. To remove, carefully use a slotted spoon and tongs, but do not squeeze.


Shared on Lady Behind The Curtain Apr. 24, 2013
Shared on Miz Helen's Country Cottage Apr. 25, 2013
Shared on The Country Cook Apr. 26, 2013

Peppers at Very Good Recipes
Pin It
reade more... Résuméabuiyad

Wrong Can, Yummy Dish

Normally I am that grocery shopper that is meticulous to a fault. I have my list, I know exactly where things are, how much they should cost, want my items bagged a certain way...yeah, I'm that girl. But sometimes, even I am in a rush, tired, or distracted and I find myself mindlessly wandering the aisles, grabbing things from the shelves, only to come home and discover I missed something on that list, or I ended up with the wrong thing in my cart. The latter is how this recipe came to be.

A couple weeks ago we had a million things to do in a very short time span and I was on a "speed mission" at the grocery store. I swear we were in and out in less than an hour, which for our family is unheard of! But then when we got back home, as I reached into the "canned items bag" (I might have been in a hurry, but I still had time to dictate the bagging process!) I came across something that was not on my list, and at first I couldn't even figure out how I was near it. Condensed French Onion Soup. Um, okay. I have no reason to own this. The only thing I was able to deduce was I had bought Alex a couple cans of chicken noodle soup, and I literally must have grabbed one too many. Why this was in the same box as chicken noodle, I'm not sure. But unless I'm going to accept the fact it jumped into the cart on it's own, I'm sticking with that.

So into the cupboard it went and I forgot about it. Then one night I was looking for something else and came across it. Great. What am I going to do with this? I know what you're saying. "Heat it up and eat it. It's soup." Well, that's a great idea except French Onion is one of my favorite soups; and I'm very picky when it comes to the flavor, so the condensed version just doesn't cut it. So instead I went looking for something to use it in and that's when I came across this. A very easy side dish for any night of the week, it's flavorful and just unique enough to be something a little different.

If you find yourself with mysterious items in your grocery bags, be sure to make the best of it. Or there is always your local food pantry!

Mushroom Rice From AllRecipes
1 c. uncooked long grain rice
1 (10 3/4 oz) can condensed French onion soup
1 (14 oz) can beef broth
1/4 c. butter
1 (4 oz) can sliced mushrooms, drained

Combine all ingredients in medium sauce pan. Bring to a boil. Reduce heat and simmer 20-25 minutes stirring often until rice tender and cooked through.


Shared on Make Ahead Meals Feb. 25, 2013
Shared on Mandy's Recipe Box Feb. 26, 2013
Shared on Lady Behind The Curtain Feb. 27, 2013
Shared on Miz Helen's Country Cottage Feb. 28, 2013

Miz Helen’s Country Cottage
Rice at Very Good Recipes
Pin It
Normally I am that grocery shopper that is meticulous to a fault. I have my list, I know exactly where things are, how much they should cost, want my items bagged a certain way...yeah, I'm that girl. But sometimes, even I am in a rush, tired, or distracted and I find myself mindlessly wandering the aisles, grabbing things from the shelves, only to come home and discover I missed something on that list, or I ended up with the wrong thing in my cart. The latter is how this recipe came to be.

A couple weeks ago we had a million things to do in a very short time span and I was on a "speed mission" at the grocery store. I swear we were in and out in less than an hour, which for our family is unheard of! But then when we got back home, as I reached into the "canned items bag" (I might have been in a hurry, but I still had time to dictate the bagging process!) I came across something that was not on my list, and at first I couldn't even figure out how I was near it. Condensed French Onion Soup. Um, okay. I have no reason to own this. The only thing I was able to deduce was I had bought Alex a couple cans of chicken noodle soup, and I literally must have grabbed one too many. Why this was in the same box as chicken noodle, I'm not sure. But unless I'm going to accept the fact it jumped into the cart on it's own, I'm sticking with that.

So into the cupboard it went and I forgot about it. Then one night I was looking for something else and came across it. Great. What am I going to do with this? I know what you're saying. "Heat it up and eat it. It's soup." Well, that's a great idea except French Onion is one of my favorite soups; and I'm very picky when it comes to the flavor, so the condensed version just doesn't cut it. So instead I went looking for something to use it in and that's when I came across this. A very easy side dish for any night of the week, it's flavorful and just unique enough to be something a little different.

If you find yourself with mysterious items in your grocery bags, be sure to make the best of it. Or there is always your local food pantry!

Mushroom Rice From AllRecipes
1 c. uncooked long grain rice
1 (10 3/4 oz) can condensed French onion soup
1 (14 oz) can beef broth
1/4 c. butter
1 (4 oz) can sliced mushrooms, drained

Combine all ingredients in medium sauce pan. Bring to a boil. Reduce heat and simmer 20-25 minutes stirring often until rice tender and cooked through.


Shared on Make Ahead Meals Feb. 25, 2013
Shared on Mandy's Recipe Box Feb. 26, 2013
Shared on Lady Behind The Curtain Feb. 27, 2013
Shared on Miz Helen's Country Cottage Feb. 28, 2013

Miz Helen’s Country Cottage
Rice at Very Good Recipes
Pin It
reade more... Résuméabuiyad

Weekend Company {Guest Blogger Angie}

Woo hoo! It's Saturday again! I hope the week treated you well, and you have a fun, or maybe just a relaxing weekend in store. Maybe some Valentine's Day shopping or planning??

I'm happy to have a "repeat offender" with us today. She always has something family friendly and yummy to share with us. So grab a cup of coffee and join Angie in the EMM kitchen~


Good Morning EMM!!! I am so thankful to be back featuring one of my most recent favorite meals.   This is Angie Cupp from Northern Indiana where it is cold one day and warm the next.  I am a busy wife, mom & teachers aide during the week.  I love trying new recipes and making yummy treats for my little family of 5.

You always have to be on your toes to find that perfect recipe for a cold day.  One of those "stick to you ribs" meal.  Of course it always helps if the hubby and children love it as well. When I ask for suggestions for a our menu for the week, this is one of those meals that is always asked for. 

I have a huge passion for cooking great tasting meals and baking many treats for my family.  I also have a love for Pinterest!  ha ha!!! I love looking for new ideas for our dinner table!  I have a few boys in my home that prefer meat and potatoes so why not try "Cowboy Casserole" that I found on Pinterest.  Although, I have changed a few things to my own liking.  Your family will absolutely love this great tasting comfort casserole.

Cowboy Casserole
1 1/2 lbs of Ground Chuck (I used 90/10)
2-3 tsp Onion powder
3 TBS Minced Garlic
1 can whole kernel corn 
1 can condensed Golden Mushroom Soup
2 cups of shredded Cheddar Cheese
1/2 cup 2 % milk
4 TBS Sour Cream
1 Bag Ore-Ida Crispy Crowns
First I thaw the Crispy Crowns for 1-2 hours prior to starting casserole.
In large skillet cook ground chuck until no longer pink. While that is cooking I add the minced garlic and onion powder for flavor.  Drain grease if any. 
In a small bowl combine soup, milk, & sour cream until smooth. Then add corn & 1 cup of shredded cheese.  Mix together.    Add this mixture to the skillet.  Stir together until cheese is melted. 
Grease a 9 x 13 baking dish.  Place half of the Crispy Crowns in bottom on dish. Pour the skillet mixture over the Crispy Crowns.  Place the other half of the Crispy Crowns on top of that.  Sprinkle with remaining 1 cup of shredded cheddar cheese.   Bake uncovered at 350 degrees for 25-30 minutes. 


Pin It
Woo hoo! It's Saturday again! I hope the week treated you well, and you have a fun, or maybe just a relaxing weekend in store. Maybe some Valentine's Day shopping or planning??

I'm happy to have a "repeat offender" with us today. She always has something family friendly and yummy to share with us. So grab a cup of coffee and join Angie in the EMM kitchen~


Good Morning EMM!!! I am so thankful to be back featuring one of my most recent favorite meals.   This is Angie Cupp from Northern Indiana where it is cold one day and warm the next.  I am a busy wife, mom & teachers aide during the week.  I love trying new recipes and making yummy treats for my little family of 5.

You always have to be on your toes to find that perfect recipe for a cold day.  One of those "stick to you ribs" meal.  Of course it always helps if the hubby and children love it as well. When I ask for suggestions for a our menu for the week, this is one of those meals that is always asked for. 

I have a huge passion for cooking great tasting meals and baking many treats for my family.  I also have a love for Pinterest!  ha ha!!! I love looking for new ideas for our dinner table!  I have a few boys in my home that prefer meat and potatoes so why not try "Cowboy Casserole" that I found on Pinterest.  Although, I have changed a few things to my own liking.  Your family will absolutely love this great tasting comfort casserole.

Cowboy Casserole
1 1/2 lbs of Ground Chuck (I used 90/10)
2-3 tsp Onion powder
3 TBS Minced Garlic
1 can whole kernel corn 
1 can condensed Golden Mushroom Soup
2 cups of shredded Cheddar Cheese
1/2 cup 2 % milk
4 TBS Sour Cream
1 Bag Ore-Ida Crispy Crowns
First I thaw the Crispy Crowns for 1-2 hours prior to starting casserole.
In large skillet cook ground chuck until no longer pink. While that is cooking I add the minced garlic and onion powder for flavor.  Drain grease if any. 
In a small bowl combine soup, milk, & sour cream until smooth. Then add corn & 1 cup of shredded cheese.  Mix together.    Add this mixture to the skillet.  Stir together until cheese is melted. 
Grease a 9 x 13 baking dish.  Place half of the Crispy Crowns in bottom on dish. Pour the skillet mixture over the Crispy Crowns.  Place the other half of the Crispy Crowns on top of that.  Sprinkle with remaining 1 cup of shredded cheddar cheese.   Bake uncovered at 350 degrees for 25-30 minutes. 


Pin It
reade more... Résuméabuiyad

A Weekly Thing

In our house during these cold, dark, depressing winter days (Can you tell the post holiday blues have set in??) one of the only bright spots is knowing we are sitting down to a warm bowl of soup for supper. And or the cook of the family...me...that bright spot shines just a little brighter when I know said soup is coming from the Crock Pot, which has done my job all day while I did my other jobs! And I just feel like when a soup comes out of the slow cooker, the flavor is deeper and it truly has that "cooked all day" flavor without me actually having done so. And so, soups are basically a weekly occurrence at our dinner table during the winter.

This is another recipe from that collection I told you about last week. The set came with many soups, but this was the first I had to try. I had a version of this soup many years ago made by a friend of the family, and it was probably one of my favorite soups of all time. I distinctly remember there only being a small amount of that soup to go around (She was actually sharing leftovers with us) and my dad and I literally fighting over it!

And for those of you who read my plight to find barley on Facebook (it really was quite funny) here is the reason why! For those of you who didn't see that story, I was at 2 different stores on 2 different days before I was able to find the pearl barley for this recipe. So, let me help you a little. Look next to the dried beans and/or rice. If not there, try the baking aisle. (Both of these places were ones I had checked because I had found it there before) And if both of those places fail, try the soup aisle. Now, if you are like I was and after searching the shelves in all of these locations and you are pulling your hair out because you still can't find it, try the international foods aisle. Because this is where I finally found mine! In the "British" section! Which, by the way, I didn't even know existed until this day! Whew...I'm glad I bought the 1 lb. bag because the next time I need it, I only have to search my pantry!

If  you too are a soup lover just trying to survive these winter days, put your Crock Pot to work making this delicious, and easy (after you find the barley) selection!

Mushroom and Barley Soup Adapted from Crock Pot
9 c. beef broth
1 lb. mushrooms, sliced
2 carrots, finely diced
1 large onion, finely diced
2 celery stalks, finely diced
3 garlic cloves, minced
1/2 c. pearl barley, uncooked
1/2 tsp. dried thyme
Salt and Pepper to taste

Combine all ingredients in slow cooker. Cook on LOW for 4-6 hours.


Shared on Lady Behind The Curtain Jan. 16, 2013
Shared on Miz Helen's Country Cottage Jan. 17, 2013
Shared on The Country Cook Jan. 18, 2013
Soup at Very Good Recipes
Pin It
In our house during these cold, dark, depressing winter days (Can you tell the post holiday blues have set in??) one of the only bright spots is knowing we are sitting down to a warm bowl of soup for supper. And or the cook of the family...me...that bright spot shines just a little brighter when I know said soup is coming from the Crock Pot, which has done my job all day while I did my other jobs! And I just feel like when a soup comes out of the slow cooker, the flavor is deeper and it truly has that "cooked all day" flavor without me actually having done so. And so, soups are basically a weekly occurrence at our dinner table during the winter.

This is another recipe from that collection I told you about last week. The set came with many soups, but this was the first I had to try. I had a version of this soup many years ago made by a friend of the family, and it was probably one of my favorite soups of all time. I distinctly remember there only being a small amount of that soup to go around (She was actually sharing leftovers with us) and my dad and I literally fighting over it!

And for those of you who read my plight to find barley on Facebook (it really was quite funny) here is the reason why! For those of you who didn't see that story, I was at 2 different stores on 2 different days before I was able to find the pearl barley for this recipe. So, let me help you a little. Look next to the dried beans and/or rice. If not there, try the baking aisle. (Both of these places were ones I had checked because I had found it there before) And if both of those places fail, try the soup aisle. Now, if you are like I was and after searching the shelves in all of these locations and you are pulling your hair out because you still can't find it, try the international foods aisle. Because this is where I finally found mine! In the "British" section! Which, by the way, I didn't even know existed until this day! Whew...I'm glad I bought the 1 lb. bag because the next time I need it, I only have to search my pantry!

If  you too are a soup lover just trying to survive these winter days, put your Crock Pot to work making this delicious, and easy (after you find the barley) selection!

Mushroom and Barley Soup Adapted from Crock Pot
9 c. beef broth
1 lb. mushrooms, sliced
2 carrots, finely diced
1 large onion, finely diced
2 celery stalks, finely diced
3 garlic cloves, minced
1/2 c. pearl barley, uncooked
1/2 tsp. dried thyme
Salt and Pepper to taste

Combine all ingredients in slow cooker. Cook on LOW for 4-6 hours.


Shared on Lady Behind The Curtain Jan. 16, 2013
Shared on Miz Helen's Country Cottage Jan. 17, 2013
Shared on The Country Cook Jan. 18, 2013
Soup at Very Good Recipes
Pin It
reade more... Résuméabuiyad
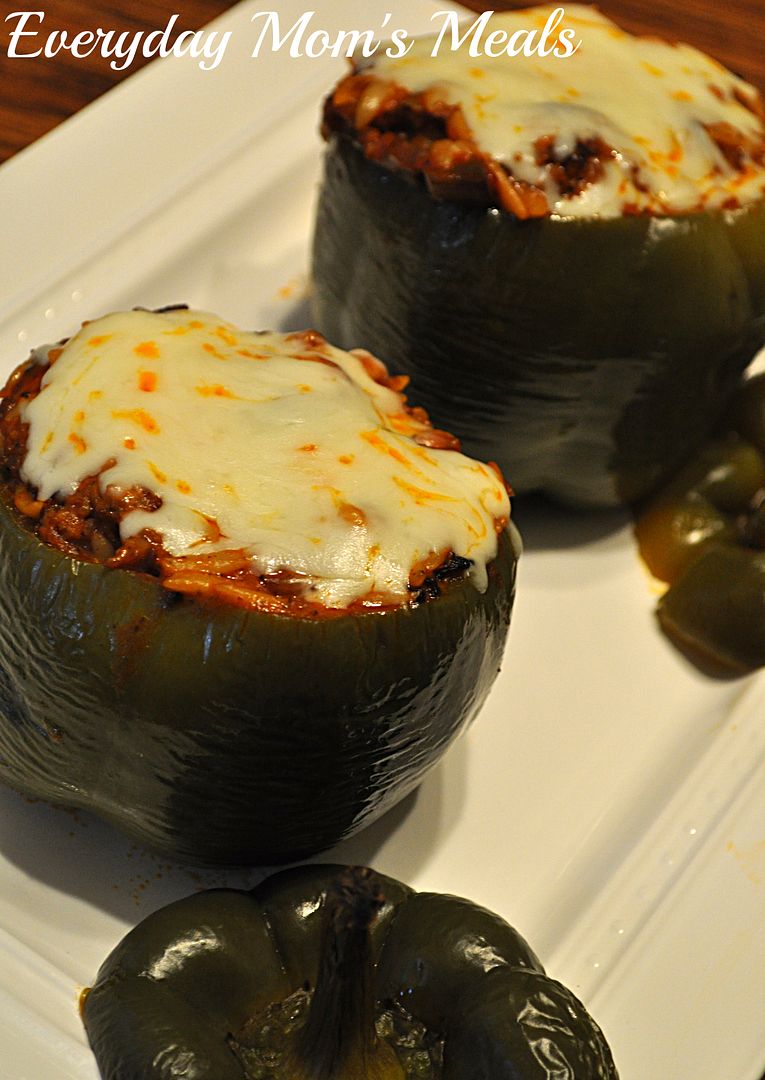
Post Holiday Leftovers

While I do not, I know many of you have containers of leftovers sitting in your freezer right now; all things you enjoyed during the holidays but just couldn't finish at the time. I think leftovers can be a great thing. Reheat them "as is" for a quick meal, or have fun turning them into something else. So even though I had to purchase the ham I used in this delicious dish, I know many of you are going to be excited to use some of that extra holiday ham you have on hand!

This is comfort food at it's best! Let's face it, if you are making a recipe that includes the words "serve over egg noodles" most of the time it's going to be a hit! There is just something so familiar, yet versatile about them. Your family is going to love this, and when they find out you made the cheese sauce from scratch, you will be a hero! Yes, it takes a little longer, but it's very simple if you go step by step. I promise. If I can do it, you can!

If you are looking for simple suppers during these chilly winter nights, but also want your loved ones to feel satisfied, this is perfect! Plus, if you have some ham hanging out in your freezer as we speak, now you have something to use it for!


Ham and Swiss On Egg Noodles Adapted from Family Living Classics
1 lb. egg noodles
2 c. cooked ham, diced
10 oz. frozen peas, thawed and drained
1 (4 oz) can sliced mushrooms, drained
3 green onions, chopped
8 TBS butter, divided
1/4 c. four
3 c. milk
8 oz. shredded Swiss cheese
1 TBS dried parsley
Salt and Pepper to taste


Cook egg noodles according to package directions.In a large saucepan cook green onions in 2 TBS butter for 3 minutes. Add mushrooms and peas. Cook until heated through, about 5 minutes. Remove from pan and set aside. Melt 6 TBS in saucepan. Add flour, whisking until smooth. Cook for 1 minute, stirring constantly. Gradually add the milk, and cook over medium heat, stirring constantly, until mixture is thickened and bubbly. Add cheese, in small batches and stir in a figure 8 motion until cheese is completely melted and sauce is smooth. Season with salt and pepper. Add vegetable and ham. Mix well. Cook until heated through, about 10 minutes on low. When noodles are done, drain and return to hot pot. Add 2 TBS butter and parsley. Stir well until noodles are coated. Serve ham mixture over egg noodles.

~Join me for Tasty Tuesday on Formula Mom~

Shared on Mandy's Recipe Box Jan. 15, 2013
Shared on Lady Behind The Curtain Jan. 16, 2013
Shared on Miz Helen's Country Cottage Jan. 17, 2013
Shared on The Country Cook Jan. 18, 2013
Ham at Very Good Recipes
Pin It
While I do not, I know many of you have containers of leftovers sitting in your freezer right now; all things you enjoyed during the holidays but just couldn't finish at the time. I think leftovers can be a great thing. Reheat them "as is" for a quick meal, or have fun turning them into something else. So even though I had to purchase the ham I used in this delicious dish, I know many of you are going to be excited to use some of that extra holiday ham you have on hand!

This is comfort food at it's best! Let's face it, if you are making a recipe that includes the words "serve over egg noodles" most of the time it's going to be a hit! There is just something so familiar, yet versatile about them. Your family is going to love this, and when they find out you made the cheese sauce from scratch, you will be a hero! Yes, it takes a little longer, but it's very simple if you go step by step. I promise. If I can do it, you can!

If you are looking for simple suppers during these chilly winter nights, but also want your loved ones to feel satisfied, this is perfect! Plus, if you have some ham hanging out in your freezer as we speak, now you have something to use it for!


Ham and Swiss On Egg Noodles Adapted from Family Living Classics
1 lb. egg noodles
2 c. cooked ham, diced
10 oz. frozen peas, thawed and drained
1 (4 oz) can sliced mushrooms, drained
3 green onions, chopped
8 TBS butter, divided
1/4 c. four
3 c. milk
8 oz. shredded Swiss cheese
1 TBS dried parsley
Salt and Pepper to taste


Cook egg noodles according to package directions.In a large saucepan cook green onions in 2 TBS butter for 3 minutes. Add mushrooms and peas. Cook until heated through, about 5 minutes. Remove from pan and set aside. Melt 6 TBS in saucepan. Add flour, whisking until smooth. Cook for 1 minute, stirring constantly. Gradually add the milk, and cook over medium heat, stirring constantly, until mixture is thickened and bubbly. Add cheese, in small batches and stir in a figure 8 motion until cheese is completely melted and sauce is smooth. Season with salt and pepper. Add vegetable and ham. Mix well. Cook until heated through, about 10 minutes on low. When noodles are done, drain and return to hot pot. Add 2 TBS butter and parsley. Stir well until noodles are coated. Serve ham mixture over egg noodles.

~Join me for Tasty Tuesday on Formula Mom~

Shared on Mandy's Recipe Box Jan. 15, 2013
Shared on Lady Behind The Curtain Jan. 16, 2013
Shared on Miz Helen's Country Cottage Jan. 17, 2013
Shared on The Country Cook Jan. 18, 2013
Ham at Very Good Recipes
Pin It
reade more... Résuméabuiyad

Weekend Company {Guest Blogger Jean}


Good morning and welcome to another weekend! This week, I'm happy to have a brand new guest in my kitchen. I love that so many EMM Fans are getting in on the blogging fun! So if you are reading this, thinking you can't do it...YOU can! If you are interested, just email me at everydaymomsmeals@gmail.com and I can send you more details.

So grab a seat, pour yourself a cup of coffee (or even a bloody Mary) and welcome Jean to EMM~

Hello, my name is Jean Hurley.  I have never blogged before but enjoy cooking for family and friends.  Thanks Krista for giving me this opportunity.
I am a nurse by profession, also a wife, mother, and now a grandmother. I am from Massachusetts, but am currently living in Georgia.
This is a recipe that I used to make for my kids when they were young. It’s quick and easy. I usually served it with either French fries or a salad and they loved it.  It is also great for parties and even school lunches.  Feel free to play with the ingredients and change them to what your family loves.  I hope you enjoy it!

Meat Pie Sliders
Ingredients:
1 green pepper, diced
1 onion, diced
1 small pkg fresh mushrooms, diced
1 teaspoon minced garlic
1 lb ground beef
1 (15 oz) can of tomato sauce
½ (14.5 oz) can of diced tomatoes
1 cup shredded mozzarella
2-3 cans pop n’ fresh biscuits, I use Pillsbury Simply Biscuits
Salt and pepper
Garlic salt
Olive oil

    Preheat oven to 375.  In a large frying pan, sauté peppers, onions, mushrooms, and garlic in a Tablespoon of olive oil until tender.  Add ground beef and cook until crumbly and brown.  Add tomato sauce and diced tomatoes, salt and pepper, stirring until mixed. Remove from heat and stir in the mozzarella.
    Lightly grease a baking sheet.  Take one biscuit and flatten it out with your fingers, keeping the round shape. Place it onto the baking sheet.  Place a spoonful of filling mixture onto the biscuit, then take another biscuit, flatten it out and cover the first one, making sure to pinch the edges tightly.  Poke a hole in the top with a sharp knife. Lightly brush the top with olive oil and sprinkle with garlic salt.  Repeat with all the biscuits.
    Bake for 18-22 minutes at 375, until golden brown.  Serve with salad or French fries.
You can change the ingredients to suit your family,sometimes I add pepperoni and black olives.  You can also make them as big or small as you choose, dividing the biscuits in two for smaller appetizers or using Grands for teens.  I have also made this with pizza dough and cut into squares for a large crowd.


Pin It


Good morning and welcome to another weekend! This week, I'm happy to have a brand new guest in my kitchen. I love that so many EMM Fans are getting in on the blogging fun! So if you are reading this, thinking you can't do it...YOU can! If you are interested, just email me at everydaymomsmeals@gmail.com and I can send you more details.

So grab a seat, pour yourself a cup of coffee (or even a bloody Mary) and welcome Jean to EMM~

Hello, my name is Jean Hurley.  I have never blogged before but enjoy cooking for family and friends.  Thanks Krista for giving me this opportunity.
I am a nurse by profession, also a wife, mother, and now a grandmother. I am from Massachusetts, but am currently living in Georgia.
This is a recipe that I used to make for my kids when they were young. It’s quick and easy. I usually served it with either French fries or a salad and they loved it.  It is also great for parties and even school lunches.  Feel free to play with the ingredients and change them to what your family loves.  I hope you enjoy it!

Meat Pie Sliders
Ingredients:
1 green pepper, diced
1 onion, diced
1 small pkg fresh mushrooms, diced
1 teaspoon minced garlic
1 lb ground beef
1 (15 oz) can of tomato sauce
½ (14.5 oz) can of diced tomatoes
1 cup shredded mozzarella
2-3 cans pop n’ fresh biscuits, I use Pillsbury Simply Biscuits
Salt and pepper
Garlic salt
Olive oil

    Preheat oven to 375.  In a large frying pan, sauté peppers, onions, mushrooms, and garlic in a Tablespoon of olive oil until tender.  Add ground beef and cook until crumbly and brown.  Add tomato sauce and diced tomatoes, salt and pepper, stirring until mixed. Remove from heat and stir in the mozzarella.
    Lightly grease a baking sheet.  Take one biscuit and flatten it out with your fingers, keeping the round shape. Place it onto the baking sheet.  Place a spoonful of filling mixture onto the biscuit, then take another biscuit, flatten it out and cover the first one, making sure to pinch the edges tightly.  Poke a hole in the top with a sharp knife. Lightly brush the top with olive oil and sprinkle with garlic salt.  Repeat with all the biscuits.
    Bake for 18-22 minutes at 375, until golden brown.  Serve with salad or French fries.
You can change the ingredients to suit your family,sometimes I add pepperoni and black olives.  You can also make them as big or small as you choose, dividing the biscuits in two for smaller appetizers or using Grands for teens.  I have also made this with pizza dough and cut into squares for a large crowd.


Pin It
reade more... Résuméabuiyad

Chicken? Again? Yes!

As far as I'm concerned nobody can have enough chicken recipes. From the restaurant chef to the home cook, we all turn to the most versatile protein whenever we are stumped as to what to make for dinner. But I think most of us consider it a "go to" when we want to experiment, or try something new. It takes on flavor so well, and can be cooked a hundred different ways, it's a great spring board for creating new dishes. I think a lot of moms think "If it's chicken I know they will eat it." So they are more open to playing around with it.  This recipe was inspired by one I found at Taste of Home, one of my favorite sources for new yummy dishes! Nine times out of ten, I know if the recipe comes from them, even if I adapt it a little, change a few things, and stray from the original a bit, it will be successful and something my family will enjoy. Plus, this includes mushrooms, which only enhances the likability factor for us! This would make a great dish to fix with all the family that might be descending on your home over the next week! You could easily double the recipe, make two pans, and have them cooking at the same time. And if you are in need of a simple new side to serve along with it, be sure to come back tomorrow because I have the perfect one! In fact, I can guarantee each time I make this, the other will be on the plate next to it every single time!

Baked Mushroom Chicken Adapted from Taste of Home
1 package (8-9 pieces) chicken tenders
1/4 c. flour
8 oz. mushrooms, sliced
3 TBS butter, divided
3 green onions, chopped
1 tsp. garlic powder
1/2 c. chicken broth
1/2 c. shredded Parmesan cheese
Salt and Pepper to taste

Preheat oven to 375. In a large plastic storage bag, place flour and season with salt and pepper. Place chicken in bag, a few pieces at a time and shake until coated. In a large skillet, melt 2 TBS butter. Brown chicken on both sides. Remove and place in a greased 11x15 baking dish. In the same skillet, add 1 TBS butter, mushrooms and garlic powder. Cook until mushrooms are brown, about 7 minutes. Season with salt and pepper. Add chicken broth. Bring to a boil. Reduce heat and let simmer until about 1/2 c. liquid remains. Spoon over chicken. Baked uncovered for 25-30 minutes until chicken is cooked through. Sprinkle with cheese and onions. Bake for an additional 5 minutes until cheese is melted.


Shared on Lady Behind The Curtain Dec. 19, 2012
Shared on Miz Helen's Country Cottage Dec. 20, 2012
Shared on The Country Cook Dec. 21, 2012

Chicken at Very Good Recipes
Pin It
As far as I'm concerned nobody can have enough chicken recipes. From the restaurant chef to the home cook, we all turn to the most versatile protein whenever we are stumped as to what to make for dinner. But I think most of us consider it a "go to" when we want to experiment, or try something new. It takes on flavor so well, and can be cooked a hundred different ways, it's a great spring board for creating new dishes. I think a lot of moms think "If it's chicken I know they will eat it." So they are more open to playing around with it.  This recipe was inspired by one I found at Taste of Home, one of my favorite sources for new yummy dishes! Nine times out of ten, I know if the recipe comes from them, even if I adapt it a little, change a few things, and stray from the original a bit, it will be successful and something my family will enjoy. Plus, this includes mushrooms, which only enhances the likability factor for us! This would make a great dish to fix with all the family that might be descending on your home over the next week! You could easily double the recipe, make two pans, and have them cooking at the same time. And if you are in need of a simple new side to serve along with it, be sure to come back tomorrow because I have the perfect one! In fact, I can guarantee each time I make this, the other will be on the plate next to it every single time!

Baked Mushroom Chicken Adapted from Taste of Home
1 package (8-9 pieces) chicken tenders
1/4 c. flour
8 oz. mushrooms, sliced
3 TBS butter, divided
3 green onions, chopped
1 tsp. garlic powder
1/2 c. chicken broth
1/2 c. shredded Parmesan cheese
Salt and Pepper to taste

Preheat oven to 375. In a large plastic storage bag, place flour and season with salt and pepper. Place chicken in bag, a few pieces at a time and shake until coated. In a large skillet, melt 2 TBS butter. Brown chicken on both sides. Remove and place in a greased 11x15 baking dish. In the same skillet, add 1 TBS butter, mushrooms and garlic powder. Cook until mushrooms are brown, about 7 minutes. Season with salt and pepper. Add chicken broth. Bring to a boil. Reduce heat and let simmer until about 1/2 c. liquid remains. Spoon over chicken. Baked uncovered for 25-30 minutes until chicken is cooked through. Sprinkle with cheese and onions. Bake for an additional 5 minutes until cheese is melted.


Shared on Lady Behind The Curtain Dec. 19, 2012
Shared on Miz Helen's Country Cottage Dec. 20, 2012
Shared on The Country Cook Dec. 21, 2012

Chicken at Very Good Recipes
Pin It
reade more... Résuméabuiyad

No More Turkey

So I guess the question on my mind today is "Are you tired of turkey yet?" Have you had your fill until next Thanksgiving? Or are you simply taking a break for 3 weeks before another roasted bird is the star of your Christmas table? Well, if you are in the first group, I have a real treat for you today. It's Italian, it's pasta, it's a casserole...those are far from a turkey sandwich! And to be honest, after a long holiday weekend, not only does nobody want to go back to work, but who wants to come home and cook something complicated? It's also very versatile because you can make it like I did, or you can split it to make an extra one. (See note below) Sometimes when parents ask me for tips to get their kids to eat certain things I just have to respond with "hide it". I even heard a chef say the other day that her nieces and nephews don't eat veggies...at all. So when auntie makes mashed potatoes...guess what! Yep, there is mashed cauliflower in them too! Ha! That's sneaky. Now luckily as you know, Monkey is not a picky eater at all. But for some reason he got it into his head forever ago he doesn't like sour cream. Which is fine, he doesn't have to eat it, but if it's in a recipe he's going to because I'm not a short order cook and won't make something different. So I've learned if it's "hidden", even in plain sight, he's fine with it. Basically as long as it's in a dish that doesn't taste like sour cream, I'm good. See, little does he know, but there are a ton of things he has eaten without even noticing because I hide it well. (Let's face it, if it has cheese, most kids are going to eat it without any questions.) This casserole will feed an army, which is good because if any of your neighbors catch a whiff of it, they will be right over! My son declared it "super yummy" and I hope your family thinks so too!

Spaghetti Casserole Adapted from Taste of Home
1 lb. spaghetti, cooked according to package directions
1 lb. ground beef
1 (15 oz) can tomato sauce
1 (26 oz) jar spaghetti sauce
2 tsp Italian Seasoning
2 c. Monterey Jack cheese, finely shredded
1 c. sour cream
1 (10 3/4 oz) can cream of mushroom soup
1 tsp dried parsley
Salt and Pepper to taste

Preheat oven to 375. While pasta is cooking, brown beef, seasoned with salt and pepper in a large skillet over medium heat. Drain if necessary. Add tomato sauce and spaghetti sauce. Stir well. Adjust salt and pepper. Remove from heat and set aside. In a small bowl combine sour cream, soup and Italian seasoning. Stir well. When pasta is cooked, drain well. Grease a 9x13 pan. Add half the meat sauce. Top with half the pasta. Spread with half the sour cream mixture. Sprinkle with 1 c. cheese. Repeat layers ending with cheese. Cover  with aluminum foil and bake for 45-55 minutes until cheese is melted. Remove foil, and sprinkle with parsley. Let sit for 5 minutes before serving.
*NOTE* You can also split this between two 8x8 pans, and freeze one for later. When ready to bake, allow to thaw for about an hour and then bake as directed.


Shared on Make Ahead Meals Nov. 26, 2012
Shared on Mandy's Recipe Box Nov. 27, 2012
Shared on Lady Behind The Curtain Nov. 28, 2012
Shared on Miz Helen's Country Cottage Nov. 29, 2012
Shared on The Country Cook Nov. 30, 2012
Pasta at Very Good Recipes
Pin It
So I guess the question on my mind today is "Are you tired of turkey yet?" Have you had your fill until next Thanksgiving? Or are you simply taking a break for 3 weeks before another roasted bird is the star of your Christmas table? Well, if you are in the first group, I have a real treat for you today. It's Italian, it's pasta, it's a casserole...those are far from a turkey sandwich! And to be honest, after a long holiday weekend, not only does nobody want to go back to work, but who wants to come home and cook something complicated? It's also very versatile because you can make it like I did, or you can split it to make an extra one. (See note below) Sometimes when parents ask me for tips to get their kids to eat certain things I just have to respond with "hide it". I even heard a chef say the other day that her nieces and nephews don't eat veggies...at all. So when auntie makes mashed potatoes...guess what! Yep, there is mashed cauliflower in them too! Ha! That's sneaky. Now luckily as you know, Monkey is not a picky eater at all. But for some reason he got it into his head forever ago he doesn't like sour cream. Which is fine, he doesn't have to eat it, but if it's in a recipe he's going to because I'm not a short order cook and won't make something different. So I've learned if it's "hidden", even in plain sight, he's fine with it. Basically as long as it's in a dish that doesn't taste like sour cream, I'm good. See, little does he know, but there are a ton of things he has eaten without even noticing because I hide it well. (Let's face it, if it has cheese, most kids are going to eat it without any questions.) This casserole will feed an army, which is good because if any of your neighbors catch a whiff of it, they will be right over! My son declared it "super yummy" and I hope your family thinks so too!

Spaghetti Casserole Adapted from Taste of Home
1 lb. spaghetti, cooked according to package directions
1 lb. ground beef
1 (15 oz) can tomato sauce
1 (26 oz) jar spaghetti sauce
2 tsp Italian Seasoning
2 c. Monterey Jack cheese, finely shredded
1 c. sour cream
1 (10 3/4 oz) can cream of mushroom soup
1 tsp dried parsley
Salt and Pepper to taste

Preheat oven to 375. While pasta is cooking, brown beef, seasoned with salt and pepper in a large skillet over medium heat. Drain if necessary. Add tomato sauce and spaghetti sauce. Stir well. Adjust salt and pepper. Remove from heat and set aside. In a small bowl combine sour cream, soup and Italian seasoning. Stir well. When pasta is cooked, drain well. Grease a 9x13 pan. Add half the meat sauce. Top with half the pasta. Spread with half the sour cream mixture. Sprinkle with 1 c. cheese. Repeat layers ending with cheese. Cover  with aluminum foil and bake for 45-55 minutes until cheese is melted. Remove foil, and sprinkle with parsley. Let sit for 5 minutes before serving.
*NOTE* You can also split this between two 8x8 pans, and freeze one for later. When ready to bake, allow to thaw for about an hour and then bake as directed.


Shared on Make Ahead Meals Nov. 26, 2012
Shared on Mandy's Recipe Box Nov. 27, 2012
Shared on Lady Behind The Curtain Nov. 28, 2012
Shared on Miz Helen's Country Cottage Nov. 29, 2012
Shared on The Country Cook Nov. 30, 2012
Pasta at Very Good Recipes
Pin It
reade more... Résuméabuiyad