Pages

Showing posts with label Halloween. Show all posts

Cake Bakeries Give Tricks For Halloween Treats

Bakeries and cake shops warn that the witching hour is almost at hand. Homes are transformed from their lovely suburban colors and decor to spiderweb covered, ghost infested haunted houses. Young and old are buying or making their costumes. What to be this year? Your favorite superhero or a bunch of grapes? Oh, the possibilities are seemingly endless!

Children are ready to travel from door to door collecting sweet treats. Although their little pumpkin buckets will be filled to the brim with wrapped chocolate bars and other store bought goodies, why not add a little something extra this year and make some delicious homemade treats for the little ones in your life.

These Halloween inspired treats are sure to delight kids and adults alike, much like the sweets from the bakery stores:

Mummy Mouths:

Take a red apple, like a Macintoch or Red Delicious, and leaving the skin on, slice with an apple slicer to remove the core. Take one slice and slice it again, lengthwise. Lay one half flat on a plate, spread a layer of peanut butter, then arrange a row of marshmallows across the front. Spread a player of peanut butter on one side of the other half of the apple slice and lay that on top of the marshmallows. The end result will look like a big toothy grin!

Tombstone Pudding:

Fill a clear cup with chocolate pudding. Crush oreos and spread that on top of the pudding. Take a Nutter Butter, Vienna Cake, or any other kind of long, rounded cookie. Write RIP in icing on the top of the cookie and place that in your pudding ground! It is a chocolaty, yummy treat that everyone can enjoy.

Pumpkin Cupcakes:

There are plenty of ways to decorate your favorite kind of cupcake (we suggest pumpkin) to give it that creepy edge. You could go for an orange icing and decorate each like a jack o lantern. This would be a great activity for your child and their friends. Have the orange iced cupcakes ready to go and let them go to town drawing on faces with black icing! Or for a cool spider web effect, after icing your cupcake in your desired color, draw 4 circles with a contrasting color (like the rings of a tree). Take a toothpick and starting in the middle draw a line to the outside like the spoke of a bicycle wheel. The resulting effect will look like a web!

Bakery shop owners hope that everyone has a fun and safe Halloween with lots of sweet treats! Remember for those extra special celebrations, their stores can bake and decorate a cake to your likely with any theme - including Halloween!

Looking for the best bakeries 11234 to create the ultimate Halloween treats that kids will love? Visit duetbakeryny.com and have all of your sweet fantasies come true in the expert hands of Chef Diana Rodov and her staff.

Bakeries and cake shops warn that the witching hour is almost at hand. Homes are transformed from their lovely suburban colors and decor to spiderweb covered, ghost infested haunted houses. Young and old are buying or making their costumes. What to be this year? Your favorite superhero or a bunch of grapes? Oh, the possibilities are seemingly endless!

Children are ready to travel from door to door collecting sweet treats. Although their little pumpkin buckets will be filled to the brim with wrapped chocolate bars and other store bought goodies, why not add a little something extra this year and make some delicious homemade treats for the little ones in your life.

These Halloween inspired treats are sure to delight kids and adults alike, much like the sweets from the bakery stores:

Mummy Mouths:

Take a red apple, like a Macintoch or Red Delicious, and leaving the skin on, slice with an apple slicer to remove the core. Take one slice and slice it again, lengthwise. Lay one half flat on a plate, spread a layer of peanut butter, then arrange a row of marshmallows across the front. Spread a player of peanut butter on one side of the other half of the apple slice and lay that on top of the marshmallows. The end result will look like a big toothy grin!

Tombstone Pudding:

Fill a clear cup with chocolate pudding. Crush oreos and spread that on top of the pudding. Take a Nutter Butter, Vienna Cake, or any other kind of long, rounded cookie. Write RIP in icing on the top of the cookie and place that in your pudding ground! It is a chocolaty, yummy treat that everyone can enjoy.

Pumpkin Cupcakes:

There are plenty of ways to decorate your favorite kind of cupcake (we suggest pumpkin) to give it that creepy edge. You could go for an orange icing and decorate each like a jack o lantern. This would be a great activity for your child and their friends. Have the orange iced cupcakes ready to go and let them go to town drawing on faces with black icing! Or for a cool spider web effect, after icing your cupcake in your desired color, draw 4 circles with a contrasting color (like the rings of a tree). Take a toothpick and starting in the middle draw a line to the outside like the spoke of a bicycle wheel. The resulting effect will look like a web!

Bakery shop owners hope that everyone has a fun and safe Halloween with lots of sweet treats! Remember for those extra special celebrations, their stores can bake and decorate a cake to your likely with any theme - including Halloween!

Looking for the best bakeries 11234 to create the ultimate Halloween treats that kids will love? Visit duetbakeryny.com and have all of your sweet fantasies come true in the expert hands of Chef Diana Rodov and her staff.
reade more... Résuméabuiyad

Some Halloween Cake Recipes With GW Bakeware

Struggling for baking ideas for Halloween? Here are some creepy creations to make for a spooky soiree.

Moon cake

For this dessert, you can enhance your normal cake mix with some extra ingredients.

Distribute prepared cake mix between two 8-inch pans coated with cooking spray. Bake for 30 to 25 minutes at 180 degrees Celsius and cool for 10 minutes.

Cover the top of the layer with dark chocolate frosting and place the second cake layer on top. Ice the entire two-layered cake.

Chill in fridge for 20 minutes and apply vanilla frosting in a crescent shape.

Make the cookies by increasing your oven temperature to 180 degrees Celsius. Wrap and chill the dough for 15 minutes.

Roll dough to one-eighth thickness and cut your bat shapes. Place cookies on a lined baking sheet and cool for 10 minutes. Bake on your bakeware for 7 to 10 minutes.

Spider Cake

To make this simple recipe for a chocolate spider cake, first distribute some prepared cake mix over two 8-inch pans.

Put the cake on your bakeware for 30 to 35 minutes at 350°F, then cool for 10 minutes while still in the pans.

Ice one of the layers with some vanilla frosting, placing the second cake layer on the top. Then, Ice the entire double-layered cake and cool in the fridge for around 15 minutes.

Make a spider template, cut it out and place it on your cake. Cover your image, and sprinkle it with black sanding sugar, making sure it is properly by pressing it down and brushing off extra sugar.

Chocolate Pumpkin Cake

Prepare your cake pans by heating your oven to 180 degrees Celsius and lightly buttering three eight inch cake pans, lining them with baking parchment.

Make the batter by sifting flour, cocoa, baking powder, baking soda, cinnamon and nutmeg into a larger bowl, and then set it aside.

You can combine buttermilk, pumpkin, and vanilla into a medium bowl and set aside. Mix the butter and sugar together in a bowl, preferably, with an electric mixer.

Add in your eggs, beating well until the mixture is smooth and light.

Bake your cake by dividing the batter among the pans and bake until a wooden skewer is inserted in the centre, which should come out clean after 35 minutes. Cool cakes in the pan for 20 minutes.

Remove cakes and cool. Then, assemble the cake and trim each layers, placing one layer on a cake plate and topping with one third of the frosting.

Repeat with the second and third layers and refrigerate.

George Wilkinson's Great British Bakeware range demonstrates excellence and innovation in bakeware manufacturing and reflects the brand ethos - designed to perform and built to last. This premium range has an innovative & exclusive long life coating.

Struggling for baking ideas for Halloween? Here are some creepy creations to make for a spooky soiree.

Moon cake

For this dessert, you can enhance your normal cake mix with some extra ingredients.

Distribute prepared cake mix between two 8-inch pans coated with cooking spray. Bake for 30 to 25 minutes at 180 degrees Celsius and cool for 10 minutes.

Cover the top of the layer with dark chocolate frosting and place the second cake layer on top. Ice the entire two-layered cake.

Chill in fridge for 20 minutes and apply vanilla frosting in a crescent shape.

Make the cookies by increasing your oven temperature to 180 degrees Celsius. Wrap and chill the dough for 15 minutes.

Roll dough to one-eighth thickness and cut your bat shapes. Place cookies on a lined baking sheet and cool for 10 minutes. Bake on your bakeware for 7 to 10 minutes.

Spider Cake

To make this simple recipe for a chocolate spider cake, first distribute some prepared cake mix over two 8-inch pans.

Put the cake on your bakeware for 30 to 35 minutes at 350°F, then cool for 10 minutes while still in the pans.

Ice one of the layers with some vanilla frosting, placing the second cake layer on the top. Then, Ice the entire double-layered cake and cool in the fridge for around 15 minutes.

Make a spider template, cut it out and place it on your cake. Cover your image, and sprinkle it with black sanding sugar, making sure it is properly by pressing it down and brushing off extra sugar.

Chocolate Pumpkin Cake

Prepare your cake pans by heating your oven to 180 degrees Celsius and lightly buttering three eight inch cake pans, lining them with baking parchment.

Make the batter by sifting flour, cocoa, baking powder, baking soda, cinnamon and nutmeg into a larger bowl, and then set it aside.

You can combine buttermilk, pumpkin, and vanilla into a medium bowl and set aside. Mix the butter and sugar together in a bowl, preferably, with an electric mixer.

Add in your eggs, beating well until the mixture is smooth and light.

Bake your cake by dividing the batter among the pans and bake until a wooden skewer is inserted in the centre, which should come out clean after 35 minutes. Cool cakes in the pan for 20 minutes.

Remove cakes and cool. Then, assemble the cake and trim each layers, placing one layer on a cake plate and topping with one third of the frosting.

Repeat with the second and third layers and refrigerate.

George Wilkinson's Great British Bakeware range demonstrates excellence and innovation in bakeware manufacturing and reflects the brand ethos - designed to perform and built to last. This premium range has an innovative & exclusive long life coating.

reade more... Résuméabuiyad

Happy Halloween!!!

It's finally here! If your kids are anything like Monkey, and I think most are, the only countdown bigger than the one to today is the one coming up in about a month towards December 25th! Children everywhere are sitting in classrooms right now watching the minutes tick away just trying to contain themselves until they can get home, don their witches hats, pirate swords, superhero capes and princess tiaras. When Monkey gets home, he is convinced he needs to change right away, and trick or treating should start promptly at 3:45 pm. Well, our city council sees things differently and therefore made trick or treat hours from 6-8 pm, which means I have 2 hours to fill the void with some Halloween fun so I don't have to hear "Is it time yet?" every 5 minutes. So, I'm going to surprise him with these for a yummy, festive after school snack! I know he is going to think they are too cute and be surprised at what lies underneath. Hopefully these will lessen his urge to run out the door a little bit until that magical witching hour. From my family to yours, I wish you and your little ones a very "spook-tacular" and fun filled day!

~HappHalloween~

My Monkey as Captain America


Ghost Pops From Pinterest
1 banana, cut into thirds
1 (6 oz) container very vanilla yogurt
1 c. sweetened flaked coconut
Candy sticks
6 pieces of chocolate puff cereal

Spread each piece of banana with yogurt, coating liberally. Roll in coconut, pressing to adhere. Dip each piece of of cereal in yogurt and press into banana for eyes. Freeze for 1 hour to set.


Shared on Lady Behind The Curtain Oct. 31, 2012
Halloween at Very Good Recipes
Pin It
It's finally here! If your kids are anything like Monkey, and I think most are, the only countdown bigger than the one to today is the one coming up in about a month towards December 25th! Children everywhere are sitting in classrooms right now watching the minutes tick away just trying to contain themselves until they can get home, don their witches hats, pirate swords, superhero capes and princess tiaras. When Monkey gets home, he is convinced he needs to change right away, and trick or treating should start promptly at 3:45 pm. Well, our city council sees things differently and therefore made trick or treat hours from 6-8 pm, which means I have 2 hours to fill the void with some Halloween fun so I don't have to hear "Is it time yet?" every 5 minutes. So, I'm going to surprise him with these for a yummy, festive after school snack! I know he is going to think they are too cute and be surprised at what lies underneath. Hopefully these will lessen his urge to run out the door a little bit until that magical witching hour. From my family to yours, I wish you and your little ones a very "spook-tacular" and fun filled day!

~HappHalloween~

My Monkey as Captain America


Ghost Pops From Pinterest
1 banana, cut into thirds
1 (6 oz) container very vanilla yogurt
1 c. sweetened flaked coconut
Candy sticks
6 pieces of chocolate puff cereal

Spread each piece of banana with yogurt, coating liberally. Roll in coconut, pressing to adhere. Dip each piece of of cereal in yogurt and press into banana for eyes. Freeze for 1 hour to set.


Shared on Lady Behind The Curtain Oct. 31, 2012
Halloween at Very Good Recipes
Pin It
reade more... Résuméabuiyad

Dipped Pretzel Rods for Halloween

These dipped pretzel rods turned out looking somewhat different than what I had intended when I started to make them, but I think they came out pretty cute anyway. My plan was to make dipped pretzels that looked like candy corn with a white layer, an orange layer, and then tipped with yellow sprinkles, but that didn't happen. Living in a small town has its advantages, but shopping is not one of them. I couldn't find the yellow sprinkles that I needed, so I tried to substitute yellow sanding sugar. It seemed like a good idea, but it didn't work. The yellow sugar didn't show up on the orange candy. That's when I went to plan B, and used the sprinkles that were available.


Instead of candy corn pretzels, mine ended up looking like Indian corn pretzels, so all is well, I think. They're still a yummy, salty/sweet snack no matter what color the sprinkles are.


These dipped pretzels were made with pretzel rods, white and orange candy melts, and candy sprinkles.


Melt the white candy according to package directions and dip about 3/4 of each pretzel rod into the melted candy. Lay the dipped pretzels out on wax paper to dry.


After the white layer has dried, melt the orange candy. Dip the pretzel rods again, this time covering about half of the white layer with the orange. Add the sprinkles at this point while the candy is still wet, then lay on wax paper to dry. My grandson Landon enjoyed helping with this part.


These simple treats look pretty festive all packaged up in pretzel bags and tied with ribbon. After making my Halloween wreath I had plenty of extra spiders, so I added a spider ring to each pretzel package for fun.


This batch of pretzels will be going to school to Landon's class. I'll bet the second graders won't even mind that these pretzels look like Indian corn instead of candy corn.


This post was shared with:
Arkansas Women Bloggers
Crazy Sweet Tuesday
These dipped pretzel rods turned out looking somewhat different than what I had intended when I started to make them, but I think they came out pretty cute anyway. My plan was to make dipped pretzels that looked like candy corn with a white layer, an orange layer, and then tipped with yellow sprinkles, but that didn't happen. Living in a small town has its advantages, but shopping is not one of them. I couldn't find the yellow sprinkles that I needed, so I tried to substitute yellow sanding sugar. It seemed like a good idea, but it didn't work. The yellow sugar didn't show up on the orange candy. That's when I went to plan B, and used the sprinkles that were available.


Instead of candy corn pretzels, mine ended up looking like Indian corn pretzels, so all is well, I think. They're still a yummy, salty/sweet snack no matter what color the sprinkles are.


These dipped pretzels were made with pretzel rods, white and orange candy melts, and candy sprinkles.


Melt the white candy according to package directions and dip about 3/4 of each pretzel rod into the melted candy. Lay the dipped pretzels out on wax paper to dry.


After the white layer has dried, melt the orange candy. Dip the pretzel rods again, this time covering about half of the white layer with the orange. Add the sprinkles at this point while the candy is still wet, then lay on wax paper to dry. My grandson Landon enjoyed helping with this part.


These simple treats look pretty festive all packaged up in pretzel bags and tied with ribbon. After making my Halloween wreath I had plenty of extra spiders, so I added a spider ring to each pretzel package for fun.


This batch of pretzels will be going to school to Landon's class. I'll bet the second graders won't even mind that these pretzels look like Indian corn instead of candy corn.


This post was shared with:
Arkansas Women Bloggers
Crazy Sweet Tuesday
reade more... Résuméabuiyad

A Halloween Wreath

Not long ago I wrote about ways to eliminate spiders from the house, and one way was to keep them off the porches. Today I am contradicting myself because I have just invited lots of spiders to adorn my front porch for Halloween. I decided to make a creepy crawly spider wreath for the entertainment of all those little trick or treaters who will soon be ringing my doorbell.


The inspiration for my wreath came from a picture that I saw on Pinterest, but I have not been able to find the original source to give due credit. I used the idea that I saw in the picture with some added embellishments of my own.


To make the wreath I used a green Christmas wreath that I had discarded and stashed in a closet. I also used a can of black spray paint.


I spray painted the wreath with several coats of paint on both sides, covering all the greenery, letting it dry between coats. 


Some of the supplies I used were black tulle, orange wired ribbon, plastic spiders, florist wire, and wire cutters.


I also used some ping pong balls, wiggly eyes, and of course, my hot glue gun.

After the wreath was painted black and dried, I wrapped some black tulle around the wreath to give it a web-like effect. Then I simply hot glued the orange spiders all over the wreath for color and "creepiness".  Peeking eyes were made from the ping pong balls and wiggly eyes hot glued together. The wreath was finished with a big orange bow made from the wired ribbon and florist wire.


I think I'll let these spiders hang around on my porch while the big googly peeking eyes are on the look out for trick or treaters!


This post was shared with:
Arkansas Women Bloggers
Creative Juice Thursday
Not long ago I wrote about ways to eliminate spiders from the house, and one way was to keep them off the porches. Today I am contradicting myself because I have just invited lots of spiders to adorn my front porch for Halloween. I decided to make a creepy crawly spider wreath for the entertainment of all those little trick or treaters who will soon be ringing my doorbell.


The inspiration for my wreath came from a picture that I saw on Pinterest, but I have not been able to find the original source to give due credit. I used the idea that I saw in the picture with some added embellishments of my own.


To make the wreath I used a green Christmas wreath that I had discarded and stashed in a closet. I also used a can of black spray paint.


I spray painted the wreath with several coats of paint on both sides, covering all the greenery, letting it dry between coats. 


Some of the supplies I used were black tulle, orange wired ribbon, plastic spiders, florist wire, and wire cutters.


I also used some ping pong balls, wiggly eyes, and of course, my hot glue gun.

After the wreath was painted black and dried, I wrapped some black tulle around the wreath to give it a web-like effect. Then I simply hot glued the orange spiders all over the wreath for color and "creepiness".  Peeking eyes were made from the ping pong balls and wiggly eyes hot glued together. The wreath was finished with a big orange bow made from the wired ribbon and florist wire.


I think I'll let these spiders hang around on my porch while the big googly peeking eyes are on the look out for trick or treaters!


This post was shared with:
Arkansas Women Bloggers
Creative Juice Thursday
reade more... Résuméabuiyad

Make Your Kids Say "Ewww"...

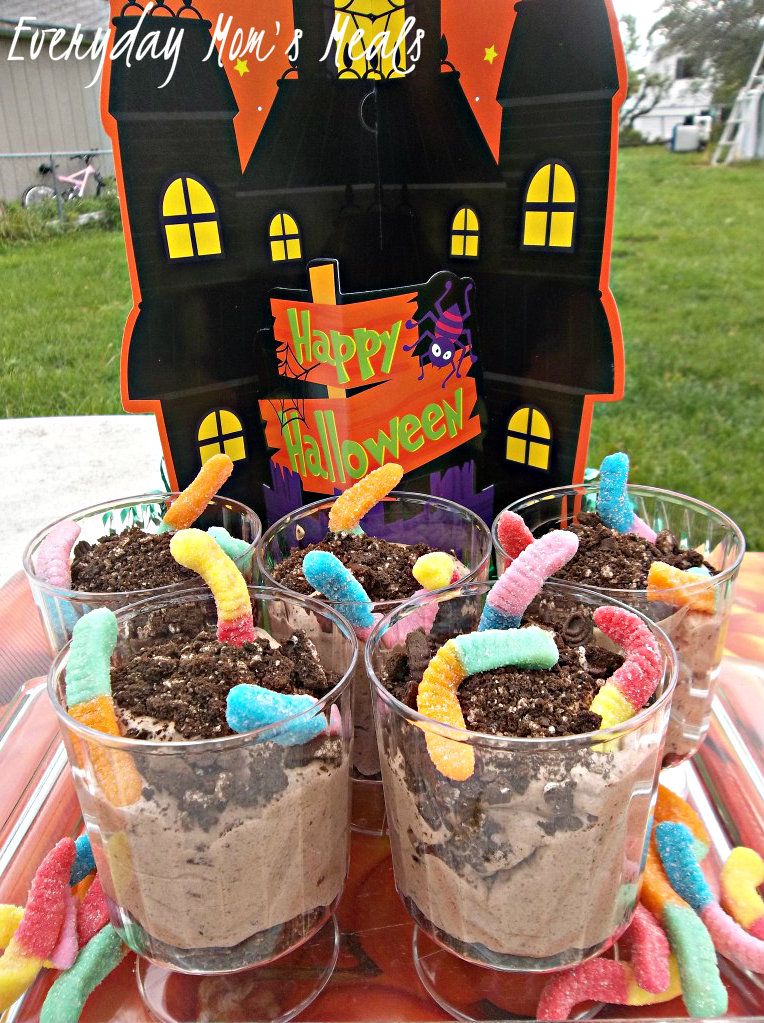
Do you have anything planned fun planned for Halloween? A costume party? A classroom party? Maybe you are just like me and while you don't have a big gathering to attend, you still want to make the day as fun as possible for you little ones. And maybe like me you enjoy the fact that not only can you be the coolest mom ever with a sweet treat, but you also get a little thrill of totally grossing them out! If this is the case, then why not have something easy to make, fun to say and yummy to eat waiting on them after school on Halloween? Can you imagine the kiddies walking through the front door asking "Mommy, can we have a snack?" And you answering with "Sure, I've some worms in dirt for you." The looks of horror on their faces would be priceless (In fact, you might want to have the camera ready!) This is actually something I remember eating as a kid at our church Halloween party, and it was always so much fun! Eating something that sounds so gross always makes it taste better! Let's face it, with kids (especially boys) the more gross something sounds, but tastes great, the more they will love it! So, if you are looking for a entertaining, yet simple dessert for Halloween night when the ghosts and goblins stop by to say "Boo", I've got you covered!

Worms in Dirt
1 (3.4oz) package instant chocolate pudding
2 c. cold milk
1 (8oz) tub Cool Whip
1 (16oz) package chocolate sandwich cookies
Gummy Worms (I used the sour variety)

In a large bowl, combine pudding and milk. Whisk constantly for 2 minutes. Allow to set in fridge for 5 minutes. In a large plastic bag, add cookies and crush with a rolling pin. When pudding is set, add Cool Whip and half the crushed cookies. Stir well until mixture is all the same color. In small plastic cups place 1 TBS remaining crushed cookies. Spoon pudding mixture into another plastic bag, and cut corner off to make a pastry bag. Pipe pudding into plastic cups, filling about 3/4 the way. Top each with about 2 TBS remaining cookies and gummy worms.

~Join me for Tasty Tuesday on Formula Mom~

Shared on Mandy's Recipe Box Oct. 23, 2012
Shared on Lady Behind The Curtain Oct. 24, 2012
Shared on Miz Helen's Country Cottage Oct. 25, 2012
Shared on The Country Cook Oct. 26, 2012
Kids at Very Good Recipes
Pin It
Do you have anything planned fun planned for Halloween? A costume party? A classroom party? Maybe you are just like me and while you don't have a big gathering to attend, you still want to make the day as fun as possible for you little ones. And maybe like me you enjoy the fact that not only can you be the coolest mom ever with a sweet treat, but you also get a little thrill of totally grossing them out! If this is the case, then why not have something easy to make, fun to say and yummy to eat waiting on them after school on Halloween? Can you imagine the kiddies walking through the front door asking "Mommy, can we have a snack?" And you answering with "Sure, I've some worms in dirt for you." The looks of horror on their faces would be priceless (In fact, you might want to have the camera ready!) This is actually something I remember eating as a kid at our church Halloween party, and it was always so much fun! Eating something that sounds so gross always makes it taste better! Let's face it, with kids (especially boys) the more gross something sounds, but tastes great, the more they will love it! So, if you are looking for a entertaining, yet simple dessert for Halloween night when the ghosts and goblins stop by to say "Boo", I've got you covered!

Worms in Dirt
1 (3.4oz) package instant chocolate pudding
2 c. cold milk
1 (8oz) tub Cool Whip
1 (16oz) package chocolate sandwich cookies
Gummy Worms (I used the sour variety)

In a large bowl, combine pudding and milk. Whisk constantly for 2 minutes. Allow to set in fridge for 5 minutes. In a large plastic bag, add cookies and crush with a rolling pin. When pudding is set, add Cool Whip and half the crushed cookies. Stir well until mixture is all the same color. In small plastic cups place 1 TBS remaining crushed cookies. Spoon pudding mixture into another plastic bag, and cut corner off to make a pastry bag. Pipe pudding into plastic cups, filling about 3/4 the way. Top each with about 2 TBS remaining cookies and gummy worms.

~Join me for Tasty Tuesday on Formula Mom~

Shared on Mandy's Recipe Box Oct. 23, 2012
Shared on Lady Behind The Curtain Oct. 24, 2012
Shared on Miz Helen's Country Cottage Oct. 25, 2012
Shared on The Country Cook Oct. 26, 2012
Kids at Very Good Recipes
Pin It
reade more... Résuméabuiyad

Time for Halloween Treats

Fall has officially arrived, and Halloween is just around the corner. Many children love the costumes and the parties that are often associated with the holiday. Whether you are hosting a party or just entertaining your own children at home, homemade treats will likely be a hit. Here are some of my past Halloween treats that kids have enjoyed:


Creepy Popcorn Hands are very easy to make and so cute. I have made these for several years for Halloween. I took these to my grandson's first grade class last Halloween, and I think every child thanked me.


The Great Pumpkin Cake is baked in a Bundt pan and has an ice cream cone as a stem. It's colorful and makes a nice table centerpiece for a party.


Halloween Cake Pops can be packaged individually if you want to hand them out as treats.


Cake Pops can be decorated in many different ways, and kids like these little treats on a stick. These are made with a red velvet cake mix, and sprinkles were used to decorate the the creatures in the post Halloween Cake Pops II.

With Halloween coming up soon, it's time to be thinking about goodies for your little ones to enjoy!

Fall has officially arrived, and Halloween is just around the corner. Many children love the costumes and the parties that are often associated with the holiday. Whether you are hosting a party or just entertaining your own children at home, homemade treats will likely be a hit. Here are some of my past Halloween treats that kids have enjoyed:


Creepy Popcorn Hands are very easy to make and so cute. I have made these for several years for Halloween. I took these to my grandson's first grade class last Halloween, and I think every child thanked me.


The Great Pumpkin Cake is baked in a Bundt pan and has an ice cream cone as a stem. It's colorful and makes a nice table centerpiece for a party.


Halloween Cake Pops can be packaged individually if you want to hand them out as treats.


Cake Pops can be decorated in many different ways, and kids like these little treats on a stick. These are made with a red velvet cake mix, and sprinkles were used to decorate the the creatures in the post Halloween Cake Pops II.

With Halloween coming up soon, it's time to be thinking about goodies for your little ones to enjoy!

reade more... Résuméabuiyad

Halloween Cake Pops II

Not long ago I posted my first attempt at making cake pops. It was a fun project, so I decided to try it again.  I did everything the same as last time, except this time I used only candy sprinkles to decorate the cake pops. The gel frosting was difficult for me to handle and control last time, so this time I created a different kind of creature. Here's one guy who is ready for a Halloween party.


And here's another little candy monster.


The basic directions and recipe for cake pops can be found on my Halloween Cake Pops page. My inspiration for making these cake pops came from the Pioneer Woman Cooks.


I thought the sprinkles were easier to work with than the gel frosting or even the regular frosting, but you do have to slap the sprinkles on pretty quickly before the candy melts start to harden. Just another idea to have fun with this fall!


Shared with:
Momnivores Dilemma Halloween Party
Everyday Tastes Its a Keeper Thursday 
Talking Dollars and Cents Sweet Temptations 
Something Swanky Sweet Treats Thursday
Not Your Ordinary Recipes Foodie Friday 
The Artsy Girl Connection Pinspirational Thursday 
Jane Deere Fusion Friday
Sugar Bananas Sweets This Week
Sweet as Sugar Cookies Sweets for a Saturday 
Bacon Time with the Hungry Hypo Halloween and Fall Recipes and Crafts 
A Well Seasoned Life Sweet Indulgences Sunday
Frugal Antics of a Harried Homemaker Your Recipe My Kitchen
Naptime Creations Tasty Tuesday
Crazy for Crust Crazy Sweet Tuesday
Lady Behind the Curtain Cast Party Wednesday
Not long ago I posted my first attempt at making cake pops. It was a fun project, so I decided to try it again.  I did everything the same as last time, except this time I used only candy sprinkles to decorate the cake pops. The gel frosting was difficult for me to handle and control last time, so this time I created a different kind of creature. Here's one guy who is ready for a Halloween party.


And here's another little candy monster.


The basic directions and recipe for cake pops can be found on my Halloween Cake Pops page. My inspiration for making these cake pops came from the Pioneer Woman Cooks.


I thought the sprinkles were easier to work with than the gel frosting or even the regular frosting, but you do have to slap the sprinkles on pretty quickly before the candy melts start to harden. Just another idea to have fun with this fall!


Shared with:
Momnivores Dilemma Halloween Party
Everyday Tastes Its a Keeper Thursday 
Talking Dollars and Cents Sweet Temptations 
Something Swanky Sweet Treats Thursday
Not Your Ordinary Recipes Foodie Friday 
The Artsy Girl Connection Pinspirational Thursday 
Jane Deere Fusion Friday
Sugar Bananas Sweets This Week
Sweet as Sugar Cookies Sweets for a Saturday 
Bacon Time with the Hungry Hypo Halloween and Fall Recipes and Crafts 
A Well Seasoned Life Sweet Indulgences Sunday
Frugal Antics of a Harried Homemaker Your Recipe My Kitchen
Naptime Creations Tasty Tuesday
Crazy for Crust Crazy Sweet Tuesday
Lady Behind the Curtain Cast Party Wednesday
reade more... Résuméabuiyad

Halloween Cake Pops

I have looked at Bakerella's cake pops with awe for quite some time now, and finally decided it was time to see if I could put some of those little treats together. The way she makes them is truly a work of art. Mine are more of a fun Halloween project. The general recipe and directions that I used came from the Pioneer Woman Cooks.


 Print Directions
Halloween Cake Pops
1 box (18.25 ounces) red velvet cake mix
1 can (16 ounces) cake frosting (any flavor you like)
2 bags (14 ounces each) melting chocolate (any color or combination of colors)
1 bag lollipop sticks
various tubes frosting or gel icing or sprinkles, if desired

Bake cake according to package directions, using a 9 x 13-inch pan. Allow to cool completely. After the cake is cooled, crumble the cake into a large bowl until the cake is in very fine crumbs. Use about 3/4 of the can of frosting, and using two forks, work the frosting into the cake crumbs until the frosting is no longer visible. Next, roll the mixture into small balls about the size of a walnut. A small cookie dough scoop can help get them the same size. Put the balls on a wax paper lined sheet pan and put them in the freezer for at least an hour.
After the cake balls are firm, melt the chocolate pieces in a double boiler. Working with only a few cake balls at a time, insert a lollipop stick into the cake ball and either dip it in the chocolate or spoon the chocolate over it until it is well coated. Lay the coated cake pops down on wax paper to harden. If using sprinkles, add those immediately after dipping. After the chocolate has hardened the cake pops can be decorated with gel or frosting as desired.


After the cake has cooled, finely crumble it in a large bowl.


Stir the frosting into the crumbled cake using two forks, working it in until the frosting is no longer visible.


A cookie dough scoop helps to measure the cake so the balls can be rolled about the same size.


Put the cake balls in the freezer for an hour before dipping.


Insert the lollipop sticks and dip the cake balls in the melted candy coating. Lay them on wax paper to dry.


Decorate any way you like.


My favorites were the green Halloween guys with sprinkles for hair.


Add a cellophane bag and a ribbon for a party treat! For more ideas see Halloween Cake Pops II.


Shared with:
Momnivore's Halloween Party
Bacon Time with the Hungry Hypo Halloween and Fall Recipes and Crafts
I have looked at Bakerella's cake pops with awe for quite some time now, and finally decided it was time to see if I could put some of those little treats together. The way she makes them is truly a work of art. Mine are more of a fun Halloween project. The general recipe and directions that I used came from the Pioneer Woman Cooks.


 Print Directions
Halloween Cake Pops
1 box (18.25 ounces) red velvet cake mix
1 can (16 ounces) cake frosting (any flavor you like)
2 bags (14 ounces each) melting chocolate (any color or combination of colors)
1 bag lollipop sticks
various tubes frosting or gel icing or sprinkles, if desired

Bake cake according to package directions, using a 9 x 13-inch pan. Allow to cool completely. After the cake is cooled, crumble the cake into a large bowl until the cake is in very fine crumbs. Use about 3/4 of the can of frosting, and using two forks, work the frosting into the cake crumbs until the frosting is no longer visible. Next, roll the mixture into small balls about the size of a walnut. A small cookie dough scoop can help get them the same size. Put the balls on a wax paper lined sheet pan and put them in the freezer for at least an hour.
After the cake balls are firm, melt the chocolate pieces in a double boiler. Working with only a few cake balls at a time, insert a lollipop stick into the cake ball and either dip it in the chocolate or spoon the chocolate over it until it is well coated. Lay the coated cake pops down on wax paper to harden. If using sprinkles, add those immediately after dipping. After the chocolate has hardened the cake pops can be decorated with gel or frosting as desired.


After the cake has cooled, finely crumble it in a large bowl.


Stir the frosting into the crumbled cake using two forks, working it in until the frosting is no longer visible.


A cookie dough scoop helps to measure the cake so the balls can be rolled about the same size.


Put the cake balls in the freezer for an hour before dipping.


Insert the lollipop sticks and dip the cake balls in the melted candy coating. Lay them on wax paper to dry.


Decorate any way you like.


My favorites were the green Halloween guys with sprinkles for hair.


Add a cellophane bag and a ribbon for a party treat! For more ideas see Halloween Cake Pops II.


Shared with:
Momnivore's Halloween Party
Bacon Time with the Hungry Hypo Halloween and Fall Recipes and Crafts
reade more... Résuméabuiyad

Great Pumpkin Cake

Someone may have to take my new Kraft Philadelphia Classic Recipes cookbook away from me. I have so many pages marked to try, and I want to try them all at once. I chose a seasonal one today, and I had a great time baking the Great Pumpkin Cake.


Great Pumpkin Cake
1 package (18.25 ounces) cake mix, any flavor
1 package (8 ounces) cream cheese, softened
1/4 cup (1/2 stick) butter, softened
4 cups powdered sugar
Wilton orange and leaf green icing colors
1 ice cream cone

Prepare cake batter and bake in a 12-cup fluted tube pan as directed on package. Cool in pan 10 minutes. Invert cake onto wire rack; remove pan. Cool cake completely.
Meanwhile, beat cream cheese and butter in medium bowl with electric mixer on medium speed until well blended. Gradually add powdered sugar, beating until well blended after each addition. Remove 1/2 cup of the frosting; place in a small bowl. Add green food coloring; stir until well blended. Spread half the green frosting onto outside of ice cream cone; set aside. Cover and reserve remaining green frosting for later use.
Add orange food coloring to remaining white frosting; stir until well blended. Spread onto cake to resemble pumpkin. Invert ice cream cone in hole in top of cake for the pumpkin's stem. Pipe the reserved green frosting in vertical lines down side of cake.


The mix I used was a Duncan Hines butter golden cake. I put my cake in the freezer for a while before I frosted it.


Frost the ice cream cone with the green frosting, then frost the cake with the orange-tinted frosting. I used a #3 tip to make the green lines down the sides of the pumpkin. The frosted ice cream cone should be inserted upside down into the hole in the center of the cake to represent the stem.


Here's the Great Pumpkin Cake right out of the pumpkin patch! Add this cake to the Creepy Popcorn Hands for part of your Halloween party menu.


Shared with:
Momnivore's Dilemma Halloween Link Party
Miz Helen's Full Plate Thursday
Something Swanky Sweet Treats Thursday
Someone may have to take my new Kraft Philadelphia Classic Recipes cookbook away from me. I have so many pages marked to try, and I want to try them all at once. I chose a seasonal one today, and I had a great time baking the Great Pumpkin Cake.


Great Pumpkin Cake
1 package (18.25 ounces) cake mix, any flavor
1 package (8 ounces) cream cheese, softened
1/4 cup (1/2 stick) butter, softened
4 cups powdered sugar
Wilton orange and leaf green icing colors
1 ice cream cone

Prepare cake batter and bake in a 12-cup fluted tube pan as directed on package. Cool in pan 10 minutes. Invert cake onto wire rack; remove pan. Cool cake completely.
Meanwhile, beat cream cheese and butter in medium bowl with electric mixer on medium speed until well blended. Gradually add powdered sugar, beating until well blended after each addition. Remove 1/2 cup of the frosting; place in a small bowl. Add green food coloring; stir until well blended. Spread half the green frosting onto outside of ice cream cone; set aside. Cover and reserve remaining green frosting for later use.
Add orange food coloring to remaining white frosting; stir until well blended. Spread onto cake to resemble pumpkin. Invert ice cream cone in hole in top of cake for the pumpkin's stem. Pipe the reserved green frosting in vertical lines down side of cake.


The mix I used was a Duncan Hines butter golden cake. I put my cake in the freezer for a while before I frosted it.


Frost the ice cream cone with the green frosting, then frost the cake with the orange-tinted frosting. I used a #3 tip to make the green lines down the sides of the pumpkin. The frosted ice cream cone should be inserted upside down into the hole in the center of the cake to represent the stem.


Here's the Great Pumpkin Cake right out of the pumpkin patch! Add this cake to the Creepy Popcorn Hands for part of your Halloween party menu.


Shared with:
Momnivore's Dilemma Halloween Link Party
Miz Helen's Full Plate Thursday
Something Swanky Sweet Treats Thursday
reade more... Résuméabuiyad

Creepy Popcorn Hands

The treat I made today is like one that I made last year for my grandson Landon's Fall Festival at his school. I made a big basketful of these Creepy Popcorn Hands last year, and they were sold in the "Country Store" at the Fall Festival. These are also a cute and quick project to put together for parties, bake sales, or class treats.


Creepy Popcorn Hands 

1. Assemble supplies you will need - plastic food service gloves, popcorn, candy corn, ribbon, and spider rings.
2. Pop the popcorn, either microwave popcorn or the old fashioned way, it's up to you.
3. Insert one candy corn at the end of each finger to represent fingernails, then begin to stuff the plastic glove with popcorn.
4. After the glove is full of popcorn, tie some colorful ribbon at the top to close it.
5. Last, put a plastic spider ring on one of the fingers and you are done!


To make the Creepy Popcorn Hands, you will need flat plastic food service gloves - NOT latex gloves.


Other items needed for this project are popcorn, candy for fingernails, plastic rings, and ribbon.
Today I made only one 3.3 ounce bag of microwave popcorn, and it filled 3 gloves.


 It only takes a few minutes and you can have Creepy Popcorn Hands!


Shared with:
Goodbye City Hello Suburbs Workshop Wednesday
Momnivore's Dilemma Halloween Link Party 
It's a Keeper Thursday
Jane Deere Fusion Friday 
Bacon Time with the Hungry Hypo Halloween and Fall Recipes and Crafts
The treat I made today is like one that I made last year for my grandson Landon's Fall Festival at his school. I made a big basketful of these Creepy Popcorn Hands last year, and they were sold in the "Country Store" at the Fall Festival. These are also a cute and quick project to put together for parties, bake sales, or class treats.


Creepy Popcorn Hands 

1. Assemble supplies you will need - plastic food service gloves, popcorn, candy corn, ribbon, and spider rings.
2. Pop the popcorn, either microwave popcorn or the old fashioned way, it's up to you.
3. Insert one candy corn at the end of each finger to represent fingernails, then begin to stuff the plastic glove with popcorn.
4. After the glove is full of popcorn, tie some colorful ribbon at the top to close it.
5. Last, put a plastic spider ring on one of the fingers and you are done!


To make the Creepy Popcorn Hands, you will need flat plastic food service gloves - NOT latex gloves.


Other items needed for this project are popcorn, candy for fingernails, plastic rings, and ribbon.
Today I made only one 3.3 ounce bag of microwave popcorn, and it filled 3 gloves.


 It only takes a few minutes and you can have Creepy Popcorn Hands!


Shared with:
Goodbye City Hello Suburbs Workshop Wednesday
Momnivore's Dilemma Halloween Link Party 
It's a Keeper Thursday
Jane Deere Fusion Friday 
Bacon Time with the Hungry Hypo Halloween and Fall Recipes and Crafts
reade more... Résuméabuiyad