Pages

Showing posts with label candy. Show all posts

Strawberry Pistachio Bark


If you need a super fast, super delicious treat for the next party you're going to, or to impress your coworkers, or just to enjoy on your own, look no further. This candy is a nice mix of sweet and salty, smooth and crunchy, it has something for everyone! It takes only a few minutes to put together, but will need to be refrigerated for a while to set properly.

Start by melting the almond bark - I did this in the microwave at 50% power in 45 second intervals, stirring between each heating. At the end, stir it well until it is smooth. Hold back some of the pistachios and strawberries to use on top of the candy. Then add the remaining chopped pistachios,


and the freeze dried strawberries.


Stir well to coat the strawberries and pistachios then quickly spread it out onto a waxed-paper lined baking sheet.


Place the remaining strawberries over the top and sprinkle with the chopped pistachios.


Refrigerate for two hours or so until set, then remove and break into pieces.


That's all there is to it! You will love it.


And you'll probably want to share it, or else you might eat all of it yourself, not that I would know anything about that.


One year ago: Snickers Fudge
Two years ago: Chocolate Peppermint Swirl Cookies
Three years ago: Cranberry Apple Coffeecake
Four years ago: Layered Mint Fudge

Get more great inspiration at Hearth and Soul, Cast Party, What's Cooking, What's Cooking #2, Full Plate Thursday, Showcase your Talent, Foodie Friday, Foodtastic Friday, Foodie Friday #2, Friday Flash, Blog Strut, Food Frenzy.

Strawberry Pistachio Bark

12 oz. almond bark
1/4 cup chopped pistachios
1/2 cup freeze dried strawberries

In a microwave safe bowl, melt the almond bark using 50% power in 30 second intervals. Stir between each heating.

Reserve a few tablespoons of pistachios and strawberries. Add the rest to the almond bark and stir well to coat. Quickly spread onto a wax-paper lined baking sheet. Top with the reserved pistachios and strawberries. Refrigerate 2 hours to set, then remove and break into pieces.


If you need a super fast, super delicious treat for the next party you're going to, or to impress your coworkers, or just to enjoy on your own, look no further. This candy is a nice mix of sweet and salty, smooth and crunchy, it has something for everyone! It takes only a few minutes to put together, but will need to be refrigerated for a while to set properly.

Start by melting the almond bark - I did this in the microwave at 50% power in 45 second intervals, stirring between each heating. At the end, stir it well until it is smooth. Hold back some of the pistachios and strawberries to use on top of the candy. Then add the remaining chopped pistachios,


and the freeze dried strawberries.


Stir well to coat the strawberries and pistachios then quickly spread it out onto a waxed-paper lined baking sheet.


Place the remaining strawberries over the top and sprinkle with the chopped pistachios.


Refrigerate for two hours or so until set, then remove and break into pieces.


That's all there is to it! You will love it.


And you'll probably want to share it, or else you might eat all of it yourself, not that I would know anything about that.


One year ago: Snickers Fudge
Two years ago: Chocolate Peppermint Swirl Cookies
Three years ago: Cranberry Apple Coffeecake
Four years ago: Layered Mint Fudge

Get more great inspiration at Hearth and Soul, Cast Party, What's Cooking, What's Cooking #2, Full Plate Thursday, Showcase your Talent, Foodie Friday, Foodtastic Friday, Foodie Friday #2, Friday Flash, Blog Strut, Food Frenzy.

Strawberry Pistachio Bark

12 oz. almond bark
1/4 cup chopped pistachios
1/2 cup freeze dried strawberries

In a microwave safe bowl, melt the almond bark using 50% power in 30 second intervals. Stir between each heating.

Reserve a few tablespoons of pistachios and strawberries. Add the rest to the almond bark and stir well to coat. Quickly spread onto a wax-paper lined baking sheet. Top with the reserved pistachios and strawberries. Refrigerate 2 hours to set, then remove and break into pieces.


reade more... Résuméabuiyad

Snickers Fudge


I've had this recipe pinned for some time and was planning to make it for Christmas this year. When I realized that it also qualified for the Improv Challenge, I was psyched. I love snickers candy bars, and I was just drooling over the list of the ingredients in this candy.

Although it has a few steps, it's not difficult. I made this on a Sunday afternoon, jamming out to Christmas tunes and dancing around the kitchen while I waited for each layer to set. And here's my advice: savor this for yourself, but give most of it away. Not only will it bless others, but you won't have to get new pants in a size bigger than you currently wear... it's that delicious, you won't be able to stop eating it.

Ok, let's get cooking. Line a 9x13 pan with foil, and let the long edges hang over a bit. Combine the peanut butter, milk chocolate chips


and butterscotch chips in a small saucepan.


Heat over medium-low heat, stirring regularly, until the mixture is melted and smooth. It's ok if there are a few lumps - you don't want the chocolate to get so hot that it seizes up. Spread the chocolate over the foil to create the bottom layer.


Refrigerate for about an hour or until set. (You don't even need to wash the pan you melted the chips in - you'll use it again for the top layer!)

For the "nougat" layer, melt the butter in a saucepan over medium heat. Add the sugar


and the milk,


and bring to a boil.


Cook and stir for five minutes. Remove from the heat and stir in the marshmallow creme, peanut butter and vanilla.


Add in the peanuts.


Stir until well combined, then carefully spread over the chocolate layer.


Return to the refrigerator to set the nougat layer. For the caramel layer, combine the caramels and cream in a small saucepan


and cook over low heat, stirring often, until melted and smooth. Spread over the nougat layer.


Back to the fridge! Let the caramel layer set. Now for the topping, repeat what you did for the first layer. Combine the chips and peanut butter and heat and stir until melted and smooth. Spread the top layer over the caramel.


One more time back to the fridge for an hour to let the topping set up. Then remove the fudge using the foil handles and carefully peel back the foil.


Cut the fudge into rows,


then cut each row into individual pieces.


Ooh, aren't you excited to try this?


You'll want to make this candy a permanent part of your Christmas treat plate!


One year ago: Chocolate Peppermint Swirl Cookies
Two years ago: Cranberry Apple Coffeecake
Three years ago: Layered Mint Fudge

Find more great stuff at Full Plate Thursday, Recipe Box, Thursday's Treasures, Foodie Friday, Food on Fridays, Friday Finds, Foodtastic Friday, Foodie Friday, Ingredient Spotlight.

Snickers Fudge

First Layer:
1 cup milk chocolate chips
1/4 cup butterscotch chips
1/4 cup peanut butter

Second Layer:
4 Tbsp. butter
1 cup sugar
1/4 cup evaporated milk
1 1/2 cups marshmallow creme
1/4 cup peanut butter
1 tsp. vanilla
1 1/2 cups chopped salted peanuts

Third Layer:
1 - 14 oz. package caramels
1/4 cup heavy cream

Fourth Layer:
1 cup milk chocolate chips
1/4 cup butterscotch chips
1/4 cup peanut butter

Line a 9×13 baking pan with tin foil and then lightly spray with cooking spray.

For Layer 1: Over medium-low heat, melt milk chocolate chips, peanut butter, and butterscotch chips in small saucepan. Stir together until completely melted and smooth, then pour into the baking pan and spread out evenly. Refrigerate until set, at least one hour.

For Layer 2: Melt butter over medium heat in saucepan. Add sugar and evaporated milk and bring to boil. Cook for 5 minutes, stirring constantly. Remove from the heat and quickly mix in marshmallow creme, peanut butter, and vanilla. Add peanuts to mixture and spread evenly over chocolate layer. Refrigerate until set, about 2 hours.

For Layer 3: Melt caramels and heavy cream over low heat until smooth. Pour over peanut mixture and refrigerate until set, about 1 hour.

For Layer 4: Melt chocolate chips, butterscotch chips, and peanut butter over low heat until smooth. Pour over caramel layer and refrigerate for at least one hour.

Remove the fudge from the pan, then carefully peel off tin foil. Cut the fudge into long strips, and the individual pieces. Keep refrigerated until serving.

Recipe Source: Somewhere in the Middle


I've had this recipe pinned for some time and was planning to make it for Christmas this year. When I realized that it also qualified for the Improv Challenge, I was psyched. I love snickers candy bars, and I was just drooling over the list of the ingredients in this candy.

Although it has a few steps, it's not difficult. I made this on a Sunday afternoon, jamming out to Christmas tunes and dancing around the kitchen while I waited for each layer to set. And here's my advice: savor this for yourself, but give most of it away. Not only will it bless others, but you won't have to get new pants in a size bigger than you currently wear... it's that delicious, you won't be able to stop eating it.

Ok, let's get cooking. Line a 9x13 pan with foil, and let the long edges hang over a bit. Combine the peanut butter, milk chocolate chips


and butterscotch chips in a small saucepan.


Heat over medium-low heat, stirring regularly, until the mixture is melted and smooth. It's ok if there are a few lumps - you don't want the chocolate to get so hot that it seizes up. Spread the chocolate over the foil to create the bottom layer.


Refrigerate for about an hour or until set. (You don't even need to wash the pan you melted the chips in - you'll use it again for the top layer!)

For the "nougat" layer, melt the butter in a saucepan over medium heat. Add the sugar


and the milk,


and bring to a boil.


Cook and stir for five minutes. Remove from the heat and stir in the marshmallow creme, peanut butter and vanilla.


Add in the peanuts.


Stir until well combined, then carefully spread over the chocolate layer.


Return to the refrigerator to set the nougat layer. For the caramel layer, combine the caramels and cream in a small saucepan


and cook over low heat, stirring often, until melted and smooth. Spread over the nougat layer.


Back to the fridge! Let the caramel layer set. Now for the topping, repeat what you did for the first layer. Combine the chips and peanut butter and heat and stir until melted and smooth. Spread the top layer over the caramel.


One more time back to the fridge for an hour to let the topping set up. Then remove the fudge using the foil handles and carefully peel back the foil.


Cut the fudge into rows,


then cut each row into individual pieces.


Ooh, aren't you excited to try this?


You'll want to make this candy a permanent part of your Christmas treat plate!


One year ago: Chocolate Peppermint Swirl Cookies
Two years ago: Cranberry Apple Coffeecake
Three years ago: Layered Mint Fudge

Find more great stuff at Full Plate Thursday, Recipe Box, Thursday's Treasures, Foodie Friday, Food on Fridays, Friday Finds, Foodtastic Friday, Foodie Friday, Ingredient Spotlight.

Snickers Fudge

First Layer:
1 cup milk chocolate chips
1/4 cup butterscotch chips
1/4 cup peanut butter

Second Layer:
4 Tbsp. butter
1 cup sugar
1/4 cup evaporated milk
1 1/2 cups marshmallow creme
1/4 cup peanut butter
1 tsp. vanilla
1 1/2 cups chopped salted peanuts

Third Layer:
1 - 14 oz. package caramels
1/4 cup heavy cream

Fourth Layer:
1 cup milk chocolate chips
1/4 cup butterscotch chips
1/4 cup peanut butter

Line a 9×13 baking pan with tin foil and then lightly spray with cooking spray.

For Layer 1: Over medium-low heat, melt milk chocolate chips, peanut butter, and butterscotch chips in small saucepan. Stir together until completely melted and smooth, then pour into the baking pan and spread out evenly. Refrigerate until set, at least one hour.

For Layer 2: Melt butter over medium heat in saucepan. Add sugar and evaporated milk and bring to boil. Cook for 5 minutes, stirring constantly. Remove from the heat and quickly mix in marshmallow creme, peanut butter, and vanilla. Add peanuts to mixture and spread evenly over chocolate layer. Refrigerate until set, about 2 hours.

For Layer 3: Melt caramels and heavy cream over low heat until smooth. Pour over peanut mixture and refrigerate until set, about 1 hour.

For Layer 4: Melt chocolate chips, butterscotch chips, and peanut butter over low heat until smooth. Pour over caramel layer and refrigerate for at least one hour.

Remove the fudge from the pan, then carefully peel off tin foil. Cut the fudge into long strips, and the individual pieces. Keep refrigerated until serving.

Recipe Source: Somewhere in the Middle


reade more... Résuméabuiyad

Tropical Holiday

As I have shared with you before, but will once again for those just tuning in, my "boys" are lime crazy!  Anything and everything made with the little green gems is a favorite of theirs. From Cilantro Lime Rice to Key Lime Pie, they just can't get enough. So when I saw this recipe in my new Gooseberry Patch cookbook, The Christmas Table I knew it would one of the new holiday treats I tried this year. Oh sure, we have our favorites...the ones I make every year, but each year when the tree goes up, and usually before, I start to compile a list of new and fun things I've seen to try, and possibly add to our holiday traditions. I couldn't believe this when I saw it. I had never even thought of it, but it's pretty genius! Especially for those of us who love all the Christmas candies, but sometimes find a few to be too heavy. It's not so much that this is "lighter" than other fudge, but the lime flavor makes it so refreshing, and it gives your mouth a burst of flavor. If you have tried either my Peanut Butter or Easy Chocolate Fudge, you will love this too because once again, it's a simple method and you do NOT have to be a candy maker expert to be successful. Believe me, if I can make it, you can! I've had some candy disasters in the kitchen, but these easy fudge recipes never let me down! I hope I've found something yummy for you to include in your holiday baking extravaganza too, after all those neighbors and teachers gifts can always use something new and fun!

Key Lime Fudge From Gooseberry Patch
3 c. white chocolate chips
1 (14 oz) can sweet condensed milk
2 tsp. key lime zest, a little reserved for top
2 TBS key lime juice
1 c. chopped macadamia nuts, a few reserved for top

In a medium saucepan on low heat, combine chocolate chips and milk. Stir and cook until melted together. Remove from heat. Stir in zest and juice. Add in nuts. Stir well to combine. Line a 8x8 baking pan with foil, with enough covering over edges for easy lifting.  Grease foil well. Pour into prepared pan and spread evenly. Sprinkle with extra nuts and zest. Gently. pat to adhere. Chill 2 hours in fridge. Remove from pan by lifting on foil and then removing. Cut into squares. Store in fridge.


Shared on Mandy's Recipe Box Dec. 11, 2012
Shared on Lady Behind The Curtain Dec. 12, 2012
Shared on Miz Helen's Country Cottage Dec. 13, 2012
Shared on The Country Cook Dec. 14, 2012


Lime at Very Good Recipes
Pin It
As I have shared with you before, but will once again for those just tuning in, my "boys" are lime crazy!  Anything and everything made with the little green gems is a favorite of theirs. From Cilantro Lime Rice to Key Lime Pie, they just can't get enough. So when I saw this recipe in my new Gooseberry Patch cookbook, The Christmas Table I knew it would one of the new holiday treats I tried this year. Oh sure, we have our favorites...the ones I make every year, but each year when the tree goes up, and usually before, I start to compile a list of new and fun things I've seen to try, and possibly add to our holiday traditions. I couldn't believe this when I saw it. I had never even thought of it, but it's pretty genius! Especially for those of us who love all the Christmas candies, but sometimes find a few to be too heavy. It's not so much that this is "lighter" than other fudge, but the lime flavor makes it so refreshing, and it gives your mouth a burst of flavor. If you have tried either my Peanut Butter or Easy Chocolate Fudge, you will love this too because once again, it's a simple method and you do NOT have to be a candy maker expert to be successful. Believe me, if I can make it, you can! I've had some candy disasters in the kitchen, but these easy fudge recipes never let me down! I hope I've found something yummy for you to include in your holiday baking extravaganza too, after all those neighbors and teachers gifts can always use something new and fun!

Key Lime Fudge From Gooseberry Patch
3 c. white chocolate chips
1 (14 oz) can sweet condensed milk
2 tsp. key lime zest, a little reserved for top
2 TBS key lime juice
1 c. chopped macadamia nuts, a few reserved for top

In a medium saucepan on low heat, combine chocolate chips and milk. Stir and cook until melted together. Remove from heat. Stir in zest and juice. Add in nuts. Stir well to combine. Line a 8x8 baking pan with foil, with enough covering over edges for easy lifting.  Grease foil well. Pour into prepared pan and spread evenly. Sprinkle with extra nuts and zest. Gently. pat to adhere. Chill 2 hours in fridge. Remove from pan by lifting on foil and then removing. Cut into squares. Store in fridge.


Shared on Mandy's Recipe Box Dec. 11, 2012
Shared on Lady Behind The Curtain Dec. 12, 2012
Shared on Miz Helen's Country Cottage Dec. 13, 2012
Shared on The Country Cook Dec. 14, 2012


Lime at Very Good Recipes
Pin It
reade more... Résuméabuiyad

Gumdrop Fudge


Do you have a sweet tooth? Well this fudge is guaranteed to satisfy any sugar craving. Sugary gumdrops are suspended in an almond bark base - you might want to make an appointment at the dentist before you eat this. Well, not really, but it is sweet! This fudge is perfect for a Christmas cookie tray, and I like that it's different from many other candies at this time of year.

Start by combining the almond bark, salt and sweetened condensed milk in a medium saucepan.


Heat this mixture until it melts - use low heat, it won't take long. When it's melted, remove from the heat then add the vanilla


and stir until smooth. Stir in the gumdrops.


Line a 9-inch pan with aluminum foil, then pour the fudge mixture in.


Refrigerate for at least four hours or until set. Remove the fudge from the pan using the foil, then cut the candy into small pieces - first columns and then rows.


I love seeing those colorful little gumdrop pieces in there!


One year ago: Dulce de Leche Chocolate Bars
Two years ago: Oatmeal Spice Drop Cookies (another gumdrop recipe!)
Three years ago: Sara's Chili

Find more great ideas at Full Plate Thursday, Recipe Box, Thursday's Treasures, Foodie Friday, Food on Fridays, Friday Finds, Foodtastic Friday, Foodie Friday (#2), Food on Friday: Christmas treats.

Gumdrop Fudge

1 - 20 oz. package almond bark (or white chocolate candy coating)
1 can sweetened condensed milk
1 1/2 tsp. vanilla
1/8 tsp. salt
1 1/2 cups gumdrops, chopped

Coarsely chop the almond bark or white chocolate candy coating. Combine the bark, sweetened condensed milk and salt in a medium saucepan. Heat over low heat, stirring often, until the mixture melts. Stir until smooth. Remove from the heat and add the vanilla and the gumdrops.

Pour the mixture into foil-lined 9-inch pan. Refrigerate until set, about 4 hours. Remove the fudge using the foil, then cut into row and columns. Makes 36 pieces.

Recipe Source: Adapted from ValSoCal

Do you have a sweet tooth? Well this fudge is guaranteed to satisfy any sugar craving. Sugary gumdrops are suspended in an almond bark base - you might want to make an appointment at the dentist before you eat this. Well, not really, but it is sweet! This fudge is perfect for a Christmas cookie tray, and I like that it's different from many other candies at this time of year.

Start by combining the almond bark, salt and sweetened condensed milk in a medium saucepan.


Heat this mixture until it melts - use low heat, it won't take long. When it's melted, remove from the heat then add the vanilla


and stir until smooth. Stir in the gumdrops.


Line a 9-inch pan with aluminum foil, then pour the fudge mixture in.


Refrigerate for at least four hours or until set. Remove the fudge from the pan using the foil, then cut the candy into small pieces - first columns and then rows.


I love seeing those colorful little gumdrop pieces in there!


One year ago: Dulce de Leche Chocolate Bars
Two years ago: Oatmeal Spice Drop Cookies (another gumdrop recipe!)
Three years ago: Sara's Chili

Find more great ideas at Full Plate Thursday, Recipe Box, Thursday's Treasures, Foodie Friday, Food on Fridays, Friday Finds, Foodtastic Friday, Foodie Friday (#2), Food on Friday: Christmas treats.

Gumdrop Fudge

1 - 20 oz. package almond bark (or white chocolate candy coating)
1 can sweetened condensed milk
1 1/2 tsp. vanilla
1/8 tsp. salt
1 1/2 cups gumdrops, chopped

Coarsely chop the almond bark or white chocolate candy coating. Combine the bark, sweetened condensed milk and salt in a medium saucepan. Heat over low heat, stirring often, until the mixture melts. Stir until smooth. Remove from the heat and add the vanilla and the gumdrops.

Pour the mixture into foil-lined 9-inch pan. Refrigerate until set, about 4 hours. Remove the fudge using the foil, then cut into row and columns. Makes 36 pieces.

Recipe Source: Adapted from ValSoCal
reade more... Résuméabuiyad

Avalanche Bark


'Tis the season for making holiday treats! This is a great one to start with - a sweet peanut buttery candy filled with krispy rice, chocolate chips and marshmallows. I suppose a person could call this a Rocky Road bark of sorts - with the added crunch of the cereal. It's super yummy, and super addictive. And since it takes less than an hour from start to finish, it's great to whip up for a last minute party. It's also great to whip up to just have in the fridge - after all, it's the season for celebrations - even if your celebration is just eating this delicious candy!

Start by combining the almond bark (it will melt better if you chop it slightly first) and peanut butter in a microwave safe bowl.


Melt it in the microwave, at about 50% power, for 30 second intervals, stirring between each heating time.


When the mixture is melted, stir well to incorporate it all together, then add in the rice krispies,


marshmallows,


and chocolate chips.


Turn the mixture out into a 9-inch pan that is lined with parchment paper. Slightly press it down into an even layer.


Place the pan in the fridge and let set up, about 30 minutes. When it is set, remove the candy from the pan using the paper, then cut into rows


and then into chunks.


One year ago: Dulce de Leche Chocolate Bars
Two years ago: Sweet Potato Pound Cake
Three years ago: Sara's chili

Find more great ideas at Mangia Monday, Mop it up Monday, Mix it up Monday, Melt in your Mouth Monday, Recipe Sharing Monday, What's on the Menu Monday, Tasty Tuesday, Tuesday at the Table, Tasty Tuesday (#2), Tempt my Tummy Tuesday, Totally Tasty Tuesdays, Tasty Tuesday (#3), Crazy Sweet Tuesdays, Clever Chicks.

Avalanche Bark

12 ounces almond bark, coarsely chopped
2/3 cup chunky peanut butter
1 1/2 cups Rice Krispies
1 1/2 cups miniature marshmallows
1/2 cup miniature chocolate chips

Place the miniature chocolate chips on a plate and place in the freezer until ready to use.

Combine the almond bark and peanut butter in a medium bowl and microwave on 50% power in 30-second increments, stirring after each, until completely melted. Remove from microwave and stir in Rice Krispies. Gently stir in the miniature marshmallows, then the miniature chocolate chips.

Turn the mixture into a 9" square pan that has been lined with parchment paper. Press into an even layer. Refrigerate until set, about 30 minutes. Remove from the pan and cut into squares. Store in an airtight container in the refrigerator for up to 1 week.

Recipe Source: Adapted from Brown Eyed Baker

'Tis the season for making holiday treats! This is a great one to start with - a sweet peanut buttery candy filled with krispy rice, chocolate chips and marshmallows. I suppose a person could call this a Rocky Road bark of sorts - with the added crunch of the cereal. It's super yummy, and super addictive. And since it takes less than an hour from start to finish, it's great to whip up for a last minute party. It's also great to whip up to just have in the fridge - after all, it's the season for celebrations - even if your celebration is just eating this delicious candy!

Start by combining the almond bark (it will melt better if you chop it slightly first) and peanut butter in a microwave safe bowl.


Melt it in the microwave, at about 50% power, for 30 second intervals, stirring between each heating time.


When the mixture is melted, stir well to incorporate it all together, then add in the rice krispies,


marshmallows,


and chocolate chips.


Turn the mixture out into a 9-inch pan that is lined with parchment paper. Slightly press it down into an even layer.


Place the pan in the fridge and let set up, about 30 minutes. When it is set, remove the candy from the pan using the paper, then cut into rows


and then into chunks.


One year ago: Dulce de Leche Chocolate Bars
Two years ago: Sweet Potato Pound Cake
Three years ago: Sara's chili

Find more great ideas at Mangia Monday, Mop it up Monday, Mix it up Monday, Melt in your Mouth Monday, Recipe Sharing Monday, What's on the Menu Monday, Tasty Tuesday, Tuesday at the Table, Tasty Tuesday (#2), Tempt my Tummy Tuesday, Totally Tasty Tuesdays, Tasty Tuesday (#3), Crazy Sweet Tuesdays, Clever Chicks.

Avalanche Bark

12 ounces almond bark, coarsely chopped
2/3 cup chunky peanut butter
1 1/2 cups Rice Krispies
1 1/2 cups miniature marshmallows
1/2 cup miniature chocolate chips

Place the miniature chocolate chips on a plate and place in the freezer until ready to use.

Combine the almond bark and peanut butter in a medium bowl and microwave on 50% power in 30-second increments, stirring after each, until completely melted. Remove from microwave and stir in Rice Krispies. Gently stir in the miniature marshmallows, then the miniature chocolate chips.

Turn the mixture into a 9" square pan that has been lined with parchment paper. Press into an even layer. Refrigerate until set, about 30 minutes. Remove from the pan and cut into squares. Store in an airtight container in the refrigerator for up to 1 week.

Recipe Source: Adapted from Brown Eyed Baker
reade more... Résuméabuiyad

Candy Overload

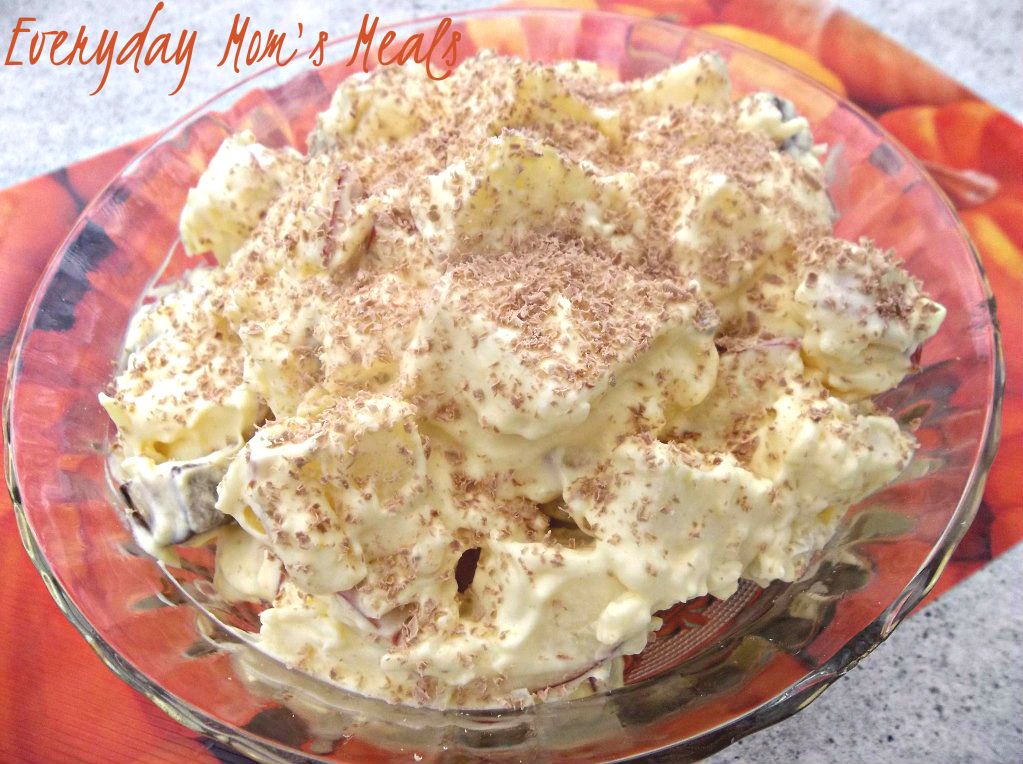
On November 1st, parents across this country, from one coast to another, will all be dealing with the same problem. TOO MUCH candy! Little ones will bring it home by the bagful on Halloween night, and even after picking through and probably disposing of some, there will still more than enough to feed an entire army for months! Or, many of you might have a different kind of candy problem. You bought bag after bag to hand out to the little ghosts and goblins, but only a tenth of what you anticipated rang your doorbell. So, if you find yourself with one, or both, of these problems come Thursday morning, I've got a great resolution for you that is yummy and easy at the same time. Why not take some of those candy bars and turn them into another dessert? How about adding in some fruit so you can feel better about eating it? When I saw this idea I thought it was pretty ingenious, and not just because it contained my favorite candy bar of all time. And yes, before you ask, I'm the mom that when I go through my son's candy bag at the end of the night, is sure to sneak a couple for myself. Don't judge...you know you do it too! So if you find yourself very "candy happy" and want to use some of it in a new,unique way, this salad is just the answer!

Apple Candy Bar Salad Adapted From Taste of Home
1 (3.4 oz) box French vanilla instant pudding
3/4 c. milk
1 1/2 c. Cool Whip
2 large honeycrisp apples, cored and chopped into bite sized chunks
2 Snickers candy bars (regular size), chopped
1/2 c. coconut
1 small chocolate bar, optional

With a wire whisk, combine 1/2 of the pudding mix and milk. Whisk for 2 minutes and let rest for 2 minutes until soft set. Fold in Cool Whip and remaining pudding mix. Stir well to combine. Add apples and candy bars. Stir. Add coconut. Stir well. Using a lemon zester, grate chocolate over the to to garnish. Chill until serving.
~Join me for Tasty Tuesday on Formula Mom~

Shared on Mandy's Recipe Box Oct. 30, 2012
Shared on Lady Behind The Curtain Oct. 31, 2012
Shared on Miz Helen's Country Cottage Nov. 1, 2012
Shared on The Country Cook Nov. 2, 2012

Mandy‘s Recipe Box
Featured On
Apples at Very Good Recipes
Pin It
On November 1st, parents across this country, from one coast to another, will all be dealing with the same problem. TOO MUCH candy! Little ones will bring it home by the bagful on Halloween night, and even after picking through and probably disposing of some, there will still more than enough to feed an entire army for months! Or, many of you might have a different kind of candy problem. You bought bag after bag to hand out to the little ghosts and goblins, but only a tenth of what you anticipated rang your doorbell. So, if you find yourself with one, or both, of these problems come Thursday morning, I've got a great resolution for you that is yummy and easy at the same time. Why not take some of those candy bars and turn them into another dessert? How about adding in some fruit so you can feel better about eating it? When I saw this idea I thought it was pretty ingenious, and not just because it contained my favorite candy bar of all time. And yes, before you ask, I'm the mom that when I go through my son's candy bag at the end of the night, is sure to sneak a couple for myself. Don't judge...you know you do it too! So if you find yourself very "candy happy" and want to use some of it in a new,unique way, this salad is just the answer!

Apple Candy Bar Salad Adapted From Taste of Home
1 (3.4 oz) box French vanilla instant pudding
3/4 c. milk
1 1/2 c. Cool Whip
2 large honeycrisp apples, cored and chopped into bite sized chunks
2 Snickers candy bars (regular size), chopped
1/2 c. coconut
1 small chocolate bar, optional

With a wire whisk, combine 1/2 of the pudding mix and milk. Whisk for 2 minutes and let rest for 2 minutes until soft set. Fold in Cool Whip and remaining pudding mix. Stir well to combine. Add apples and candy bars. Stir. Add coconut. Stir well. Using a lemon zester, grate chocolate over the to to garnish. Chill until serving.
~Join me for Tasty Tuesday on Formula Mom~

Shared on Mandy's Recipe Box Oct. 30, 2012
Shared on Lady Behind The Curtain Oct. 31, 2012
Shared on Miz Helen's Country Cottage Nov. 1, 2012
Shared on The Country Cook Nov. 2, 2012

Mandy‘s Recipe Box
Featured On
Apples at Very Good Recipes
Pin It
reade more... Résuméabuiyad

Make Your Kids Say "Ewww"...

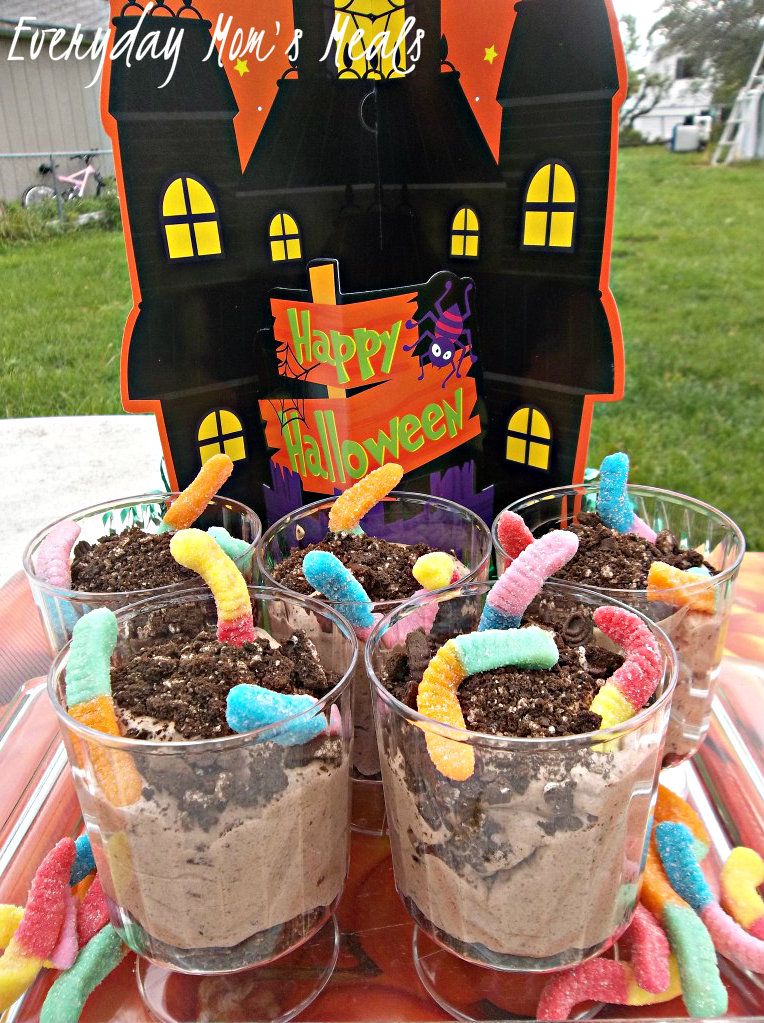
Do you have anything planned fun planned for Halloween? A costume party? A classroom party? Maybe you are just like me and while you don't have a big gathering to attend, you still want to make the day as fun as possible for you little ones. And maybe like me you enjoy the fact that not only can you be the coolest mom ever with a sweet treat, but you also get a little thrill of totally grossing them out! If this is the case, then why not have something easy to make, fun to say and yummy to eat waiting on them after school on Halloween? Can you imagine the kiddies walking through the front door asking "Mommy, can we have a snack?" And you answering with "Sure, I've some worms in dirt for you." The looks of horror on their faces would be priceless (In fact, you might want to have the camera ready!) This is actually something I remember eating as a kid at our church Halloween party, and it was always so much fun! Eating something that sounds so gross always makes it taste better! Let's face it, with kids (especially boys) the more gross something sounds, but tastes great, the more they will love it! So, if you are looking for a entertaining, yet simple dessert for Halloween night when the ghosts and goblins stop by to say "Boo", I've got you covered!

Worms in Dirt
1 (3.4oz) package instant chocolate pudding
2 c. cold milk
1 (8oz) tub Cool Whip
1 (16oz) package chocolate sandwich cookies
Gummy Worms (I used the sour variety)

In a large bowl, combine pudding and milk. Whisk constantly for 2 minutes. Allow to set in fridge for 5 minutes. In a large plastic bag, add cookies and crush with a rolling pin. When pudding is set, add Cool Whip and half the crushed cookies. Stir well until mixture is all the same color. In small plastic cups place 1 TBS remaining crushed cookies. Spoon pudding mixture into another plastic bag, and cut corner off to make a pastry bag. Pipe pudding into plastic cups, filling about 3/4 the way. Top each with about 2 TBS remaining cookies and gummy worms.

~Join me for Tasty Tuesday on Formula Mom~

Shared on Mandy's Recipe Box Oct. 23, 2012
Shared on Lady Behind The Curtain Oct. 24, 2012
Shared on Miz Helen's Country Cottage Oct. 25, 2012
Shared on The Country Cook Oct. 26, 2012
Kids at Very Good Recipes
Pin It
Do you have anything planned fun planned for Halloween? A costume party? A classroom party? Maybe you are just like me and while you don't have a big gathering to attend, you still want to make the day as fun as possible for you little ones. And maybe like me you enjoy the fact that not only can you be the coolest mom ever with a sweet treat, but you also get a little thrill of totally grossing them out! If this is the case, then why not have something easy to make, fun to say and yummy to eat waiting on them after school on Halloween? Can you imagine the kiddies walking through the front door asking "Mommy, can we have a snack?" And you answering with "Sure, I've some worms in dirt for you." The looks of horror on their faces would be priceless (In fact, you might want to have the camera ready!) This is actually something I remember eating as a kid at our church Halloween party, and it was always so much fun! Eating something that sounds so gross always makes it taste better! Let's face it, with kids (especially boys) the more gross something sounds, but tastes great, the more they will love it! So, if you are looking for a entertaining, yet simple dessert for Halloween night when the ghosts and goblins stop by to say "Boo", I've got you covered!

Worms in Dirt
1 (3.4oz) package instant chocolate pudding
2 c. cold milk
1 (8oz) tub Cool Whip
1 (16oz) package chocolate sandwich cookies
Gummy Worms (I used the sour variety)

In a large bowl, combine pudding and milk. Whisk constantly for 2 minutes. Allow to set in fridge for 5 minutes. In a large plastic bag, add cookies and crush with a rolling pin. When pudding is set, add Cool Whip and half the crushed cookies. Stir well until mixture is all the same color. In small plastic cups place 1 TBS remaining crushed cookies. Spoon pudding mixture into another plastic bag, and cut corner off to make a pastry bag. Pipe pudding into plastic cups, filling about 3/4 the way. Top each with about 2 TBS remaining cookies and gummy worms.

~Join me for Tasty Tuesday on Formula Mom~

Shared on Mandy's Recipe Box Oct. 23, 2012
Shared on Lady Behind The Curtain Oct. 24, 2012
Shared on Miz Helen's Country Cottage Oct. 25, 2012
Shared on The Country Cook Oct. 26, 2012
Kids at Very Good Recipes
Pin It
reade more... Résuméabuiyad

Marshmallow Inspired

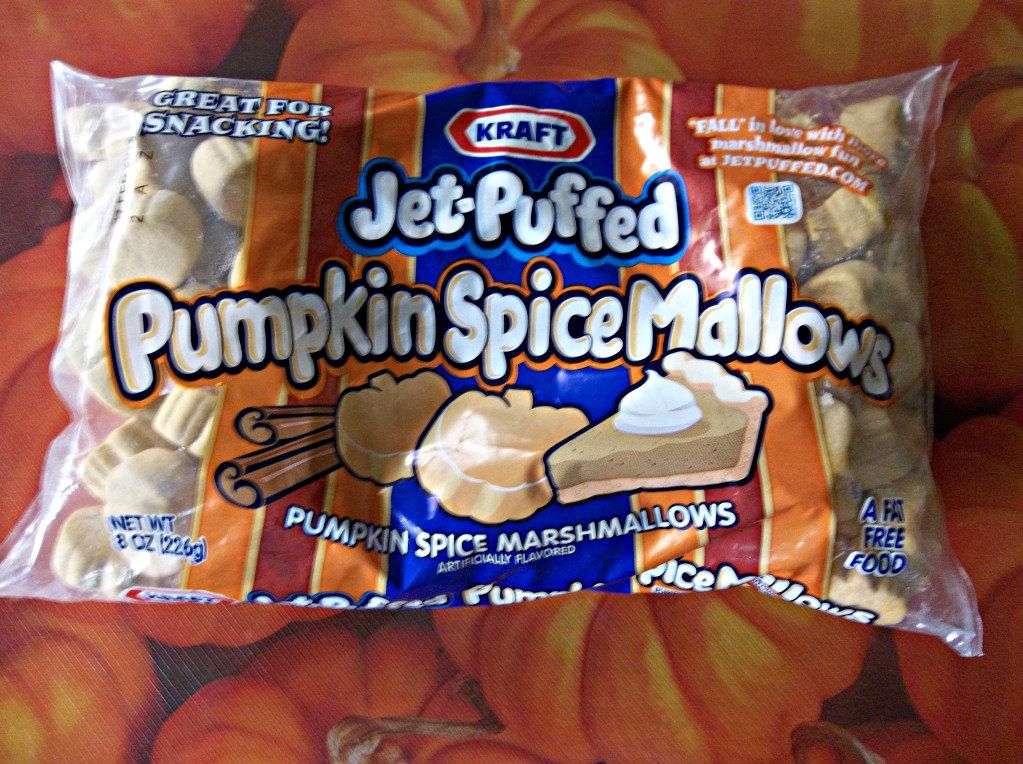
So a few weeks ago I was rushing through Meijer trying to pick up a few last minute items I had actually forgotten the previous day when I was grocery shopping when all of a sudden an "end-cap" display stopped me dead in my tracks. What could have caught my attention so much you ask? Well, it was something I had never seen before and instantly knew would be going home with me...Pumpkin Spiced Marshmallows.

 Have you seen them at your store? I just love all these creative & yummy flavors they are coming out with! Last year we discovered the Peppermint ones at Christmas time (so delicious in hot cocoa!), and then this summer I used the Mint Chocolate ones for my first s'mores ever! And now the perfect ones for autumn! I wasn't even sure what I would do with them but I knew I had to come up with something!

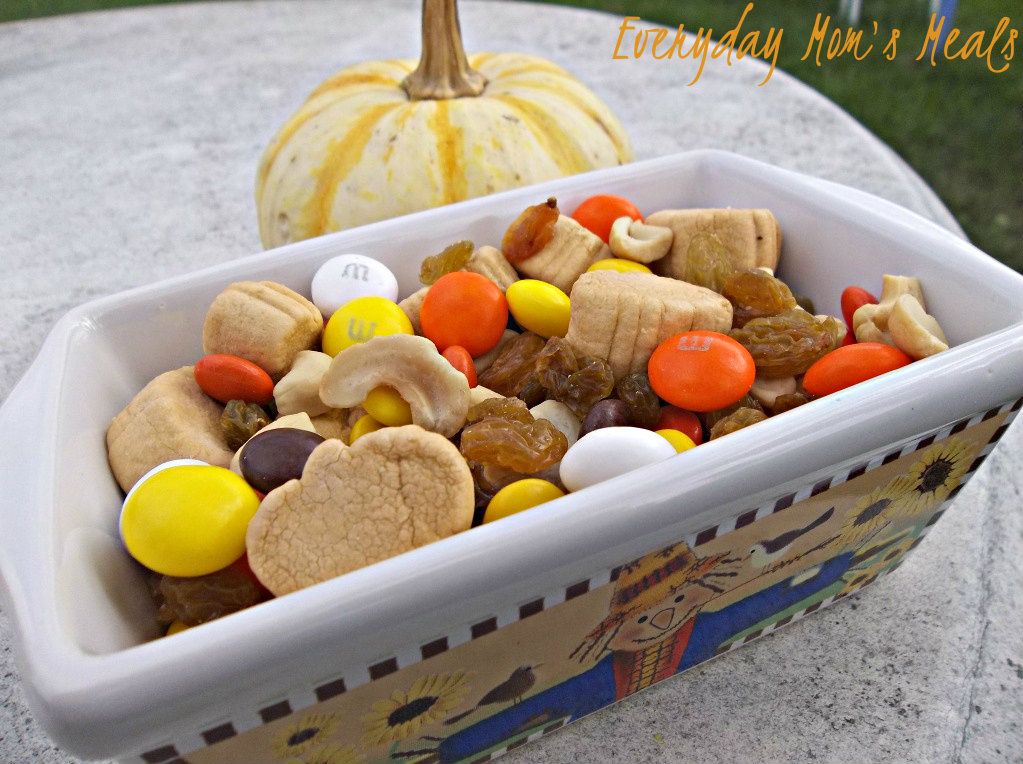
After about a week of sitting in my cupboard I finally knew what I wanted to do. A snack mix, of course. I just love trail mixes and coming up with different combos is both challenging for me, and fun for Alex. Last Halloween I shared with you my Goblin Mix and then more recently Monkey Munch I served at his birthday party. They just make such great party foods, or even after school snacks. For this one, I wanted every ingredient to be fall colored, so it took a little extra effort, but the result is both pretty and yummy! If your child's class is having a fall party, put some of this in cute treat sacks and the kiddies will love it! And be sure to be on the lookout for new flavors of marshmallows coming to a baking aisle near you!

Pumpkin Spice Snack Mix
1 (8oz) package pumpkin spice marshmallows
1 c. cashew halves
1 c. golden raisins
1 (9.9oz) package White Chocolate Candy Corn M&Ms
1 (14.5oz) package Reece's Pieces Candy

In a large bowl, combine all and mix well. Store in airtight container.


Shared on The Country Cook Oct. 12, 2012
Shared on Make Ahead Meals Oct. 15, 2012
Shared on Mandy's Recipe Box Oct. 16, 2012

Snacks at Very Good Recipes
Pin It
So a few weeks ago I was rushing through Meijer trying to pick up a few last minute items I had actually forgotten the previous day when I was grocery shopping when all of a sudden an "end-cap" display stopped me dead in my tracks. What could have caught my attention so much you ask? Well, it was something I had never seen before and instantly knew would be going home with me...Pumpkin Spiced Marshmallows.

 Have you seen them at your store? I just love all these creative & yummy flavors they are coming out with! Last year we discovered the Peppermint ones at Christmas time (so delicious in hot cocoa!), and then this summer I used the Mint Chocolate ones for my first s'mores ever! And now the perfect ones for autumn! I wasn't even sure what I would do with them but I knew I had to come up with something!

After about a week of sitting in my cupboard I finally knew what I wanted to do. A snack mix, of course. I just love trail mixes and coming up with different combos is both challenging for me, and fun for Alex. Last Halloween I shared with you my Goblin Mix and then more recently Monkey Munch I served at his birthday party. They just make such great party foods, or even after school snacks. For this one, I wanted every ingredient to be fall colored, so it took a little extra effort, but the result is both pretty and yummy! If your child's class is having a fall party, put some of this in cute treat sacks and the kiddies will love it! And be sure to be on the lookout for new flavors of marshmallows coming to a baking aisle near you!

Pumpkin Spice Snack Mix
1 (8oz) package pumpkin spice marshmallows
1 c. cashew halves
1 c. golden raisins
1 (9.9oz) package White Chocolate Candy Corn M&Ms
1 (14.5oz) package Reece's Pieces Candy

In a large bowl, combine all and mix well. Store in airtight container.


Shared on The Country Cook Oct. 12, 2012
Shared on Make Ahead Meals Oct. 15, 2012
Shared on Mandy's Recipe Box Oct. 16, 2012

Snacks at Very Good Recipes
Pin It
reade more... Résuméabuiyad

Caramel Chocolate Fudge


This fudge is very tasty, and impressive looking, but is not difficult to make. It uses everyday ingredients that you probably already have in your pantry! Basically, you just repeat the same process twice with slightly different ingredients to get a multicolored and flavored candy that is wonderful for serving or gift giving. This makes a large pan of fudge - 96 pieces - so you will have plenty to share!

Start by preparing the pan. Line a 9 x13-inch pan with foil, extending foil over sides of pan to create handles. Then spray the foil with cooking spray. (Sometimes I use Reynolds Release wrap - accomplishes the same thing!)

To make the caramel layer, combine the butter, evaporated milk


and brown sugar


in a heavy medium saucepan and cook over medium-high heat, stirring constantly, until sugar is dissolved.


Heat to boiling, stirring constantly. Reduce heat to low; boil gently without stirring 5 minutes.


Remove saucepan from heat. Add the vanilla,


marshmallows,


and the vanilla chips.


Stir until marshmallows and chips are melted and mixture is smooth.


Stir in chopped walnuts, if you're using them. (I don't, so you won't see them here!) Quickly spread mixture in pan.


Refrigerate this layer for 30 minutes before preparing the chocolate layer.

The second layer is made just like the first, but with chocolate chips instead of vanilla, and white sugar instead of brown. So, combine the butter and remaining milk


with the sugar in a heavy medium saucepan, and cook over medium-high heat, stirring constantly, until the sugar is dissolved.


Heat to boiling, stirring constantly. Reduce heat to low; boil gently without stirring 5 minutes. Remove the saucepan from heat and add the marshmallows,


chocolate chips


and vanilla. Stir until marshmallows and chips are melted and mixture is smooth. Beat 30 seconds with spoon until glossy.


Quickly spread mixture on top of caramel fudge layer.


If you're using walnuts, sprinkle them over fudge and press gently onto the surface.

Cover the fudge with foil or plastic wrap and refrigerate for 1 1/2 hours. Remove the fudge from the pan by lifting the foil handles, then carefully peel back the foil from the sides of the candy. With a long knife, cut the fudge into 12 rows by 8 rows.


Store in a tightly covered container in refrigerator.

One year ago: Chocolate Peanut Butter Caramel Pretzels
Two years ago: Shrimp and Corn Chowder

Get more inspiration at Turning the Table Thursday, It's a Keeper, Full Plate Thursday, Sweet Treats Thursday, Sweet Tooth Friday, Foodie Friday, Fusion Friday, Food on Fridays, Friday Food, Simply Delish, Sweets for a Saturday.

Caramel Chocolate Fudge

Caramel Fudge Layer:
2 cups brown sugar
1/4 cup butter (do not use margarine)
3/4 cup evaporated milk (1/2 of 12-oz can)
2 cups miniature marshmallows
1 bag (12 oz) white vanilla baking chips (2 cups)
1 tsp. vanilla
1 cup chopped walnuts, optional

Chocolate Fudge Layer:
2 cups sugar
1/4 cup butter (do not use margarine)
3/4 cup evaporated milk (remaining 1/2 of 12-oz can)
2 cups miniature marshmallows
1 bag (12 oz) semisweet chocolate chips (2 cups)
1 tsp. vanilla
8 oz. walnut halves or pieces (about 1 1/2 cups)

Line a 9 x13-inch pan with foil, extending foil over sides of pan; spray foil with cooking spray.

For Caramel Fudge Layer, in heavy 3-quart saucepan, cook brown sugar, 1/4 cup butter and 3/4 cup evaporated milk over medium-high heat, stirring constantly, until sugar is dissolved. Heat to boiling, stirring constantly. Reduce heat to low; boil gently without stirring 5 minutes. Remove saucepan from heat. Stir in 2 cups marshmallows, the vanilla chips and 1 teaspoon vanilla; stir until marshmallows and chips are melted and mixture is smooth. Stir in chopped walnuts. Quickly spread mixture in pan. Refrigerate 30 minutes before preparing Chocolate Fudge layer.

For Chocolate Fudge Layer, in heavy 3-quart saucepan, cook sugar, 1/4 cup butter and 3/4 cup evaporated milk over medium-high heat, stirring constantly, until sugar is dissolved. Heat to boiling, stirring constantly. Reduce heat to low; boil gently without stirring 5 minutes. Remove saucepan from heat. Stir in 2 cups marshmallows, the chocolate chips and vanilla; stir until marshmallows and chips are melted and mixture is smooth. Beat 30 seconds with spoon until glossy. Quickly spread mixture on top of caramel fudge layer. Sprinkle walnut halves and pieces over fudge; press gently into fudge.

Cover; refrigerate 1 1/2 hours. Remove fudge from pan by lifting foil; remove foil from sides of fudge. With long knife, cut fudge into 12 rows by 8 rows. Store in tightly covered container in refrigerator. Makes 96 pieces.


This fudge is very tasty, and impressive looking, but is not difficult to make. It uses everyday ingredients that you probably already have in your pantry! Basically, you just repeat the same process twice with slightly different ingredients to get a multicolored and flavored candy that is wonderful for serving or gift giving. This makes a large pan of fudge - 96 pieces - so you will have plenty to share!

Start by preparing the pan. Line a 9 x13-inch pan with foil, extending foil over sides of pan to create handles. Then spray the foil with cooking spray. (Sometimes I use Reynolds Release wrap - accomplishes the same thing!)

To make the caramel layer, combine the butter, evaporated milk


and brown sugar


in a heavy medium saucepan and cook over medium-high heat, stirring constantly, until sugar is dissolved.


Heat to boiling, stirring constantly. Reduce heat to low; boil gently without stirring 5 minutes.


Remove saucepan from heat. Add the vanilla,


marshmallows,


and the vanilla chips.


Stir until marshmallows and chips are melted and mixture is smooth.


Stir in chopped walnuts, if you're using them. (I don't, so you won't see them here!) Quickly spread mixture in pan.


Refrigerate this layer for 30 minutes before preparing the chocolate layer.

The second layer is made just like the first, but with chocolate chips instead of vanilla, and white sugar instead of brown. So, combine the butter and remaining milk


with the sugar in a heavy medium saucepan, and cook over medium-high heat, stirring constantly, until the sugar is dissolved.


Heat to boiling, stirring constantly. Reduce heat to low; boil gently without stirring 5 minutes. Remove the saucepan from heat and add the marshmallows,


chocolate chips


and vanilla. Stir until marshmallows and chips are melted and mixture is smooth. Beat 30 seconds with spoon until glossy.


Quickly spread mixture on top of caramel fudge layer.


If you're using walnuts, sprinkle them over fudge and press gently onto the surface.

Cover the fudge with foil or plastic wrap and refrigerate for 1 1/2 hours. Remove the fudge from the pan by lifting the foil handles, then carefully peel back the foil from the sides of the candy. With a long knife, cut the fudge into 12 rows by 8 rows.


Store in a tightly covered container in refrigerator.

One year ago: Chocolate Peanut Butter Caramel Pretzels
Two years ago: Shrimp and Corn Chowder

Get more inspiration at Turning the Table Thursday, It's a Keeper, Full Plate Thursday, Sweet Treats Thursday, Sweet Tooth Friday, Foodie Friday, Fusion Friday, Food on Fridays, Friday Food, Simply Delish, Sweets for a Saturday.

Caramel Chocolate Fudge

Caramel Fudge Layer:
2 cups brown sugar
1/4 cup butter (do not use margarine)
3/4 cup evaporated milk (1/2 of 12-oz can)
2 cups miniature marshmallows
1 bag (12 oz) white vanilla baking chips (2 cups)
1 tsp. vanilla
1 cup chopped walnuts, optional

Chocolate Fudge Layer:
2 cups sugar
1/4 cup butter (do not use margarine)
3/4 cup evaporated milk (remaining 1/2 of 12-oz can)
2 cups miniature marshmallows
1 bag (12 oz) semisweet chocolate chips (2 cups)
1 tsp. vanilla
8 oz. walnut halves or pieces (about 1 1/2 cups)

Line a 9 x13-inch pan with foil, extending foil over sides of pan; spray foil with cooking spray.

For Caramel Fudge Layer, in heavy 3-quart saucepan, cook brown sugar, 1/4 cup butter and 3/4 cup evaporated milk over medium-high heat, stirring constantly, until sugar is dissolved. Heat to boiling, stirring constantly. Reduce heat to low; boil gently without stirring 5 minutes. Remove saucepan from heat. Stir in 2 cups marshmallows, the vanilla chips and 1 teaspoon vanilla; stir until marshmallows and chips are melted and mixture is smooth. Stir in chopped walnuts. Quickly spread mixture in pan. Refrigerate 30 minutes before preparing Chocolate Fudge layer.

For Chocolate Fudge Layer, in heavy 3-quart saucepan, cook sugar, 1/4 cup butter and 3/4 cup evaporated milk over medium-high heat, stirring constantly, until sugar is dissolved. Heat to boiling, stirring constantly. Reduce heat to low; boil gently without stirring 5 minutes. Remove saucepan from heat. Stir in 2 cups marshmallows, the chocolate chips and vanilla; stir until marshmallows and chips are melted and mixture is smooth. Beat 30 seconds with spoon until glossy. Quickly spread mixture on top of caramel fudge layer. Sprinkle walnut halves and pieces over fudge; press gently into fudge.

Cover; refrigerate 1 1/2 hours. Remove fudge from pan by lifting foil; remove foil from sides of fudge. With long knife, cut fudge into 12 rows by 8 rows. Store in tightly covered container in refrigerator. Makes 96 pieces.
reade more... Résuméabuiyad