Pages

Showing posts with label Sour Cream. Show all posts

A Twist On a NYE Favorite

If you know me personally, or have been following the blog for a while now, you know we have a very fun tradition in this house for New Year's Eve. It doesn't involve getting all dressed up, or heading out with the masses. What it does involve is plenty of family time and yummy food. Each December 31st we ring in the new year here at home, just the 3 of us, watching movies or holiday specials, or even mixed martial arts on the tv, all while enjoying a buffet of our favorite appetizers. I filled the table with a huge variety of our most enjoyed "nibbly bits" (as Alex calls them) and we eat all night long, warm and safe in our home.

Today's recipe is a new twist on one of my husband's favorite things I put out on this buffet every year. Probably what is the most simple appetizer ever created. Dried Beef Rolls. You've had these, right?? Cream cheese spread on dried beef, rolled and cut into bite sized pieces. I still remember the first year I made them for him. I had all these amazing dishes sitting out, some kind of complicated, and these simple rolls that took me all of 10 minutes to make were the one thing he was most excited about. The thing he went on and on about. The thing he could not get enough of. I was like "All of this food, and that is what you are most excited about?" Hey, he likes the simple things, what can I say? So every year since they are always included in our New Year's Eve feast.

But this year I will be switching it up just a little, with this fantastic dip that is super tasty, and almost just as easy. It really doesn't take much more time and has incredible flavor. It would be perfect for any holiday party, rather it be next week for Christmas, or if like me you're already planning how to welcome in 2014. It will be here before we know it!

Creamy Beef Spread From Hometown Christmas
1 (8 oz.) package cream cheese, at room temperature
1/4 c. sour cream
1/4 c. mayo
1/4 c. grated Parmesan cheese
1 green onion, finely chopped, plus extra for garnish
1 (2.5 oz.) jar dried beefy, finely chopped and divided

In a bowl beat cream cheese until smooth. Add remaining ingredients, reserving 2 TBS dried beef. Mix well and transfer to a serving bowl. Sprinkle with reserved beef and extra onion. Cover and chill until serving. Serve with crackers.


Shared on The Country Cook Dec. 20, 2013

Appetizers at Very Good Recipes
If you know me personally, or have been following the blog for a while now, you know we have a very fun tradition in this house for New Year's Eve. It doesn't involve getting all dressed up, or heading out with the masses. What it does involve is plenty of family time and yummy food. Each December 31st we ring in the new year here at home, just the 3 of us, watching movies or holiday specials, or even mixed martial arts on the tv, all while enjoying a buffet of our favorite appetizers. I filled the table with a huge variety of our most enjoyed "nibbly bits" (as Alex calls them) and we eat all night long, warm and safe in our home.

Today's recipe is a new twist on one of my husband's favorite things I put out on this buffet every year. Probably what is the most simple appetizer ever created. Dried Beef Rolls. You've had these, right?? Cream cheese spread on dried beef, rolled and cut into bite sized pieces. I still remember the first year I made them for him. I had all these amazing dishes sitting out, some kind of complicated, and these simple rolls that took me all of 10 minutes to make were the one thing he was most excited about. The thing he went on and on about. The thing he could not get enough of. I was like "All of this food, and that is what you are most excited about?" Hey, he likes the simple things, what can I say? So every year since they are always included in our New Year's Eve feast.

But this year I will be switching it up just a little, with this fantastic dip that is super tasty, and almost just as easy. It really doesn't take much more time and has incredible flavor. It would be perfect for any holiday party, rather it be next week for Christmas, or if like me you're already planning how to welcome in 2014. It will be here before we know it!

Creamy Beef Spread From Hometown Christmas
1 (8 oz.) package cream cheese, at room temperature
1/4 c. sour cream
1/4 c. mayo
1/4 c. grated Parmesan cheese
1 green onion, finely chopped, plus extra for garnish
1 (2.5 oz.) jar dried beefy, finely chopped and divided

In a bowl beat cream cheese until smooth. Add remaining ingredients, reserving 2 TBS dried beef. Mix well and transfer to a serving bowl. Sprinkle with reserved beef and extra onion. Cover and chill until serving. Serve with crackers.


Shared on The Country Cook Dec. 20, 2013

Appetizers at Very Good Recipes
reade more... Résuméabuiyad

Back To Back Comparison

A couple days ago I featured my Mom's Goulash, the recipe I had grown up with, and now make for my family regularly. It's simple, tasty and a perfect weeknight supper. And until recent years, it was the only version I knew; but as my culinary knowledge and experiences have expanded, I have discovered there are many different versions of this classic, and today I'm sharing another, that is nothing like the first, but just as yummy, in different ways!

When I first came across this recipe, two things caught my eye. Goulash and Crock Pot. My brain immediately went to that stand by recipe I've used for years and I thought "Oh yeah, I bet you could do that in the slow cooker, making it even easier." Then I went on to read the recipe and realized it was very different than what I was picturing.

According to Wikipedia, "Goulash is a soup or stew of meat, noodles and vegetables, seasoned with paprika and other spices, originating from Hungary."  Um, okay, so I guess this is actually closer to a traditional goulash than what I've been calling goulash all these years.

However, in the same article on Wikipedia, it mentions "American Goulash, mentioned in cookbooks dating back to 1914, consists of ground meat, elbow macaroni, and tomatoes in some form." Ah, okay now I see what happened. Someone way back when decided to Americanize a recipe, and a new, very different version was born.

This actually reminds me of another dish that is popular in our house, because it's Mr. Everyday's favorite, Beef Stroganoff, but the addition of tomatoes makes is a very different flavor profile. This is the perfect weeknight supper. Prepare it in the morning before work. Set it and forget it. When you get home, you'll have some noodles to cook and sour cream to stir into the beef mixture. Supper can literally be on the table in about 20 minutes! And the beef? Oh my. So tender. So flavorful. And the sauce over the noodles...YUM!

However you choose to eat your goulash, rather it be a more traditional way, or a more American version, it's a delicious family friendly dish. And nothing says one way is the best way. Personally, I like having different versions of something familiar. It prevent the meal rut we all seem to find now and again.

Crock Pot Hungarian Goulash From Taste of Home
2 lbs. round steak, cut into 1-inch cubes
1 medium white onion, thinly sliced
2 TBS flour
1 1/2 tsp. paprika
1 tsp. garlic salt
1/2 tsp. pepper
1 bay leaf
1 (14.5 oz) can diced tomatoes, with juice
8 oz. sour cream
1 lb. egg noodles
2 TBS butter
2 TBS dried parsley

Place beef and onions in bottom of slow cooker. In a small bowl combine flour, paprika, garlic salt, and pepper. Mix well. Sprinkle over meat and onions. Stir to coat. Add tomatoes. Stir to combine. Add bay leaf. Cook on LOW 8-10 hours until meat is tender. Just before serving, boil egg noodles according to package directions. Drain and return to hot pot. Stir in butter and parsley. Add sour cream to beef mixture and stir well. Serve beef over hot egg noodles. Garnish with extra parsley.


Shared on The Country Cook Sept. 6, 2013
Crock Pot at Very Good Recipes
A couple days ago I featured my Mom's Goulash, the recipe I had grown up with, and now make for my family regularly. It's simple, tasty and a perfect weeknight supper. And until recent years, it was the only version I knew; but as my culinary knowledge and experiences have expanded, I have discovered there are many different versions of this classic, and today I'm sharing another, that is nothing like the first, but just as yummy, in different ways!

When I first came across this recipe, two things caught my eye. Goulash and Crock Pot. My brain immediately went to that stand by recipe I've used for years and I thought "Oh yeah, I bet you could do that in the slow cooker, making it even easier." Then I went on to read the recipe and realized it was very different than what I was picturing.

According to Wikipedia, "Goulash is a soup or stew of meat, noodles and vegetables, seasoned with paprika and other spices, originating from Hungary."  Um, okay, so I guess this is actually closer to a traditional goulash than what I've been calling goulash all these years.

However, in the same article on Wikipedia, it mentions "American Goulash, mentioned in cookbooks dating back to 1914, consists of ground meat, elbow macaroni, and tomatoes in some form." Ah, okay now I see what happened. Someone way back when decided to Americanize a recipe, and a new, very different version was born.

This actually reminds me of another dish that is popular in our house, because it's Mr. Everyday's favorite, Beef Stroganoff, but the addition of tomatoes makes is a very different flavor profile. This is the perfect weeknight supper. Prepare it in the morning before work. Set it and forget it. When you get home, you'll have some noodles to cook and sour cream to stir into the beef mixture. Supper can literally be on the table in about 20 minutes! And the beef? Oh my. So tender. So flavorful. And the sauce over the noodles...YUM!

However you choose to eat your goulash, rather it be a more traditional way, or a more American version, it's a delicious family friendly dish. And nothing says one way is the best way. Personally, I like having different versions of something familiar. It prevent the meal rut we all seem to find now and again.

Crock Pot Hungarian Goulash From Taste of Home
2 lbs. round steak, cut into 1-inch cubes
1 medium white onion, thinly sliced
2 TBS flour
1 1/2 tsp. paprika
1 tsp. garlic salt
1/2 tsp. pepper
1 bay leaf
1 (14.5 oz) can diced tomatoes, with juice
8 oz. sour cream
1 lb. egg noodles
2 TBS butter
2 TBS dried parsley

Place beef and onions in bottom of slow cooker. In a small bowl combine flour, paprika, garlic salt, and pepper. Mix well. Sprinkle over meat and onions. Stir to coat. Add tomatoes. Stir to combine. Add bay leaf. Cook on LOW 8-10 hours until meat is tender. Just before serving, boil egg noodles according to package directions. Drain and return to hot pot. Stir in butter and parsley. Add sour cream to beef mixture and stir well. Serve beef over hot egg noodles. Garnish with extra parsley.


Shared on The Country Cook Sept. 6, 2013
Crock Pot at Very Good Recipes
reade more... Résuméabuiyad

Doesn't Get Fresher

Having a big barbecue this Labor Day weekend? Have fresh veggies from the garden you would like to use? How about a cool, creamy, crunchy and most of all flavorful salad you and your guests will love? Your everyday mom is here with the perfect idea!

I love summer for so many reasons, too many to even list, but the foodie in me loves being able to eat foods we grow ourselves in our backyard. Or should I say, foods my boys grow in our backyard. Because besides picking them, I don't have much to do with it. It's better that way. My thumbs are not green in any way!

But when they come inside with a big bowl filled with beautiful tomatoes, cucumbers, blackberries, grapes, etc...that's when it's my job to find ways to use them all in a yummy, and sometimes new way.

When I first saw this recipe, it reminded me of other creamy veggie salads I've made in the past, except for one thing: the radishes. We are huge radish fans. Even little man loves them, so I was happy to find a new way to use them. Plus, I loved the use of lemon and seasoning salt in the dressing. They really took the basic sour cream dressing and took it to a whole other flavor level. Oh, and I have to tell you, I was extremely pleased with it's consistency after sitting in the fridge for a few hours. The vegetables were still crisp, not mushy at all.

Since we're going into the "last weekend of summer" (the quotations are because I don't consider it to be, but I know society says different) there is no better time than to head outside, fire up the grill, invite friends and family over, and enjoy a backyard bash. And this salad would be great with anything you're pulling off the fire. Enjoy summer's bounty while you still can because it doesn't get fresher, and in about 3 months when we're knee deep in snow, we will be missing it profusely!

Creamy Vegetable Salad Adapted From Taste of Home
2 large tomatoes, seeded and chopped
2 large cucumbers, seeded and chopped
3-4 green onions, chopped, reserve a few for garnish
6 radishes, finely chopped
1 c. sour cream
1/2 tsp. seasoning salt
1/8 c. lemon juice
1/4 tsp. pepper
1/2 tsp. celery seed, extra for garnish

In a large bowl combine tomatoes, cucumbers, green onions, and radishes. Toss to combine. In a small bowl whisk together sour cream, seasoning salt, lemon juice, pepper and celery seed. Pour over veggies. Mix well. Cover and refrigerate at least 2 hours. Serve with a slotted spoon.


Shared on The Country Cook Aug. 30, 2013
Salad at Very Good Recipes
Having a big barbecue this Labor Day weekend? Have fresh veggies from the garden you would like to use? How about a cool, creamy, crunchy and most of all flavorful salad you and your guests will love? Your everyday mom is here with the perfect idea!

I love summer for so many reasons, too many to even list, but the foodie in me loves being able to eat foods we grow ourselves in our backyard. Or should I say, foods my boys grow in our backyard. Because besides picking them, I don't have much to do with it. It's better that way. My thumbs are not green in any way!

But when they come inside with a big bowl filled with beautiful tomatoes, cucumbers, blackberries, grapes, etc...that's when it's my job to find ways to use them all in a yummy, and sometimes new way.

When I first saw this recipe, it reminded me of other creamy veggie salads I've made in the past, except for one thing: the radishes. We are huge radish fans. Even little man loves them, so I was happy to find a new way to use them. Plus, I loved the use of lemon and seasoning salt in the dressing. They really took the basic sour cream dressing and took it to a whole other flavor level. Oh, and I have to tell you, I was extremely pleased with it's consistency after sitting in the fridge for a few hours. The vegetables were still crisp, not mushy at all.

Since we're going into the "last weekend of summer" (the quotations are because I don't consider it to be, but I know society says different) there is no better time than to head outside, fire up the grill, invite friends and family over, and enjoy a backyard bash. And this salad would be great with anything you're pulling off the fire. Enjoy summer's bounty while you still can because it doesn't get fresher, and in about 3 months when we're knee deep in snow, we will be missing it profusely!

Creamy Vegetable Salad Adapted From Taste of Home
2 large tomatoes, seeded and chopped
2 large cucumbers, seeded and chopped
3-4 green onions, chopped, reserve a few for garnish
6 radishes, finely chopped
1 c. sour cream
1/2 tsp. seasoning salt
1/8 c. lemon juice
1/4 tsp. pepper
1/2 tsp. celery seed, extra for garnish

In a large bowl combine tomatoes, cucumbers, green onions, and radishes. Toss to combine. In a small bowl whisk together sour cream, seasoning salt, lemon juice, pepper and celery seed. Pour over veggies. Mix well. Cover and refrigerate at least 2 hours. Serve with a slotted spoon.


Shared on The Country Cook Aug. 30, 2013
Salad at Very Good Recipes
reade more... Résuméabuiyad

Crack Nachos

Ha! That got your attention, didn't it??!! Hey, I have to suck you in somehow! I will explain the inspiration for that title in just a minute!

I love taking things I know how to cook blindfolded, and turn them into something brand new. It's a great way to create brand new things in the kitchen with some of the pressure taken away. If part of a new dish is something that is "tried and true" it takes some of the anxiety of  "will it turn out" away! Not all, but some!

So when I was thinking of new ways to use my now almost famous Coney Sauce, I was talking to a friend who loves it as much as we do; and she mentioned she loves making nachos out of it when I make it for her. How perfect! And since she refers to it as "Crack Sauce", the name of this post was born.

If you love Coney Dogs, or even Chili Dogs, you will love these nachos. The flavor of the sauce is only enhanced by your topping choices. I decided to go with things we top our Coney Dogs with, plus a few extra nacho must haves. The combination was definitely a winner! They make a fun, tasty, light summer supper, or make a huge platter for your next backyard party! But don't forget to tell your friends they are eating "crack nachos"...the look on their faces is worth the price of admission!

Coney Nachos
1 lb. ground beef
1/2 c. chopped onion
1 clove garlic, minced
2 TBS butter
2 TBS yellow mustard
2 TBS cider vinegar
1 tsp. Worcestershire sauce
1/2 tsp. hot pepper sauce
1 c. ketchup
2 tsp. paprika
2 tsp. chili powder
Salt and Pepper to taste
Tortilla Chips
Toppings:
Sliced Black Olives
Finely Chopped White Onion
Shredded Cheese
Sour Cream
Jalapeno Peppers

In a medium bowl combine ketchup, mustard, vinegar, Worcestershire, hot sauce, paprika, chili powder,  salt and pepper. In a skillet over medium heat, melt butter. Add ground beef, onion and garlic. Cook until meat is no longer pink, breaking up very fine. (I like to use a potato masher.) Add ketchup mixture. Reduce heat to low and allow to simmer 20-25 minutes until thickened. Lay tortilla chips on plate, top with coney sauce. Garnish with favorite toppings.


Pin It
Ha! That got your attention, didn't it??!! Hey, I have to suck you in somehow! I will explain the inspiration for that title in just a minute!

I love taking things I know how to cook blindfolded, and turn them into something brand new. It's a great way to create brand new things in the kitchen with some of the pressure taken away. If part of a new dish is something that is "tried and true" it takes some of the anxiety of  "will it turn out" away! Not all, but some!

So when I was thinking of new ways to use my now almost famous Coney Sauce, I was talking to a friend who loves it as much as we do; and she mentioned she loves making nachos out of it when I make it for her. How perfect! And since she refers to it as "Crack Sauce", the name of this post was born.

If you love Coney Dogs, or even Chili Dogs, you will love these nachos. The flavor of the sauce is only enhanced by your topping choices. I decided to go with things we top our Coney Dogs with, plus a few extra nacho must haves. The combination was definitely a winner! They make a fun, tasty, light summer supper, or make a huge platter for your next backyard party! But don't forget to tell your friends they are eating "crack nachos"...the look on their faces is worth the price of admission!

Coney Nachos
1 lb. ground beef
1/2 c. chopped onion
1 clove garlic, minced
2 TBS butter
2 TBS yellow mustard
2 TBS cider vinegar
1 tsp. Worcestershire sauce
1/2 tsp. hot pepper sauce
1 c. ketchup
2 tsp. paprika
2 tsp. chili powder
Salt and Pepper to taste
Tortilla Chips
Toppings:
Sliced Black Olives
Finely Chopped White Onion
Shredded Cheese
Sour Cream
Jalapeno Peppers

In a medium bowl combine ketchup, mustard, vinegar, Worcestershire, hot sauce, paprika, chili powder,  salt and pepper. In a skillet over medium heat, melt butter. Add ground beef, onion and garlic. Cook until meat is no longer pink, breaking up very fine. (I like to use a potato masher.) Add ketchup mixture. Reduce heat to low and allow to simmer 20-25 minutes until thickened. Lay tortilla chips on plate, top with coney sauce. Garnish with favorite toppings.


Pin It
reade more... Résuméabuiyad

It's Almost Time

Berry season is just around the corner for most of us; and for some of you, maybe it's even closer than it is for me. We usually kick off our Memorial Day weekend with strawberry picking, and then the berry love continues right on through summer. Raspberries, red and black, blueberries....oh we love our berries!

I've told you before how raspberry crazy Mr. and Little Everyday are, so during the warm months, I try really hard to find as many recipes as I can using them. But during the colder months, they aren't something I'm really on the lookout for. However, I was always taught to never look a gift horse in the mouth. See, back in February my father in law was given an obscene amount of frozen black raspberries and he generously offered to share with us. So I filled a few bags, brought them home and popped them in the freezer, knowing at some point I would find the perfect use for them.

Then all of a sudden it was Easter weekend, and we were going to be celebrating with my parents on Good Friday evening, mom making a huge meal (it was actually the "re-do" from my birthday supper she was to ill to make), and I offered to take dessert. I knew I wanted something spring inspired, maybe with berries...and that's when I remembered those beauties just hanging out in the chest freezer.

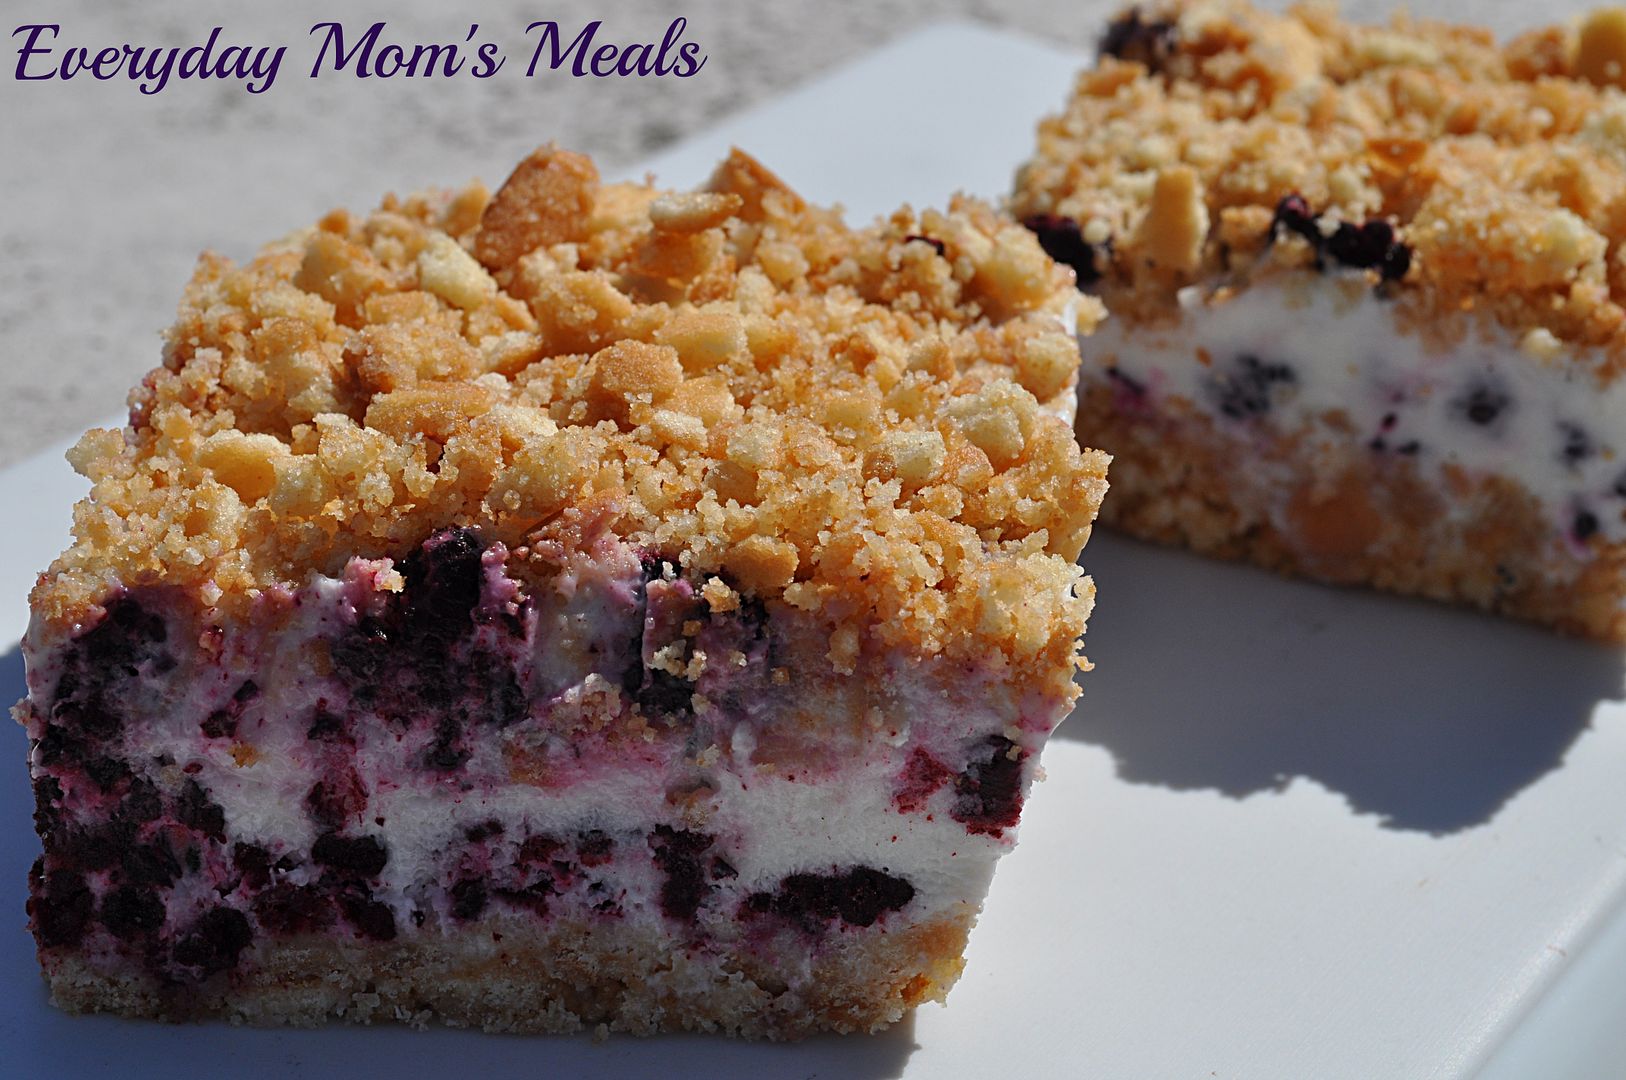
These are so incredibly pretty! The layers of berries and cream create these perfect colored bars. Oh, and not to mention they are super easy and scrumptious too. Plus, with warmer weather coming, they would make a great dessert for a hot summer day when only a frozen treat will do!

Berry season is coming, and will be here before we know it' I'm so glad I'm prepared with this great new recipe, and I hope you are too!

Frozen Raspberry Cream Bars Adapted from Taste of Home
2 c. crushed vanilla wafers (about 65 wafers)
1/4 c. butter, melted
2 c. frozen unsweetened black raspberries, do NOT thaw
3/4 c. sour cream
1 c. half and half
1/2 c. sugar

In a bowl, combine the wafer crumbs and butter. Grease a 8 x 8 baking dish. Press half of the crumb mixture into dish. Set remaining crumb mixture aside. Sprinkle berries over crust. In a bowl, combine sour cream and sugar; gradually stir in half-and-half until smooth, whisking to combine. Pour over berries. Sprinkle with remaining crumb mixture. Cover and freeze for 3 hours or until firm. You can allow these to sit for about 10 minutes to make for easier cutting, but I actually prefer to serve them frozen.


Shared on The Country Cook Apr. 19, 2013
Shared on Make Ahead Meals Apr. 22, 2013
Shared on Mandy's Recipe Box Apr. 23, 2013
Shared on Lady Behind The Curtain Apr. 24, 2013
Shared on Miz Helen's Country Cottage Apr. 25, 2013
Raspberry at Very Good Recipes
Pin It
Berry season is just around the corner for most of us; and for some of you, maybe it's even closer than it is for me. We usually kick off our Memorial Day weekend with strawberry picking, and then the berry love continues right on through summer. Raspberries, red and black, blueberries....oh we love our berries!

I've told you before how raspberry crazy Mr. and Little Everyday are, so during the warm months, I try really hard to find as many recipes as I can using them. But during the colder months, they aren't something I'm really on the lookout for. However, I was always taught to never look a gift horse in the mouth. See, back in February my father in law was given an obscene amount of frozen black raspberries and he generously offered to share with us. So I filled a few bags, brought them home and popped them in the freezer, knowing at some point I would find the perfect use for them.

Then all of a sudden it was Easter weekend, and we were going to be celebrating with my parents on Good Friday evening, mom making a huge meal (it was actually the "re-do" from my birthday supper she was to ill to make), and I offered to take dessert. I knew I wanted something spring inspired, maybe with berries...and that's when I remembered those beauties just hanging out in the chest freezer.

These are so incredibly pretty! The layers of berries and cream create these perfect colored bars. Oh, and not to mention they are super easy and scrumptious too. Plus, with warmer weather coming, they would make a great dessert for a hot summer day when only a frozen treat will do!

Berry season is coming, and will be here before we know it' I'm so glad I'm prepared with this great new recipe, and I hope you are too!

Frozen Raspberry Cream Bars Adapted from Taste of Home
2 c. crushed vanilla wafers (about 65 wafers)
1/4 c. butter, melted
2 c. frozen unsweetened black raspberries, do NOT thaw
3/4 c. sour cream
1 c. half and half
1/2 c. sugar

In a bowl, combine the wafer crumbs and butter. Grease a 8 x 8 baking dish. Press half of the crumb mixture into dish. Set remaining crumb mixture aside. Sprinkle berries over crust. In a bowl, combine sour cream and sugar; gradually stir in half-and-half until smooth, whisking to combine. Pour over berries. Sprinkle with remaining crumb mixture. Cover and freeze for 3 hours or until firm. You can allow these to sit for about 10 minutes to make for easier cutting, but I actually prefer to serve them frozen.


Shared on The Country Cook Apr. 19, 2013
Shared on Make Ahead Meals Apr. 22, 2013
Shared on Mandy's Recipe Box Apr. 23, 2013
Shared on Lady Behind The Curtain Apr. 24, 2013
Shared on Miz Helen's Country Cottage Apr. 25, 2013
Raspberry at Very Good Recipes
Pin It
reade more... Résuméabuiyad

Just A Little Greek

Do you have a food or a dish that each time you eat it you feel...how shall I say it..."fancy"? You don't know why but it just makes you feel like you aren't sitting in your pajamas in front of the television eating it, but instead in a very sophisticated setting with crystal water glasses. For me that food is olive tapenade.

For those of you who have never had it, let me explain. Olive Tapenade is a dish consisting of pureed or finely chopped olives, anchovies, capers and oil. It comes from the French word for capers and is usually eaten as an appetizer in the South of France, but is also seen in Italian and Mediterranean cuisine.

I first had it a few years ago as a spread on baguette bread, and it was love at first bite. I'm not surprised. I love both olives and capers; and their briny, salty flavor. But until that moment, it was always something I had thought of as a delicacy and therefore, it retains this image in my mind every time I eat it. Not to mention, I just love the stuff!!

So you can imagine how thrilled I was when I found a burger recipe using it as an ingredient, not just a "topper". These burgers may be small, but they pack a punch of big flavor. Perfect for a party or family meal, they are also super simple. Plus, they are made with ground turkey, so you can feel good about having three!

If you have never had olive tapenade, I encourage you to try this recipe one because they are delicious; but also because there is enough in a jar you will have some left over and it's the perfect snack with some crackers or pita chips!

Greek Turkey Sliders Adapted from Betty Crocker
1 lb. ground turkey
1/3 c. olive tapenade
6 tsp. dried parsley, divided
1/2 c. plain Greek Yogurt
1/2 c. sour cream
1/2 c. cucumber, peeled and chopped
8 slider buns
16 thin slices cucumber
Salt and Pepper to taste

In a medium bowl combine turkey, olive tapenade, 4 tsp. parsley, salt and pepper. Mix well using hands and form into 8 small patties, about 1/2 inch thick. Spray grill pan with cooking spray and cook patties for about 5 minutes per side. In a small bowl combine yogurt, sour cream, chopped cucumber, 2 tsp. parsley, salt and pepper. Mix well. When burgers are done, spread sauce on bottom of bun, add 2 slices of cucumber and burger. Top with bun and serve.


Shared on Lady Behind The Curtain Mar. 6, 2013
Shared on Miz Helen's Country Cottage Mar. 7, 2013
Shared on The Country Cook Mar. 8, 2013
Greek at Very Good Recipes
Pin It
Do you have a food or a dish that each time you eat it you feel...how shall I say it..."fancy"? You don't know why but it just makes you feel like you aren't sitting in your pajamas in front of the television eating it, but instead in a very sophisticated setting with crystal water glasses. For me that food is olive tapenade.

For those of you who have never had it, let me explain. Olive Tapenade is a dish consisting of pureed or finely chopped olives, anchovies, capers and oil. It comes from the French word for capers and is usually eaten as an appetizer in the South of France, but is also seen in Italian and Mediterranean cuisine.

I first had it a few years ago as a spread on baguette bread, and it was love at first bite. I'm not surprised. I love both olives and capers; and their briny, salty flavor. But until that moment, it was always something I had thought of as a delicacy and therefore, it retains this image in my mind every time I eat it. Not to mention, I just love the stuff!!

So you can imagine how thrilled I was when I found a burger recipe using it as an ingredient, not just a "topper". These burgers may be small, but they pack a punch of big flavor. Perfect for a party or family meal, they are also super simple. Plus, they are made with ground turkey, so you can feel good about having three!

If you have never had olive tapenade, I encourage you to try this recipe one because they are delicious; but also because there is enough in a jar you will have some left over and it's the perfect snack with some crackers or pita chips!

Greek Turkey Sliders Adapted from Betty Crocker
1 lb. ground turkey
1/3 c. olive tapenade
6 tsp. dried parsley, divided
1/2 c. plain Greek Yogurt
1/2 c. sour cream
1/2 c. cucumber, peeled and chopped
8 slider buns
16 thin slices cucumber
Salt and Pepper to taste

In a medium bowl combine turkey, olive tapenade, 4 tsp. parsley, salt and pepper. Mix well using hands and form into 8 small patties, about 1/2 inch thick. Spray grill pan with cooking spray and cook patties for about 5 minutes per side. In a small bowl combine yogurt, sour cream, chopped cucumber, 2 tsp. parsley, salt and pepper. Mix well. When burgers are done, spread sauce on bottom of bun, add 2 slices of cucumber and burger. Top with bun and serve.


Shared on Lady Behind The Curtain Mar. 6, 2013
Shared on Miz Helen's Country Cottage Mar. 7, 2013
Shared on The Country Cook Mar. 8, 2013
Greek at Very Good Recipes
Pin It
reade more... Résuméabuiyad

Yep, It's That Time Again

What time? Soup time! And more specifically, Crock Pot soup time! What can I say? I am addicted to my new one, and the numerous new recipes I have to go with it. And with the temperatures not rising out of the teens for day time highs, the arctic chill screams for more soup meals. I try to limit it to once per week, but to be honest, if I am cold, there is going to be soup on the table!

When I was trying to "prioritize" the new soups I have to try, so basically putting them in order of "drool factor" this was one that had to be put at the front of the line, for one simple reason. Leeks. I love leeks, but don't get to cook with them nearly enough. Have you ever had them? They look like giant green onions, but have a much milder flavor. They give a dish a slight onion flavor in the background without overpowering the dish. And one thing they were meant to be cooked with are potatoes.

Now when you buy them at the store, they will more than likely have the dark green stems attached. These will not be used. And when you chop and prepare them, here is a great tip. Slice the white and light green part down the middle, vertically. Then slice each piece into half moon shapes, separating the pieces. Fill your sink, or a large bowl, with cold water. Place the separated pieces into the water and gently shake with your fingers. Leeks grow in soil, and it gets into the layers. By doing this, you separate the layers, washing them thoroughly. The dirt and grit will fall to the bottom while the pieces of leek will float. Remove them from the water with your hands or a slotted spoon and place in a colander to drain/dry.

This soup is so creamy with great flavor and is truly "set it and forget it". Serve some sliced bread or maybe my Easy Yeast Rolls, or even Cheddar Biscuits on the side for a full, satisfying and comforting meal. As long as winter sticks around, you can be sure to find more soups here on EMM and I'm guessing a majority those are going to include the Crock Pot!

Potato and Leek Soup Adapted from Crock Pot
5 c. frozen shredded hashbrowns
1 (10 3/4 oz) can cream of potato soup, undiluted
1 (5 oz) can evaporated milk
1 (14 oz ) can chicken broth
3 leeks, cleaned and sliced
2 ribs celery, finely chopped
12 slices pre cooked bacon, crisp and chopped
1/2 c. milk
1/2 c. sour cream
Salt and Pepper to taste
Real bacon bits, for garnish

Combine potatoes, leeks, soup, evaporated milk, chicken broth, crisp bacon, salt and pepper in Crock Pot. Stir well. Cook on LOW 6-7 hours. After 1 hour, add 1/2 c. milk. Throughout cooking, stir about every 30 minutes. Just before serving stir in sour cream and garnish with bacon bits.


Shared on Make Ahead Meals Jan. 28, 2013
Shared on Mandy's Recipe Box Jan. 29, 2013
Shared on Lady Behind The Curtain Jan. 30, 2013
Shared on Miz Helen's Country Cottage Jan. 31, 2013
Soup at Very Good Recipes
Pin It
What time? Soup time! And more specifically, Crock Pot soup time! What can I say? I am addicted to my new one, and the numerous new recipes I have to go with it. And with the temperatures not rising out of the teens for day time highs, the arctic chill screams for more soup meals. I try to limit it to once per week, but to be honest, if I am cold, there is going to be soup on the table!

When I was trying to "prioritize" the new soups I have to try, so basically putting them in order of "drool factor" this was one that had to be put at the front of the line, for one simple reason. Leeks. I love leeks, but don't get to cook with them nearly enough. Have you ever had them? They look like giant green onions, but have a much milder flavor. They give a dish a slight onion flavor in the background without overpowering the dish. And one thing they were meant to be cooked with are potatoes.

Now when you buy them at the store, they will more than likely have the dark green stems attached. These will not be used. And when you chop and prepare them, here is a great tip. Slice the white and light green part down the middle, vertically. Then slice each piece into half moon shapes, separating the pieces. Fill your sink, or a large bowl, with cold water. Place the separated pieces into the water and gently shake with your fingers. Leeks grow in soil, and it gets into the layers. By doing this, you separate the layers, washing them thoroughly. The dirt and grit will fall to the bottom while the pieces of leek will float. Remove them from the water with your hands or a slotted spoon and place in a colander to drain/dry.

This soup is so creamy with great flavor and is truly "set it and forget it". Serve some sliced bread or maybe my Easy Yeast Rolls, or even Cheddar Biscuits on the side for a full, satisfying and comforting meal. As long as winter sticks around, you can be sure to find more soups here on EMM and I'm guessing a majority those are going to include the Crock Pot!

Potato and Leek Soup Adapted from Crock Pot
5 c. frozen shredded hashbrowns
1 (10 3/4 oz) can cream of potato soup, undiluted
1 (5 oz) can evaporated milk
1 (14 oz ) can chicken broth
3 leeks, cleaned and sliced
2 ribs celery, finely chopped
12 slices pre cooked bacon, crisp and chopped
1/2 c. milk
1/2 c. sour cream
Salt and Pepper to taste
Real bacon bits, for garnish

Combine potatoes, leeks, soup, evaporated milk, chicken broth, crisp bacon, salt and pepper in Crock Pot. Stir well. Cook on LOW 6-7 hours. After 1 hour, add 1/2 c. milk. Throughout cooking, stir about every 30 minutes. Just before serving stir in sour cream and garnish with bacon bits.


Shared on Make Ahead Meals Jan. 28, 2013
Shared on Mandy's Recipe Box Jan. 29, 2013
Shared on Lady Behind The Curtain Jan. 30, 2013
Shared on Miz Helen's Country Cottage Jan. 31, 2013
Soup at Very Good Recipes
Pin It
reade more... Résuméabuiyad

No More Turkey

So I guess the question on my mind today is "Are you tired of turkey yet?" Have you had your fill until next Thanksgiving? Or are you simply taking a break for 3 weeks before another roasted bird is the star of your Christmas table? Well, if you are in the first group, I have a real treat for you today. It's Italian, it's pasta, it's a casserole...those are far from a turkey sandwich! And to be honest, after a long holiday weekend, not only does nobody want to go back to work, but who wants to come home and cook something complicated? It's also very versatile because you can make it like I did, or you can split it to make an extra one. (See note below) Sometimes when parents ask me for tips to get their kids to eat certain things I just have to respond with "hide it". I even heard a chef say the other day that her nieces and nephews don't eat veggies...at all. So when auntie makes mashed potatoes...guess what! Yep, there is mashed cauliflower in them too! Ha! That's sneaky. Now luckily as you know, Monkey is not a picky eater at all. But for some reason he got it into his head forever ago he doesn't like sour cream. Which is fine, he doesn't have to eat it, but if it's in a recipe he's going to because I'm not a short order cook and won't make something different. So I've learned if it's "hidden", even in plain sight, he's fine with it. Basically as long as it's in a dish that doesn't taste like sour cream, I'm good. See, little does he know, but there are a ton of things he has eaten without even noticing because I hide it well. (Let's face it, if it has cheese, most kids are going to eat it without any questions.) This casserole will feed an army, which is good because if any of your neighbors catch a whiff of it, they will be right over! My son declared it "super yummy" and I hope your family thinks so too!

Spaghetti Casserole Adapted from Taste of Home
1 lb. spaghetti, cooked according to package directions
1 lb. ground beef
1 (15 oz) can tomato sauce
1 (26 oz) jar spaghetti sauce
2 tsp Italian Seasoning
2 c. Monterey Jack cheese, finely shredded
1 c. sour cream
1 (10 3/4 oz) can cream of mushroom soup
1 tsp dried parsley
Salt and Pepper to taste

Preheat oven to 375. While pasta is cooking, brown beef, seasoned with salt and pepper in a large skillet over medium heat. Drain if necessary. Add tomato sauce and spaghetti sauce. Stir well. Adjust salt and pepper. Remove from heat and set aside. In a small bowl combine sour cream, soup and Italian seasoning. Stir well. When pasta is cooked, drain well. Grease a 9x13 pan. Add half the meat sauce. Top with half the pasta. Spread with half the sour cream mixture. Sprinkle with 1 c. cheese. Repeat layers ending with cheese. Cover  with aluminum foil and bake for 45-55 minutes until cheese is melted. Remove foil, and sprinkle with parsley. Let sit for 5 minutes before serving.
*NOTE* You can also split this between two 8x8 pans, and freeze one for later. When ready to bake, allow to thaw for about an hour and then bake as directed.


Shared on Make Ahead Meals Nov. 26, 2012
Shared on Mandy's Recipe Box Nov. 27, 2012
Shared on Lady Behind The Curtain Nov. 28, 2012
Shared on Miz Helen's Country Cottage Nov. 29, 2012
Shared on The Country Cook Nov. 30, 2012
Pasta at Very Good Recipes
Pin It
So I guess the question on my mind today is "Are you tired of turkey yet?" Have you had your fill until next Thanksgiving? Or are you simply taking a break for 3 weeks before another roasted bird is the star of your Christmas table? Well, if you are in the first group, I have a real treat for you today. It's Italian, it's pasta, it's a casserole...those are far from a turkey sandwich! And to be honest, after a long holiday weekend, not only does nobody want to go back to work, but who wants to come home and cook something complicated? It's also very versatile because you can make it like I did, or you can split it to make an extra one. (See note below) Sometimes when parents ask me for tips to get their kids to eat certain things I just have to respond with "hide it". I even heard a chef say the other day that her nieces and nephews don't eat veggies...at all. So when auntie makes mashed potatoes...guess what! Yep, there is mashed cauliflower in them too! Ha! That's sneaky. Now luckily as you know, Monkey is not a picky eater at all. But for some reason he got it into his head forever ago he doesn't like sour cream. Which is fine, he doesn't have to eat it, but if it's in a recipe he's going to because I'm not a short order cook and won't make something different. So I've learned if it's "hidden", even in plain sight, he's fine with it. Basically as long as it's in a dish that doesn't taste like sour cream, I'm good. See, little does he know, but there are a ton of things he has eaten without even noticing because I hide it well. (Let's face it, if it has cheese, most kids are going to eat it without any questions.) This casserole will feed an army, which is good because if any of your neighbors catch a whiff of it, they will be right over! My son declared it "super yummy" and I hope your family thinks so too!

Spaghetti Casserole Adapted from Taste of Home
1 lb. spaghetti, cooked according to package directions
1 lb. ground beef
1 (15 oz) can tomato sauce
1 (26 oz) jar spaghetti sauce
2 tsp Italian Seasoning
2 c. Monterey Jack cheese, finely shredded
1 c. sour cream
1 (10 3/4 oz) can cream of mushroom soup
1 tsp dried parsley
Salt and Pepper to taste

Preheat oven to 375. While pasta is cooking, brown beef, seasoned with salt and pepper in a large skillet over medium heat. Drain if necessary. Add tomato sauce and spaghetti sauce. Stir well. Adjust salt and pepper. Remove from heat and set aside. In a small bowl combine sour cream, soup and Italian seasoning. Stir well. When pasta is cooked, drain well. Grease a 9x13 pan. Add half the meat sauce. Top with half the pasta. Spread with half the sour cream mixture. Sprinkle with 1 c. cheese. Repeat layers ending with cheese. Cover  with aluminum foil and bake for 45-55 minutes until cheese is melted. Remove foil, and sprinkle with parsley. Let sit for 5 minutes before serving.
*NOTE* You can also split this between two 8x8 pans, and freeze one for later. When ready to bake, allow to thaw for about an hour and then bake as directed.


Shared on Make Ahead Meals Nov. 26, 2012
Shared on Mandy's Recipe Box Nov. 27, 2012
Shared on Lady Behind The Curtain Nov. 28, 2012
Shared on Miz Helen's Country Cottage Nov. 29, 2012
Shared on The Country Cook Nov. 30, 2012
Pasta at Very Good Recipes
Pin It
reade more... Résuméabuiyad