In case you've been living under a rock, today is the first day of November. Put those jack-o-lanterns away and grab the turkeys and pilgrims, kids. Thanksgiving is exactly 27 days from today. In this house once the fun of Halloween is behind is, it's pretty much a downward coast to the holiday season. Thanksgiving, Christmas and even New Year's are approaching quicker than some of you might realize, or even want. But don't fret, don't freak out, I am here to help with at least one aspect of the holiday rush. Over the next several weeks, I will be offering up some ideas for your meal plans, from breakfast to mains, to sides, that could all be great additions to your holiday planning.
First up, something I made for supper a few weeks ago, that will definitely be appearing on our table again, and if you are planning on a house full of family for Thanksgiving or Christmas, could be the answer to your breakfast prayers!
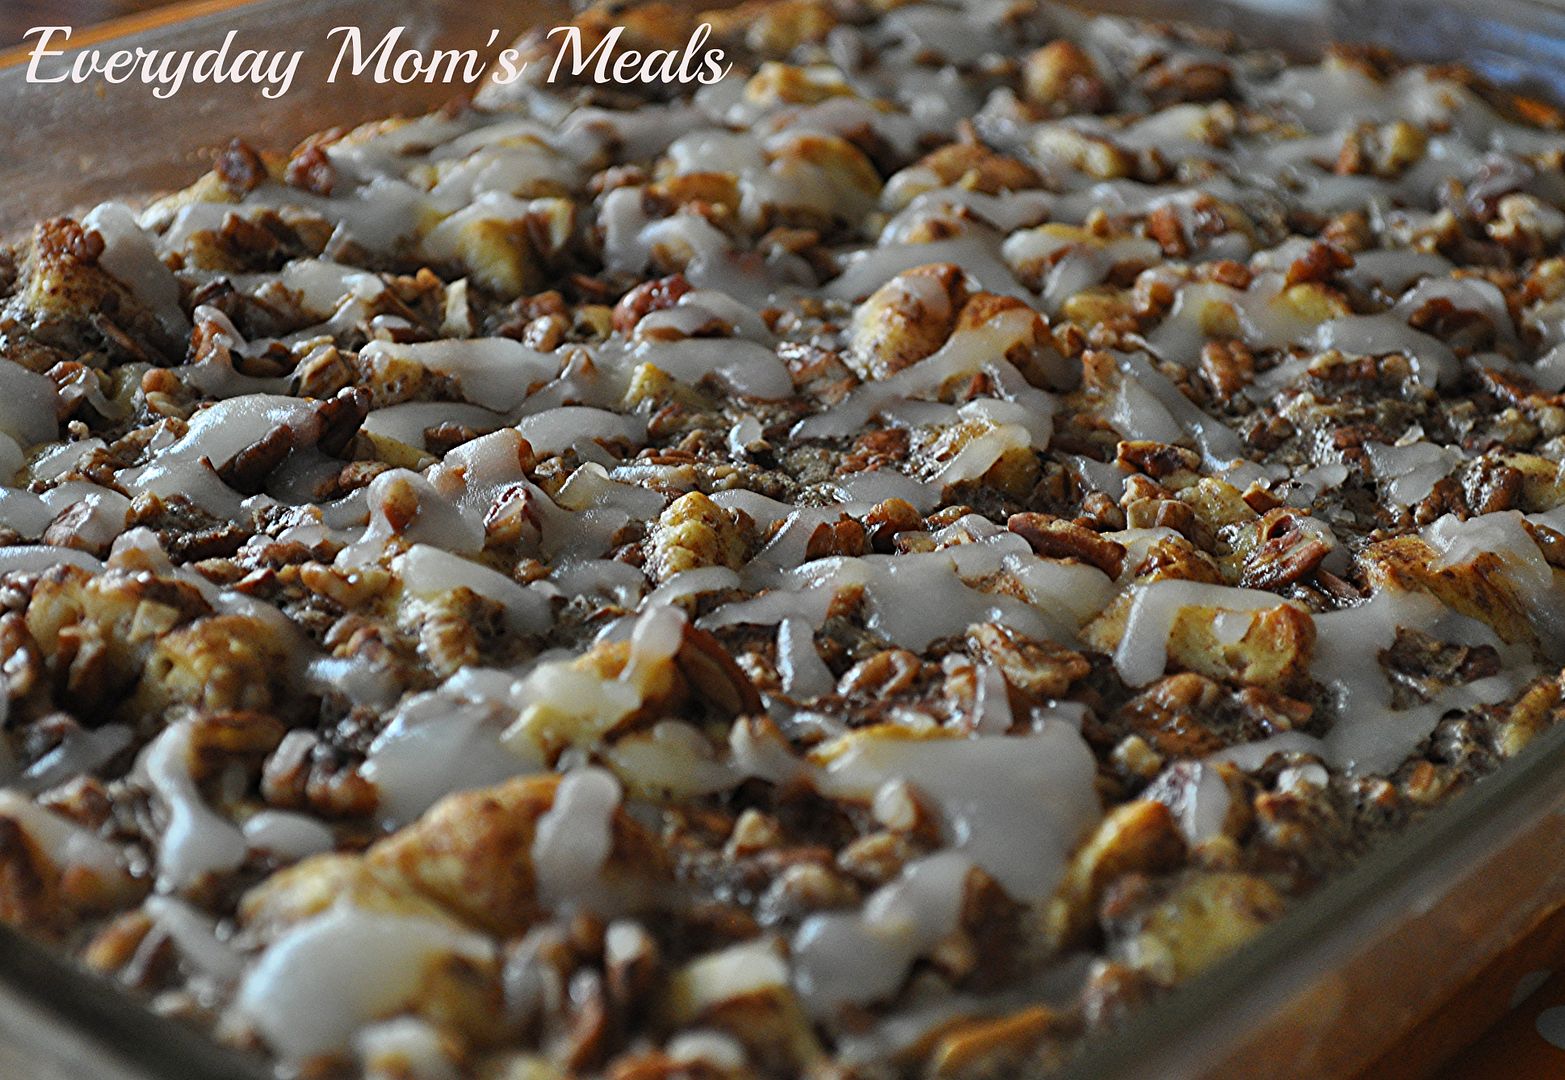
I am SO excited to share this one because I know ya'll are going to go as nuts for it as we did. Sure, I used it as "breakfast for supper", and it was just as yummy at 6pm as I know it would be for breakfast or brunch. Oh, and a side note: this reheats beautifully! We had some leftover and Alex ate it for breakfast for the next 3 days. Just pop it in the microwave for about 30 seconds! Which is also a great idea if you're having house guests because maybe you cook it once, and they eat it for a couple days, saving you time and money!
If you love cinnamon rolls, French Toast and bread pudding, then let me introduce you to your new favorite dish. With a little help from refrigerated cinnamon rolls, and a custard filling filled with flavor, oh and of course nuts, syrup and icing, this is hands down the easiest and most delicious breakfast casserole I've ever made. Yes it's rich. I'm not gonna lie. But it's the holidays. We are all supposed to indulge a little!! Serve it with some fresh fruit on the side, that will make you feel better.
The holidays are coming, like it or not. But we can prepare, and organize and get ready so maybe just a little of the stress is taken away so we can enjoy the time with our families a little more. Or, we can totally stress, and eat plates of this and not care because it tastes so darn good!
Cinnamon Roll French Toast Bake From Pillsbury
1/4 c. butter, melted
2 (12.4 oz.) tubes refrigerated cinnamon rolls, icing removed
6 eggs, beaten
1/2 c. heavy cream
2 tsp. cinnamon
2 tsp. vanilla
1 c. chopped pecans
1 c. maple syrup
Preheat oven to 375. Pour melted butter into the bottom of a 9x13 baking dish. Separate each tube into individual rolls. Cut each roll into small bite sized pieces, about 6-8 per roll. Lay cinnamon roll pieces in butter in dish. In a medium bowl, combine eggs, cream, cinnamon and vanilla. Mix well. Pour over cinnamon roll pieces. Sprinkle with pecans. Drizzle with maple syrup. Bake about 25 minutes, until golden brown. While baking, transfer icing to microwavable safe bowl. Heat for about 15 seconds, until thin enough to pour. When casserole is finished, drizzle top with icing.
Shared on The Country Cook November 1, 2013

Breakfast at Very Good Recipes
In case you've been living under a rock, today is the first day of November. Put those jack-o-lanterns away and grab the turkeys and pilgrims, kids. Thanksgiving is exactly 27 days from today. In this house once the fun of Halloween is behind is, it's pretty much a downward coast to the holiday season. Thanksgiving, Christmas and even New Year's are approaching quicker than some of you might realize, or even want. But don't fret, don't freak out, I am here to help with at least one aspect of the holiday rush. Over the next several weeks, I will be offering up some ideas for your meal plans, from breakfast to mains, to sides, that could all be great additions to your holiday planning.
First up, something I made for supper a few weeks ago, that will definitely be appearing on our table again, and if you are planning on a house full of family for Thanksgiving or Christmas, could be the answer to your breakfast prayers!
I am SO excited to share this one because I know ya'll are going to go as nuts for it as we did. Sure, I used it as "breakfast for supper", and it was just as yummy at 6pm as I know it would be for breakfast or brunch. Oh, and a side note: this reheats beautifully! We had some leftover and Alex ate it for breakfast for the next 3 days. Just pop it in the microwave for about 30 seconds! Which is also a great idea if you're having house guests because maybe you cook it once, and they eat it for a couple days, saving you time and money!
If you love cinnamon rolls, French Toast and bread pudding, then let me introduce you to your new favorite dish. With a little help from refrigerated cinnamon rolls, and a custard filling filled with flavor, oh and of course nuts, syrup and icing, this is hands down the easiest and most delicious breakfast casserole I've ever made. Yes it's rich. I'm not gonna lie. But it's the holidays. We are all supposed to indulge a little!! Serve it with some fresh fruit on the side, that will make you feel better.
The holidays are coming, like it or not. But we can prepare, and organize and get ready so maybe just a little of the stress is taken away so we can enjoy the time with our families a little more. Or, we can totally stress, and eat plates of this and not care because it tastes so darn good!
Cinnamon Roll French Toast Bake From Pillsbury
1/4 c. butter, melted
2 (12.4 oz.) tubes refrigerated cinnamon rolls, icing removed
6 eggs, beaten
1/2 c. heavy cream
2 tsp. cinnamon
2 tsp. vanilla
1 c. chopped pecans
1 c. maple syrup
Preheat oven to 375. Pour melted butter into the bottom of a 9x13 baking dish. Separate each tube into individual rolls. Cut each roll into small bite sized pieces, about 6-8 per roll. Lay cinnamon roll pieces in butter in dish. In a medium bowl, combine eggs, cream, cinnamon and vanilla. Mix well. Pour over cinnamon roll pieces. Sprinkle with pecans. Drizzle with maple syrup. Bake about 25 minutes, until golden brown. While baking, transfer icing to microwavable safe bowl. Heat for about 15 seconds, until thin enough to pour. When casserole is finished, drizzle top with icing.
Shared on The Country Cook November 1, 2013
Breakfast at Very Good Recipes


.jpg)


