Pages

Holy Cow, Someone's Forty

Even though I'm just an amateur at cake decorating, I still like to put together one of a kind birthday cakes for my family. Today a special family member celebrated a milestone birthday, so we needed a cake to mark the occasion. This cake was baked in a 9 x 13-inch pan and was frosted with Classic Vanilla Buttercream. I don't have a lot of experience using fondant, but I made up a batch from a very simple recipe and found it to be easy to use for the decorative cutouts.


Marshmallow Fondant

16 ounces mini marshmallows
2 - 5 teaspoons water
2 pounds powdered sugar
Crisco shortening (to be used for greasing hands)

In a microwave safe bowl, melt the marshmallows and 2 tablespoons water together, stirring after 30 second intervals. When marshmallows are melted, stir in about 5 cups of the powdered sugar, mixing well. Grease hands with Crisco and knead in the remaining powdered sugar. Add food coloring as desired. Knead the fondant for about 7 minutes. Additional water may be added 1/2 tablespoon at a time if mixture is too dry. Dust surface with powdered sugar and roll to 1/8 inch thickness to cover cake or to cut into decorative shapes. To store the fondant for later use, roll in a ball and lightly grease with Crisco. Double wrap tightly with plastic wrap, then seal in a zip-top bag. Store in refrigerator. Bring to room temperature before rolling out.


My cow shape was cut from white fondant with a cookie cutter. I used pink and black tinted fondant cutouts to complete the cow. The letters and numbers were cut from red and black tinted fondant. The fondant pieces will adhere to the cake when dampened with a few drops of water on the back, then positioned into place.


Happy birthday, Susan! The cake may say 40, but you'll always be this little girl to me!


This recipe was shared with:
Arkansas Women Bloggers
Weekend Potluck
Full Plate Thursday


reade more... Résuméabuiyad

Coconut Raspberry Ice Cream


I love finding new ways to create ice cream bases - there's the traditional custard way with egg yolks, the sweetened condensed milk version, varieties that use just half and half, the cornstarch version, and probably several more that I haven't tried yet. And today's version is different still - it uses just coconut milk! I have made a super delicious ice cream using cream of coconut, but I until now, I hadn't thought of using coconut milk.

With just four simple ingredients, this ice cream comes together super quickly, and is super refreshing. It's pretty light as far as ice cream goes, so you can enjoy a few scoops without guilt. The raspberries add wonderful flavor, color and texture to the coconut base.

Start by combining the coconut milk,


sugar


and vanilla in a blender. Blend until combined and the sugar is dissolved. Then pour the base into your ice cream maker


and let it churn away til the ice cream is at the soft serve stage. Now add the raspberries.


I actually found it easiest to fold in most of the raspberries after I transferred the ice cream to my container. My ice cream maker was practically filled to the rim and there wasn't room for raspberries! Also, while you fold in the raspberries, you will want to crush them slightly with your spoon. There's nothing worse (well, maybe there are) than getting a huge piece of frozen fruit in the middle of your ice cream bite! You want small pieces of raspberries. Crushing them up will be very easy with fresh raspberries, and slightly more difficult with frozen. If I would have thought ahead, I would have let my berries thaw slightly. In any case! Fold them in and crush them up.


Freeze the ice cream until solid, about 2 hours. As usual with homemade ice cream, you'll want to let it sit on the counter for about 5 minutes before scooping.


This ice cream is so pretty I just wanted to take lots of pictures of it! And then I dug in, of course.


One year ago: Raspberry Streusel Muffins
Two years ago: Pineapple Sorbet
Three years ago: Oat Waffles

Find more great stuff at Hearth and Soul, Cast Party, Whatcha Whipped Up, Wednesday Extravaganza, Wicked Good Wednesday, What's Cooking, Full Plate Thursday, Thursday's Treasures.

Coconut Raspberry Ice Cream

2 cans chilled Thai coconut milk
3/4 cup sugar
1 tsp. vanilla
1 cup raspberries (fresh or frozen)

Place the coconut milk, sugar, and vanilla in a blender. Blend until combined, about 30 seconds. Pour the mixture into an ice cream maker, and churn for 20-25 minutes, until the ice cream is at soft serve stage.

Transfer to a freezer safe container and fold in the raspberries. Using a spoon, break up the raspberries slightly as you fold them in - you want small pieces of raspberries, not big chunks. (Frozen raspberries will require more muscles than fresh raspberries, which are already quite tender.)

Freeze for 2-3 hours or until firm. Let the ice cream sit at room temperature for about 5 minutes before scooping. Makes 1 quart.

Recipe Source: Slightly adapted from Two Peas
reade more... Résuméabuiyad

Football and Soul Food { A Review and Giveaway with KYVAN }

"Cooking is a way of life in the South, and nobody knows that better than NFL Pro Reggie Kelly, owner of KYVAN Soul Food Selections." 

The above line is the first in the "about" section of the KYVAN website. I couldn't introduce today's new products to you any better than that, so I decided to allow them to do it for me. For those of you who don't follow NFL football like we do, Reggie Kelly played 13 years professionally with the Cincinnati Bengals and the Atlanta Falcons; and even though he has traveled the world, he never forgot where he came from.


 "Since I was a little boy, cooking in my household has been an event within itself and my family is a big reason why I love to cook.  Growing up, they would always tell me, "Reggie, when you cook, make sure you do it with love."  "My family believed  that great meals should be prepared  in such a way that once eaten,  it would touch your "SOUL". I gathered that I should cook in such a way that first time visitors would feel welcomed..feel as though they are a part of my family."

Named after his children, Kyla and Kavan, KYVAN is truly a family owned and operated business. And I love that! From barbecues sauces, to salsa to seasoning mixes, they have a little something soul for everyone! So I was honored when Reggie's wife, Sheila contacted me about trying some of their delicious products in my kitchen and then sharing with you!

I decided on the Sweet Barbecue Sauce and the Blackberry Honey, and I can tell you right now I made a very wise, and yummy, choice. I am a barbecue sauce snob. I'm the first one to admit that. I have to love it from the first bite, or I won't enjoy it. And with KYVAN's...I certainly did. It's sweet but not too sweet. It really allows the flavor of the meat (or in this case seafood) still shine through. It compliments without overpowering. 

And the Blackberry Honey...well, let's just say that I could drink that stuff with a straw! It is truly some of the best honey I've ever had. (Oh, and after you use it in this recipe, try it on some cornbread still warm from the oven. We did and Oh My-lanta...it was to die for!) 

I didn't just taste quality, I could taste the love and attention that goes into every single KYVAN product. You can tell they enjoy what they are doing, and want to bring the very best products to their consumers. 

I thought the flavors of the barbecue sauce and honey would actually compliment each other very nicely, so I decided to feature them both in a light summer time salad, perfect for lunch or supper. The crunch, fresh veggies, sweet barbecued shrimp and tangy yet sweet dressing all play off each other so well, it's a real flavor extravaganza for your taste buds! 

We love a big salad meal during these dog days of summer, and if you do too, you are gonna love this one. Plus, you have the chance to win your very own samples of the same things I used in this recipe. Just keep scrolling down for the GIVEAWAY! And be sure to check out KYVAN on all their social media outlets (Listed below) for more info!

Barbecued Shrimp Salad with Blackberry Honey Vinaigrette

14 medium shrimp, tail on
2 garlic cloves, minced
1 TBS lemon juice
3 TBS olive oil
Salt and Pepper to taste
1/4. KYVAN Sweet Barbecue Sauce
1 (5.5 oz) container field green lettuce mix
1/4 c. sliced almonds
1/2 c. red onion, sliced thin
4-6 medium radishes, sliced thin

Dressing:
2 TBS Dijon mustard
2 TBS red wine vinegar
1 TBS olive oil
1 tsp. KYVAN blackberry honey

In a medium bowl combine shrimp, garlic, lemon juice, olive oil, salt and pepper. Mix to combine. Marinade 1-2 hours in fridge. When ready, preheat grill to medium-high. Spray with cooking spray. Skewer shrimp. Sear on both sides for about 1 minute. Reduce heat to low. Baste shrimp with barbecue shrimp until cooked through and pink. About 5-7 minutes.

To make dressing, whisk together all ingredients until well combined. To assemble salads, divide lettuce, onions, radish and almonds evenly on 2 large plates. Top each salad with 7 shrimp each. Serve with dressing on side. Makes 2 dinner size salads.


Shared on The Country Cook Aug. 2, 2013
Shrimp at Very Good Recipes
Pin It


********Giveaway********
Rules:
1. This contest is open to US Residents 18 and older ONLY.

2. The winner will be chosen by Random.org 

3. The winner will be notified by email and Facebook. He/she will have 48 hours to respond or another winner will be chosen. I will then pass on your address to the sponsor for shipping.

4. When leaving comments for entries, they MUST BE SEPARATE ones AND include an email address so it's easy for me to find the winner. If entries are together, it will only count as (1) and if no email, entry will not be considered.

5. If any of the extra entries are items you are already doing, please just remind me!


6. Contest Ends: Friday Aug. 9, 2013  


One Lucky Winner Will Receive:
(1) Sweet Barbecue Sauce
(1) Blackberry Honey


Mandatory Entry:
1.Become a fan of KYVAN on Facebook. Leave a comment when you have.

Extra Entries:

1. Follow KYVAN on Twitter. Leave a comment when you have.

2. Follow KYVAN on Pinterest. Leave a comment when you have. 

3. Follow KYVAN on Instagram. Leave a comment when you have.

4. Take a look around the KYVAN site. Tell me what other product you would love to try.

That makes up to 5 entries per person!!!

Good Luck!

Disclaimer: I was provided with free product for this review, and an extra one for a fan giveaway. All thoughts and opinions are my own.


reade more... Résuméabuiyad

It's Fair Time Again {Indiana Family of Farmers}

When the month of August rolls around in Indiana, for our family it means two things. One, the beginning of the school year is just around the corner (this one we try to ignore as long as possible) and two, it is time once again to venture 2 hours south to one of our favorite summer time events, The Indiana State Fair!

For two weeks, Hoosiers descend onto the fairgrounds in Indianapolis to enjoy great exhibits, fun activities and delicious food! It truly is a highlight of our summer; and some of our favorite things to enjoy at the fair are those sponsored by Indiana Family of Farmers.


Fair goers can follow the IFOF Recipe Trail  and help feed the hungry, plus receive a useful popcorn-shaped memento.

For each person who finishes the trail, IFOF partners with Feeding Indiana’s Hungry to donate one pound of food to food banks across the state. Recipe trail travelers donated more than 3,000 pounds of food last year. This year’s goal is 3,500 pounds, so 3,500 people need to go through the recipe trail to attain the goal.

Recipe card locations
  • Exposition Hall (Rose Acre Farms, booths 526 and 527, southwest side)
  • Ball State Ag/Hort Building (World’s Largest Popcorn Ball)
  • DuPont Food Pavilion (3 stops: Indiana Wine Grape Council, Indiana Dairy, Purdue)
  • Habitat for Humanity Ag House
  • Indiana Farm Bureau Building
  • Glass Barn
  • Normandy Barn
  • Pathway to Water Quality
Final stop/recipe redemption point: IFOF booth at DuPont food pavilion     

Participants collect recipe cards from the 10 locations around the fairgrounds and bring them to the IFoF booth at the DuPont Food Pavilion where they will receive their memento and get counted as a donor of a pound of food. The booth also features a chance to register for a daily popcorn giveaway and the grand prize of a chest freezer.

Rules
·        Start at any location and travel to the 10 destinations to collect recipe cards.
·        Visit the IFOF booth in the DuPont Food Pavilion with your recipes to be pick up your popcorn-shaped memento, be counted as a food donor and sign up for prizes.
·        Winners of the daily giveaway are selected by a random drawing at the close of each day of the fair.
·        One winner of the chest freezer will be selected by a random drawing on the last day of the fair.
·        Winners will be notified by email or phone.

The IFOF recipe cards feature recipes from real farmers around Indiana and highlight Indiana’s commodities such as pork, beef, poultry, soybeans, corn and dairy along with an Indiana wine pairing. On the reverse, you will meet the farmer and read a personal story from his or her family.  

Other IFOF Sponsored Fair Attractions:

Sponsor of World’s Largest Popcorn Ball
IFOF is the sponsor the World’s Largest Popcorn Ball, a 5,000-pound, 9-foot popcorn delicacy featured at the Ball State Ag/Horticulture Building.  This will also be a stop on the 2013 IFOF recipe trail. After the fair, the popcorn will be fed to Indiana livestock. *This is one Alex is looking forward to!!*

IFOF booth in DuPont Food Pavilion
For the second year in a row, the DuPont Food Pavilion will be a part of this year’s state fair. Along with hourly food demos on the Red Gold Kitchen the pavilion will also feature a retail store with more than 30 Indiana made specialty items available for purchase.

IFOF is proud to be part of the food pavilion all 17 days. Along with the recipe trail, different agricultural groups will be featured and providing samples at the IFOF booth.

Partnership with Habitat for Humanity
The Habitat home build on the state fairgrounds will be a stop on this year’s recipe trail. As part of our partnership, Indiana’s Family of Farmers will donate a freezer and meat donations to fill the freezer to the new homeowner. Thanks to the farmers around the state who grow our food and who generously gave back.

I am so proud to work with the IFOF because I believe in their message 100%: Indiana farmers grow the grains, produce and meat you eat every day. We believe that quality farming means quality food that is good for you, your family and the environment. Food for your family, from our family.


***GIVEAWAY***

IFOF is giving away (1) 4 pack of State Fair Tickets to (1) Lucky EMM Fan. 

It's easy to enter. Leave a comment on this post telling me your favorite attraction at the fair. One winner will be chosen randomly. 

Contest Ends: Monday Aug. 5, 2013 12 am EST
reade more... Résuméabuiyad

Little Cheese Fiend

My son loves food, we all know that. But there are a few specific things he does become fiendish for, and one at the top of the list is cheese. It's not his fault. He comes by it naturally. Both of his parents are also cheese lovers, and so are both of his grandpas. We are a cheese loving family.

My son will eat cheese as a snack. One of his favorite lunch staples is a cheese sandwich...bread and American cheese, that's it. Until the age of 6 his favorite pizza, and the only one he would eat, was plain cheese. From cheddar, the sharper the better, to Colby, to Swiss, he loves every kind, any way he can get it. We even have a picture when he was about 2 at Thanksgiving sneaking food from the table. What was it? Not pie. Not candy. Cheese!!

His most recent cheese addiction is actually feta. Now he thinks it's goat cheese, but for those of us who eat feta on a regular basis, we know most of the time it's made with a mix of both sheep's and goat's milk. (But that's okay, we will let him think it's goat. It makes him feel like a real foodie.) And for those of you who have never had it, feta is a brined cheese with a salty and tangy flavor. Most of the time it's in crumbled form and a staple in Greece.  In fact, it was on a Greek salad that Alex first fell in love with his new favorite cheese.

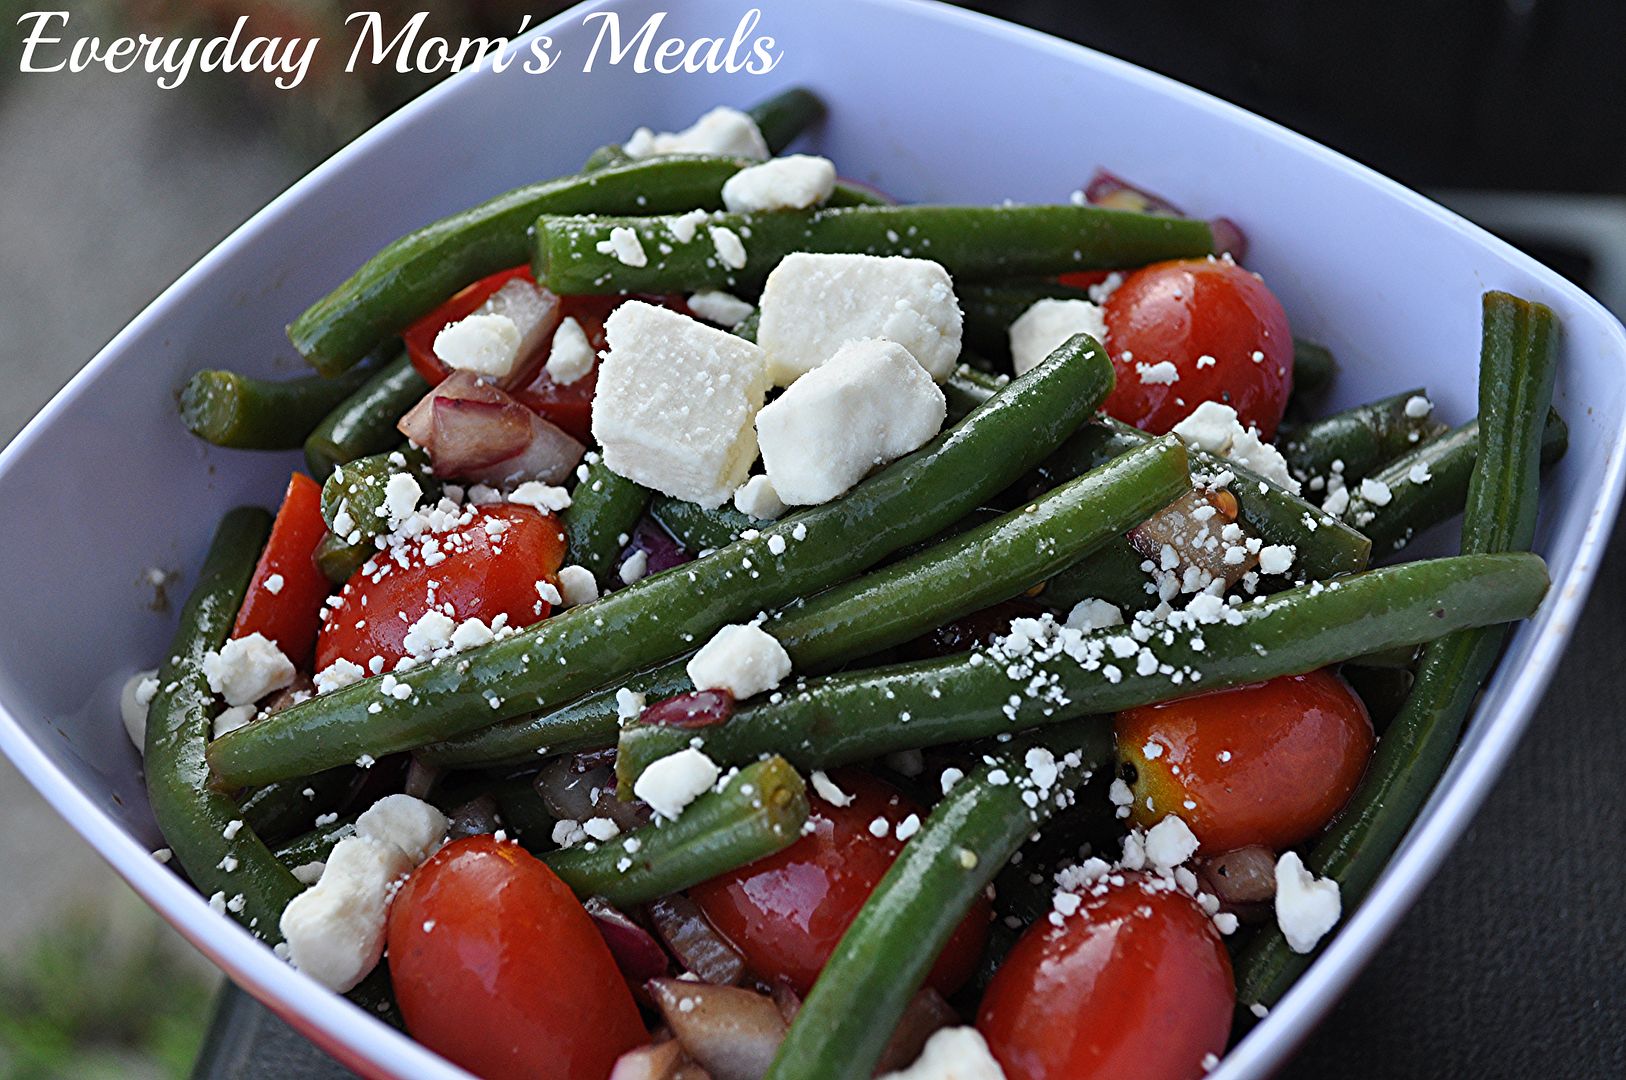
So when I had some fresh green beans in the fridge (Yay for produce sales!!) and knew I wanted to make a salad instead of just boiling them, I was so excited when I came upon this. It had some of his favorite things! Beans, tomatoes, and plenty of feta!

If your side dish rotation has gotten a little tiresome, or maybe you have plenty of green beans coming from your garden, this salad is a fantastic, unique side dish for any meal. Full of color and flavor, it's so pretty for summer too.

My little cheese fiend isn't going to give up his addiction any time soon. That's okay though. It could be much worse! I will take him sneaking cheese over candy any day of the week!

Balsamic Green Bean Salad From Taste of Home
2 lb. fresh green beans, trimmed and cut into 1 inch pieces
1 medium red onion, finely chopped
4 c. cherry tomatoes, halved
1 c. crumbled feta cheese
1/4 c. olive oil
3 TBS lemon juice
1/4 tsp. salt
1/8 tsp. pepper
1/4 tsp. garlic powder
1/4 tsp. ground mustard

In a medium pan over high heat, place green beans covered with water. Bring to a boil. Cook 8-10 minutes until crisp tender. Drain and place in ice water to stop cooking. Pat dry. Place in large bowl. Add onions. In a small bowl whisk together oil, lemon juice, and seasonings. Mix well. Pour over green bean mixture. Chill for at least 1 hour. Stir. Add tomatoes and cheese just before serving.


Shared on Mandy's Recipe Box July 30, 2013
Shared on The Country Cook Aug. 2, 2013
Green Beans at Very Good Recipes
Pin It
reade more... Résuméabuiyad

Roasted Pistachio Ice Cream


I am not exaggerating when I say that this is the best ice cream I have ever made. And it is also, quite possibly, the best that I have EVER eaten. Seriously. I just ate another dish of it to confirm that it's true. And it is. This ice cream is so amazingly delicious that I don't have enough adjectives. Just hurry up and make it yourself and tell me if you agree with my assessment!

Start by roasting the pistachios. This gives the ice cream incredible depth of flavor so don't skip this step! Spread the pistachios out on a baking sheet


and toast for 10-12 minutes. They'll get really fragrant and just start to brown. That's when they're perfect. Now transfer them to the bowl of a food processor and grind away until the nuts turn into a paste. This will take a few minutes, so don't be alarmed if it's not immediate. Here's what you're looking for:


Scrape the paste into a large measuring cup or batter bowl (you'll store the ice cream batter in this dish overnight, so be sure it's big enough) and add the cream cheese.


Now in a small bowl, combine the cornstarch and 2 tablespoons of the milk


and whisk until smooth. In a large saucepan, combine the remaining milk, cream,


sugar and corn syrup.


Over medium high heat, bring this mixture to a rolling boil and boil for 4 minutes.


Remove from the heat and gradually add the cornstarch mixture (whisk it again so be sure it's all dissolved).


Stirring constantly, bring the mixture back to a boil over medium high heat and boil for 1 minute or until slightly thickened.

Now add a couple of ladles-full of the cream mixture to the pistachio/cream cheese


and whisk until combine. Continue to gradually add the cream mixture, whisking constantly. Cover the bowl and refrigerate overnight.

When you're ready to make the ice cream, remove the batter from the fridge and give it a good stir. Pour the batter into the ice cream maker


and once it is churning, add the almond extract.


Continue to churn until the ice cream is at the soft serve stage. Transfer to a freezer safe container and then press parchment paper down onto the surface of the ice cream.


Freeze until firm, about 4 hours. I hope you can wait that long. It is well worth it.


You can garnish this with chopped pistachios. I may or may not be planning to make hot fudge tomorrow to pour over this ice cream...

One year ago: Poppyseed Cake
Two years ago: Basmati Rice and Chicken Salad
Three years ago: Canteloupe Sorbet
Four years ago: Shrimp and Vegetable Stir Fry

Find more inspiration at Inspiration Monday, Mouthwatering Monday, Mix it Up, Melt in Your Mouth, Recipe Sharing, Tasty Tuesday, Totally Tasty Tuesday, Tasteful Tuesday, Tuesday Talent Show, Clever Chicks, Try a New Recipe, Share Your Stuff.

Roasted Pistachio Ice Cream

1/2 cup shelled pistachios
2 cups whole milk
1 Tbsp. + 1 tsp. cornstarch
1 1/2 ounces cream cheese, softened (reduced fat is fine)
1/2 tsp. salt
1 1/2 cups heavy cream
2/3 cup sugar
2 Tbsp. light corn syrup
1/2 tsp. almond extract

Spread the pistachios out on a small baking sheet and toast at 350 for 10-12 minutes, until fragrant and just starting to brown. Remove from the oven and grind in a food processor until the nuts form a smooth paste.

Whisk the cream cheese, pistachio paste and salt in a large measuring cup or batter bowl until smooth. Set aside.

In a small bowl, combine 2 Tbsp. of the milk and the cornstarch and whisk until smooth. Set aside.

Combine the remaining milk, cream, sugar and corn starch in a large saucepan and bring to a rolling boil over medium-high heat. Boil for 4 minutes. Remove from the heat and gradually add the cornstarch mixture. Return this mixture to a boil, stirring constantly, until slightly thickened, about 1 minute.

Whisk about 2 ladles-full of the cream mixture into the pistachio/cream cheese mixture. Continue to add the cream mixture gradually to the pistachio mixture, whisking constantly. Cover and refrigerate overnight.

Remove from the refrigerator and stir well. Pour into the ice cream machine and then add almond extract. Churn the ice cream until thick, soft serve stage. Pack the ice cream into a freezer safe container and place parchment paper on top. Freeze until firm, about 4 hours. Makes 1 quart.

Recipe Source: Adapted from Jeni's Splendid Ice Creams at Home
reade more... Résuméabuiyad

Summer Time Snack

This is a Sponsored post written by me on behalf of Jel Sert for SocialSpark. All opinions are 100% mine.

Are you always on the look out for great snacks for your kids during these dog days of summer? Things that are light, refreshing, tasty but not filled with sugar and additives? If the answer is YES (and as a mom I know it is) you are going to love Otter Pops. 

Otter Pops are a super fun snack mad with real fruit juice, resulting in a great fat free treat! Plus, they contain no major allergens so you can feel secure handing them out to little ones who struggle with food allergies. Not to mention they are light enough they won't interfere with any meals! And to top it off, they are also very affordable compared to other snack options out there.

We are always on the go during the summer, and I love having quick, easy and fun snacks for my little man to enjoy. Rather it be in the back yard on the slip-n-slide, or at the local park and splash pad, or even in the car, these would be the perfect treat for him to gobble up and cool down with!
Available in great flavors including Original Fruit and Tropical, there is a yummy option for everyone! ( I would be all over those Tropical ones!)

And right now Otter Pops is hosting the "Sir Isaac Summer Scramble" Sweepstakes, from July 15- August 19, 2013.
Prizes Include:
- 5 weekly winners (total of 25 winners): (1) 16 count box of Otter pops 
- 3 random winners: (1) $50 VISA gift card 
Grand Prize winner: (1) year supply of Otter Pops

Now I know you are asking " How do I enter the Summer Scramble Sweeps" Well, it's super easy!  Just head over the their Facebook Page, give them a "like", click on the Sweeps tab, and fill out the information when prompted! Could not be more simple!


So the next time you're looking for a feel good, taste great summer snack for the kids, remember Otter Pops, and don't forget about the Sweepstakes too! Oh and be sure to follow @Otterpops on Twitter too!

Visit Sponsor's Site
reade more... Résuméabuiyad

Church Supper # 96

Good Morning and welcome to another Sunday! I hope this finds you enjoying your weekend and ready to share in some good fellowship and great food!
Thanks for stopping by today. I truly appreciate you sharing with our foodie family!
Please link up your favorite recipes from the week. And remember I wish you God's blessings all week long!
 " Rejoice in the Lord always. I will say it again: Rejoice!" (Philippians 4:4)


Last Week's Most Viewed Recipe:

Roadhouse Pizza


Congrats! Be sure to grab my Featured On Button!

Rules:

1. Feel free to link up as many recipes, butrecipes ONLY please, as you like!

2. Link up to your ACTUAL recipe, not just your homepage. Much easier to find you that way!

3. Include a link back to EMM on your recipe post or grab my button!

4. Leave comments so I can visit you back!

5. Visit at least 2 other sites and tell them you joined them at my Church Supper!

6. Follow my blog here w/ GFC and on Facebook :)


reade more... Résuméabuiyad

Soul Food Saturday #15

Welcome to another weekend! I hope you had a nice week, and some beautiful weather to go along with it. The heat and humidity subsided here in Northern Indiana, and it was sunny and pleasant, perfect for enjoying some time outside! Bekki has a great, simple meal idea for you today that I think the little ones will love!


Interesting thing happened last time we visited my niece and nephews. My oldest nephew Kyle, has a huge love for something he calls Chili Mac. Yes, I said it. I had no clue what this was until I was part of this family. I have made Cheeseburger Macaroni many times and loved it, from childhood. After hearing about this Chili Mac for some time I decided I’d try it. Wow, I was definitely missing out. To combine the taste of a chili dog and Mac in cheese in a bowl, how could I have gone so long without knowing about this? Who knows…? All I know is I am keeping this one in the box, for a rainy day. And, who says they don’t need one more great way to have fun with that little blue box? Not anyone I know. So watch out, if you blink you may miss this one. It’s done in no time flat. Enjoy!
Chili Mac-Stat!
1 (7.25 oz.) box Mac and Cheese Dinner {we’ll let the one you choose be a secret}
6 c. water
¼ c. butter
¼ c. milk
1(15 oz.) can Thick Chili with beans
 In a large saucepan heat water to boiling and add macaroni. Let cook for 7-10 minutes until macaroni is tender. Drain. Add butter, and mix to combine. Add milk and sauce packet, and mix well. Add chili with beans and mix to combine. Serve hot. Serves 4


Pin It
reade more... Résuméabuiyad

Meal Plan July 28-Aug 2

* New Recipe
Links to Recipes on Blog

Sunday
I have a baby shower to attend. The boys are hanging out with my father in law.

Monday
Grilled Citrus Chicken*
Wild Rice
Pan Roasted Brussels Sprouts

Tuesday
Stovetop Creamy Mac n Cheese*
Green Beans
Mandarin Oranges

Wednesday
Teriyaki Shrimp Cups
Marinated Cucumbers
Satueed Mushrooms

Thursday
Soft Tacos
Chips
Crock Pot Queso*

Friday
Alex has a sleepover w/ Maa Ma. Adam and I will have leftovers.


reade more... Résuméabuiyad

Chippy Side Dish

Have you ever had one of those moments where you see something that is new to you, and for the next few days, or even weeks, you start to see it everywhere? Like it never existed in your world, and all of sudden you are inundated with it? It's similar to when you buy a new car, and driving home you begin seeing the same one all over the road! Well, this recipe is a great example of just that. 

I had never heard of this my entire life. That's right 32 years of never knowing there was such a thing. Then at the beginning of the summer I saw it online....once...twice...three times...and again! I saw it every where from my good friend Brandie, The Country Cook, to Paula Deen on tv to a friend talking about it on Facebook, and finally I found it while trolling through a cookbook. It was like the gods were trying to tell me something. I finally accepted the signs and decided to try it for myself.

Now I'm guessing since it's been popping up all over the place, this is one of those recipes that can be made a thousand different ways, and everyone that makes it does it that way because someone before them, perhaps mom or grandma, made it that way. So, this is my version. A little of this and a little of that from each different version I found. I guess if I was going to site a source, I would have to say "inspired by everyone who has ever made this." 

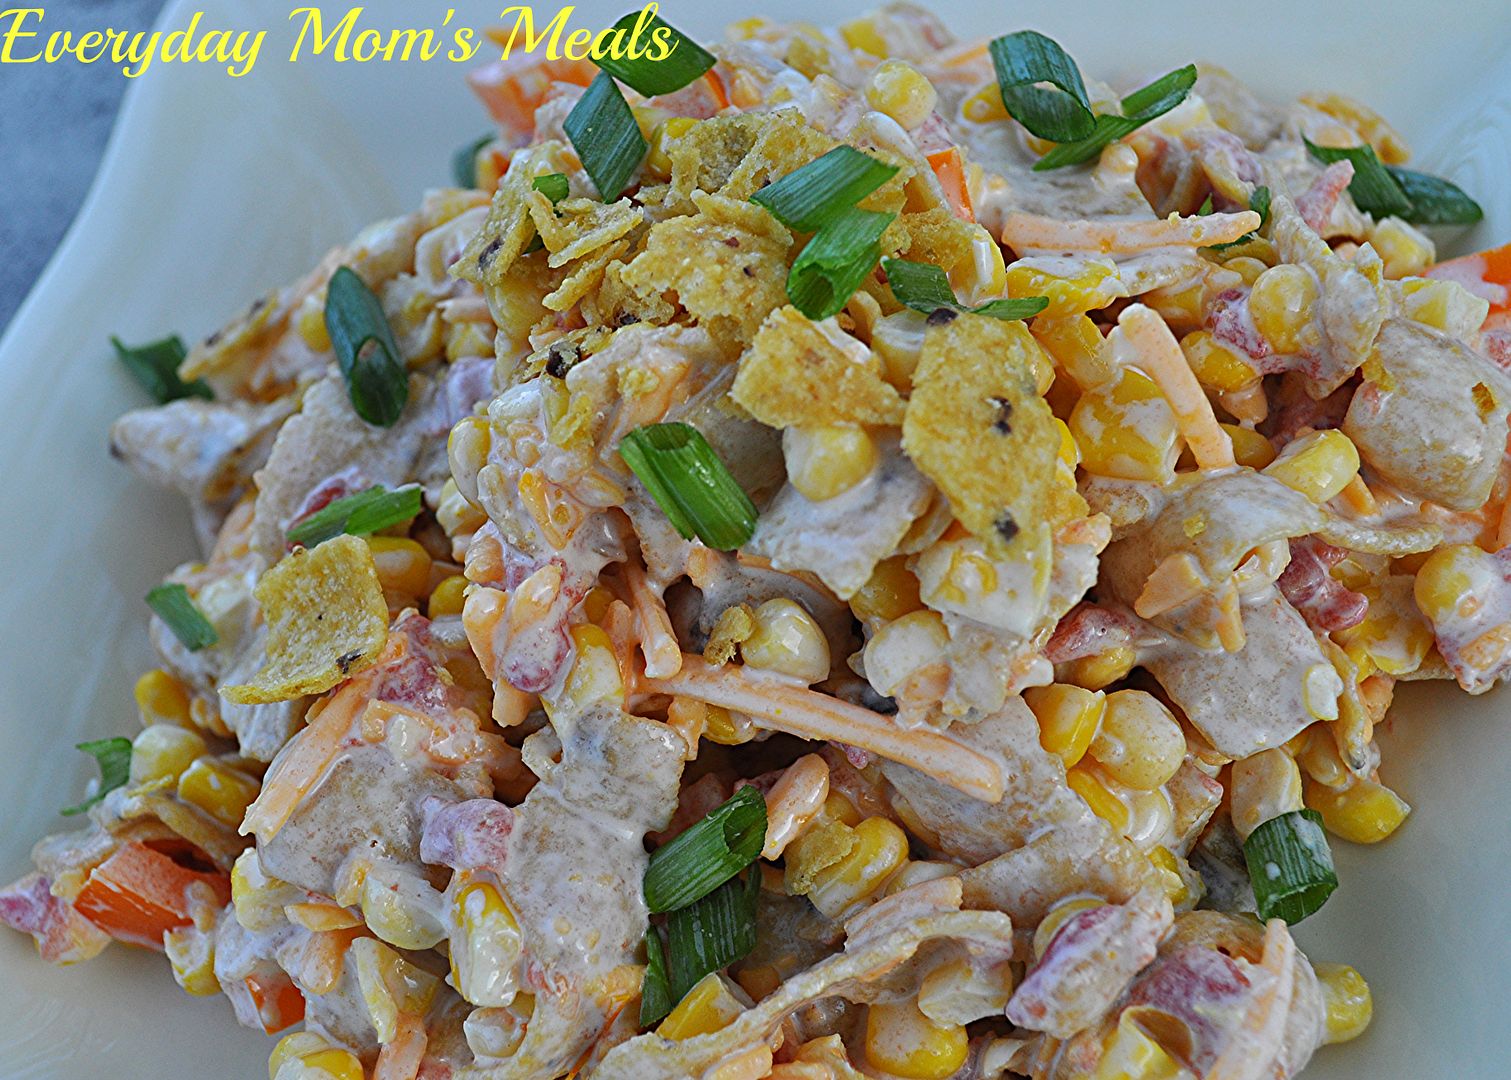
For those of you like me who had no idea such a concoction existed, let me tell you, it's delicious! Creamy and crunchy, sweet with just a little zip from the chilies, it makes a great side dish for any barbecue or backyard party! If you are going to a cookout this weekend, take this instead of the old stand bys! Give them something new to try! 

Or, perhaps when you show up with it, you'll hear about how someone has been making it for years, and the next day someone else will tell you the same thing. If it starts to feel like you are seeing it everywhere and anywhere, don't feel bad. You probably are. It's okay though. It's yummy enough you'll be happy you are!

Corn Chip Salad 
1 (10 oz.) bag corn chips
2 (15 oz.) cans corn, drained
1 orange bell pepper, chopped
1 (10 oz.) can diced tomatoes and green chilies
2 c. shredded sharp cheddar cheese
1 c. mayo
2 green onions, chopped, for garnish

In a large bowl combine corn, pepper, diced tomatoes, and cheese. Stir well. Add mayo. Mix to combine. Chill for at least an hour. Right before serving, stir in chips, crushing slightly. Garnish with green onions and extra chips.


Shared on The Country Cook July 26, 2013
Shared on Mandy's Recipe Box July 30, 2013
Corn at Very Good Recipes
Pin It
reade more... Résuméabuiyad

Fifty Shades of Kale { A Review}

Have you heard the term "superfood"? It's one that is being tossed around a lot lately when it comes to folks trying to eat right and only putting things into their bodies that fuel them for life. And one of the ones I hear the most about, is one I actually adore...kale.

Now you can learn about kale, all of it's wonderful varieties and enjoy 50 fresh and satisfying recipes starring kale in the new cookbook, Fifty Shades of Kale, by Drew Ramsey, M.D and Jennifer Iserloh. (I love that title!)


"Kale is the queen of the cruciferous vegetables, a family of superfoods packed with nutritional benefits." In fact, did you know one serving has more than 600 percent of your daily Vitamin K allowance? Plus, it has more Vitamin C than an orange! Not to mention Vitamin A and Calcium too! Now you can see why it's called a superfood!

I had not idea there were so many varieties of kale out there. Okay, so maybe there aren't exactly 50, but it's close! Inside this book you can learn to do so many things with all of them. From breakfast dishes to appetizers, favorites like pastas and tacos, it truly has something for everyone.

One of my favorite parts of the book is on pages 11-15, "Coupling with Kale." This section gives you some great matches for serving with it, and things you should have in your pantry and fridge to make the best of your kale experience.

If you love kale and want to cook with it even more, or maybe are looking for  away to incorporate it into your diet, be sure to check them out on Facebook, and visit their site for more info, and ordering.


Disclaimer: I was given a copy of this cookbook for review. All thoughts and opinions are my own.

reade more... Résuméabuiyad

Chocolate Peanut Butter Ice Cream


You probably know this, but July is National Ice Cream Month. So I thought it would be appropriate to end the month with a few ice cream recipes. Today we start with one that I've wanted to make for years and just finally got around to...chocolate peanut butter revel is one of my favorite flavors to get at the ice cream parlor - and it's very very hard to find a similar version at the grocery store. But I don't need to look anymore - cause I can just make this! This chocolate ice cream is custardy smooth and rich - and the salty peanut butter complements it beautifully. My sister-in-law, who loves this flavor also, said it was BETTER than our ice cream shop's version! Now that's a huge success.

Start by combining 2 cups of the whole milk,


cocoa,


sugar


and salt in a medium saucepan. Heat over medium low heat until the milk starts to steam, but do not let it boil. Meanwhile, in a small measuring cup, combine the remaining milk and the cornstarch.


Whisk together until smooth, then add to the steaming milk mixture.


Cook and stir until this mixture comes to a boil. It will resemble chocolate pudding.


Remove from the heat. In a large measuring cup or batter bowl, heat the cream in the microwave until it comes to a boil. Add the chocolate chips


and stir until smooth.


Now add the saucepan mixture to the measuring cup


and stir well to combine. Cover this mixture and refrigerate until chilled, about 2 hours.

Add the ice cream base to your ice cream machine


and churn until the mixture is soft serve stage. Drizzle in half of the peanut butter


and don't let the machine churn too much - you want to see ripples in the finished ice cream. Transfer the ice cream to a freezer safe container then fold in the remaining peanut butter.


Cover and freeze until solid. Let sit on the counter for 5 minutes or so before scooping up and enjoying!


One year ago: Roasted Banana Ice Cream
Two years ago: Curried Chicken Salad with Blackberries
Three years ago: Peach and Blackberry Tart
Four years ago: Strawberry Banana Trifle

Find more great stuff at Whatcha Whipped Up, What's Cooking Wednesday, Wicked Good Wednesday, What's Cooking #2, Cast Party, Full Plate Thursday, Thursday's Treasures, Foodie Friday, Foodie Friday (#2), Friday Flash, TGIF, Food on Friday, Friday Food Frenzy.

Chocolate Peanut Butter Ice Cream

2 1/2 cups whole milk, divided
1 cup sugar
1/3 cup cocoa powder
pinch of salt
3 Tbsp. cornstarch
1/2 cup heavy cream
3/4 cup chocolate chips
1/2 cup creamy peanut butter

In a saucepan over medium heat, stir together 2 cups whole milk, sugar, cocoa powder and salt. Heat until the milk starts to steam, but before it starts to boil.

In a small measuring cup, whisk together the remaining 1/2 cup of whole milk and the cornstarch until no lumps remain. Add the cornstarch mixture to the heated milk and chocolate mixture and bring to a low boil. Boil until thickened then remove from the heat.

Add the heavy cream to a large measuring cup, and heat in the microwave until it boils. Pour in the chocolate chips. Let sit for 1 minute, then stir until well blended.

Add the contents of the saucepan to the large measuring cup, and stir well to combine. Cover, and refrigerate until chilled. (about 1 1/2 to 2 hours)

Once cool, add to your ice cream maker and churn. Once the mixture has thickened in the ice cream maker, slowly drizzle in 1/4 cup of peanut butter. Don’t over mix. Transfer the ice cream into a freezer safe container and fold in the remaining 1/4 cup of peanut butter. Cover and freeze until solid.

Recipe Source: Joy the Baker

reade more... Résuméabuiyad