How would you like to be able to make some of your favorite recipes, and with just changing each one a little bit, be eating something much healthier for you? Sounds like the best of both worlds, right? Well, in the new cookbook
Recipe Rehab, that's exactly what you're gonna be able to do, and with the help from some outstanding chefs!
From the test kitchens of the Everyday Health hit TV show, this cookbook is filled with 80 delicious recipes that "slash the fat, not the flavor." We're talking family classics rehabbed by your favorite chefs! Oh, and the TV show?? It's now an Emmy nominated program, recognized in the Outstanding Culinary Program category.
When I received my copy, I couldn't wait to dive in and find something yummy that I could feel great about serving my family. Boy, were there a lot of options! From breakfast to appetizers, dinner to desserts...every page looked more mouth watering than the next. I love the chapter titled "Lightened-Up Carbs." You know how I am a carb-a-holic!
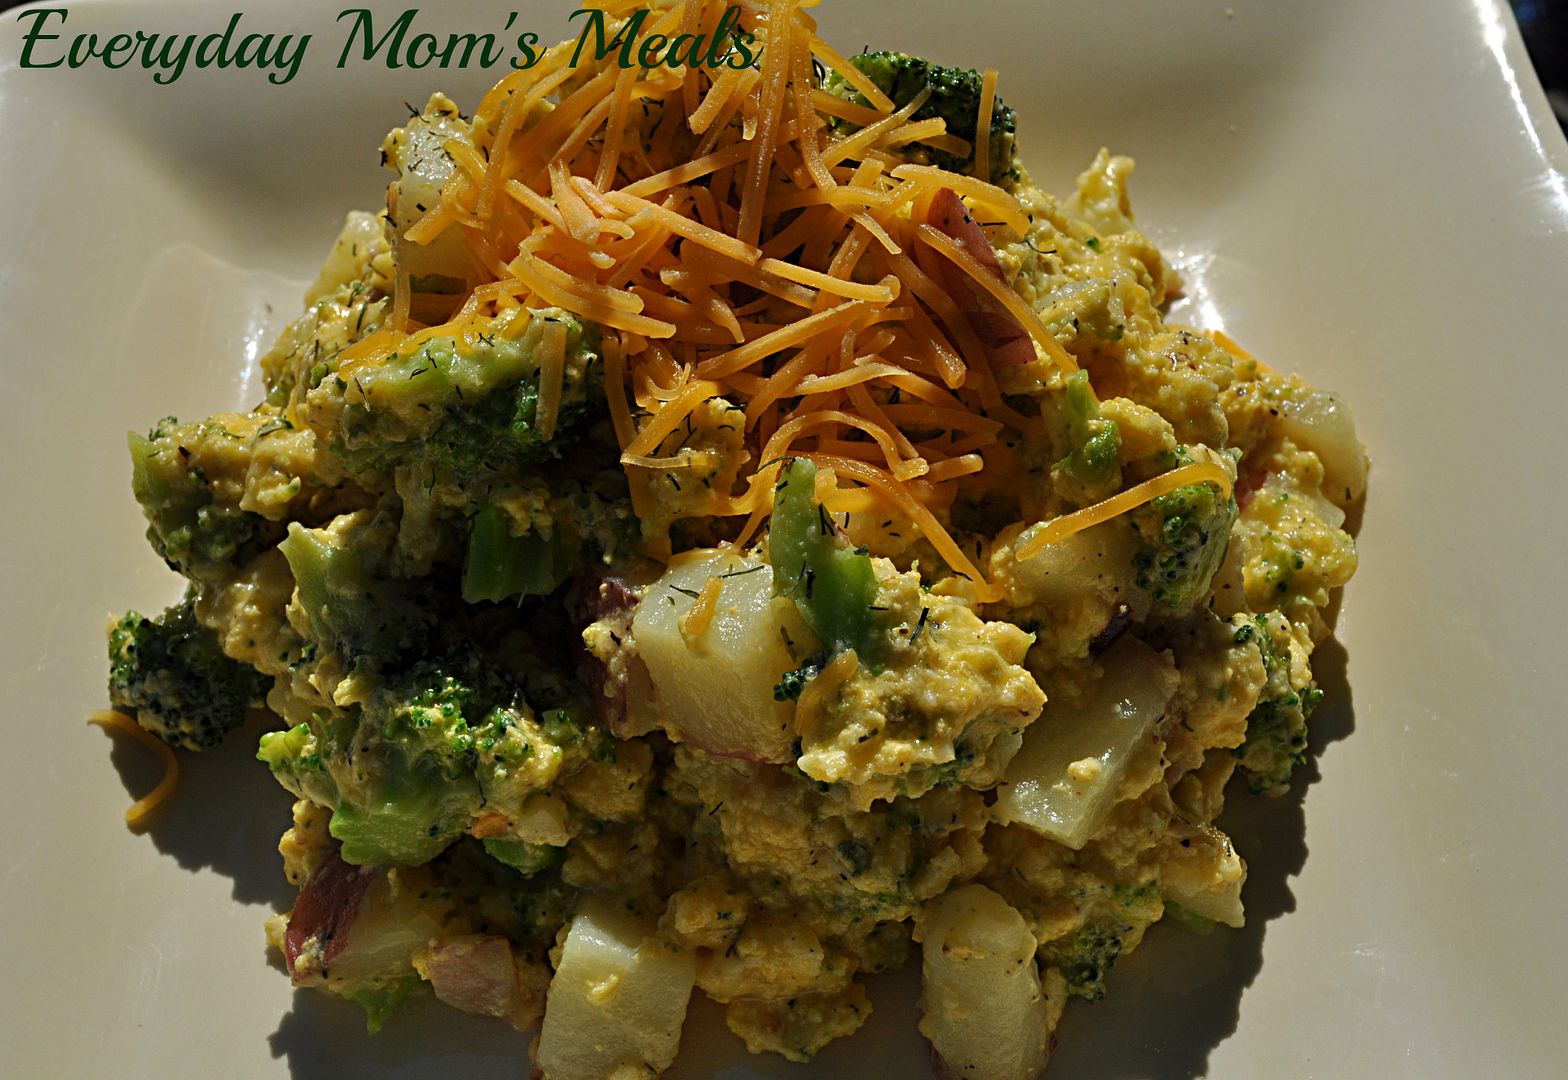
But I decided to try a new breakfast scramble, which in this house meant breakfast for dinner...one of our favorite treats. I love the use of fresh broccoli and potato! Any time I can get more green veggies into our diet, I'm a happy mama!
This makes a delicious quick weeknight meal with some whole grain toast on the side. Or the perfect weekend breakfast or brunch dish. It would be amazing with a big bowl of fresh fruit too!
Taking our favorite foods and making them a little easier on our waistline is something we can all enjoy and benefit from. Especially now that swimsuit season is upon us...eek!!!
Plus, you have a chance to
win your very own copy of Recipe Rehab. Just scroll down past the recipe to see how to enter!
Cheesy Broccoli Egg Scramble2 small red potatoes, diced
3/4 c. water
1 c. chopped broccoli florets, fresh or frozen and thawed
1 TBS vegetable oil
2 garlic cloves, minced
1/4 tsp. red pepper flakes
2 c. liquid egg substitute
1/2 c. reduced fat shredded cheddar cheese
2 tsp. fresh dill, chopped
Put a deep skillet over medium-high heat. When the pan is hot, add the potatoes and water. Once the water comes to a boil, reduce the heat to medium-low and cover. Steam until the potatoes begin to soften, about 4 minutes. Add the broccoli, stirring to combine with the potatoes, and cover. Cook for 4 more minutes, until both vegetables are just fork tender. Drain the vegetables in a colander, wipe out the pan and return to medium-high heat.
Coat the skillet with the oil. When oil i shot, add the cooked broccoli, potatoes, garlic and red pepper flakes. Gook and stir until the vegetables begin to brown on the edges, about 2 minutes. Pour in the liquid egg. Using a rubber spatula, drag the eggs from the outside of the pan to the center to create fluffy curds. When the eggs are just about set, sprinkle in the cheese and dill. Remove from heat.
*NOTE* My changes: I used 1/4 tsp. dill weed, salt and pepper to taste. I also garnished with a little extra cheese.
********Giveaway********
Rules:
1. This contest is open to US and Canadian Residents 18 and older ONLY.
3. The winner will be notified by email and Facebook. He/she will have 48 hours to respond or another winner will be chosen. I will then pass on your address to the sponsor for shipping.
4. When leaving comments for entries, they MUST BE SEPARATE ones AND include an email address so it's easy for me to find the winner. If entries are together, it will only count as (1) and if no email, entry will not be considered.
5. If any of the extra entries are items you are already doing, please just remind me!
6. Contest Ends: Friday, June 7, 2013
One Lucky Winner Will Receive:
(1) Copy Recipe Rehab
Mandatory Entry: 1. Leave a comment telling me you what recipe you would love to see lightened up.
1. Become an EMM Facebook fan. Leave a comment when you have. 2. Follow EMM on Twitter. Leave a comment when you are.
3. Follow EMM on Pinterest. Leave a comment when you have.
4. Follow me on Instagram. Leave a comment when you have.
That makes up to 5 entries per person!!!
Good Luck!
Disclaimer: I was provided with a free cookbook for this review, and an extra one for a fan giveaway. All thoughts and opinions are my own.
Pin It
How would you like to be able to make some of your favorite recipes, and with just changing each one a little bit, be eating something much healthier for you? Sounds like the best of both worlds, right? Well, in the new cookbook
Recipe Rehab, that's exactly what you're gonna be able to do, and with the help from some outstanding chefs!
From the test kitchens of the Everyday Health hit TV show, this cookbook is filled with 80 delicious recipes that "slash the fat, not the flavor." We're talking family classics rehabbed by your favorite chefs! Oh, and the TV show?? It's now an Emmy nominated program, recognized in the Outstanding Culinary Program category.
When I received my copy, I couldn't wait to dive in and find something yummy that I could feel great about serving my family. Boy, were there a lot of options! From breakfast to appetizers, dinner to desserts...every page looked more mouth watering than the next. I love the chapter titled "Lightened-Up Carbs." You know how I am a carb-a-holic!
But I decided to try a new breakfast scramble, which in this house meant breakfast for dinner...one of our favorite treats. I love the use of fresh broccoli and potato! Any time I can get more green veggies into our diet, I'm a happy mama!
This makes a delicious quick weeknight meal with some whole grain toast on the side. Or the perfect weekend breakfast or brunch dish. It would be amazing with a big bowl of fresh fruit too!
Taking our favorite foods and making them a little easier on our waistline is something we can all enjoy and benefit from. Especially now that swimsuit season is upon us...eek!!!
Plus, you have a chance to
win your very own copy of Recipe Rehab. Just scroll down past the recipe to see how to enter!
Cheesy Broccoli Egg Scramble2 small red potatoes, diced
3/4 c. water
1 c. chopped broccoli florets, fresh or frozen and thawed
1 TBS vegetable oil
2 garlic cloves, minced
1/4 tsp. red pepper flakes
2 c. liquid egg substitute
1/2 c. reduced fat shredded cheddar cheese
2 tsp. fresh dill, chopped
Put a deep skillet over medium-high heat. When the pan is hot, add the potatoes and water. Once the water comes to a boil, reduce the heat to medium-low and cover. Steam until the potatoes begin to soften, about 4 minutes. Add the broccoli, stirring to combine with the potatoes, and cover. Cook for 4 more minutes, until both vegetables are just fork tender. Drain the vegetables in a colander, wipe out the pan and return to medium-high heat.
Coat the skillet with the oil. When oil i shot, add the cooked broccoli, potatoes, garlic and red pepper flakes. Gook and stir until the vegetables begin to brown on the edges, about 2 minutes. Pour in the liquid egg. Using a rubber spatula, drag the eggs from the outside of the pan to the center to create fluffy curds. When the eggs are just about set, sprinkle in the cheese and dill. Remove from heat.
*NOTE* My changes: I used 1/4 tsp. dill weed, salt and pepper to taste. I also garnished with a little extra cheese.
********Giveaway********
Rules:
1. This contest is open to US and Canadian Residents 18 and older ONLY.
3. The winner will be notified by email and Facebook. He/she will have 48 hours to respond or another winner will be chosen. I will then pass on your address to the sponsor for shipping.
4. When leaving comments for entries, they MUST BE SEPARATE ones AND include an email address so it's easy for me to find the winner. If entries are together, it will only count as (1) and if no email, entry will not be considered.
5. If any of the extra entries are items you are already doing, please just remind me!
6. Contest Ends: Friday, June 7, 2013
One Lucky Winner Will Receive:
(1) Copy Recipe Rehab
Mandatory Entry: 1. Leave a comment telling me you what recipe you would love to see lightened up.
1. Become an EMM Facebook fan. Leave a comment when you have. 2. Follow EMM on Twitter. Leave a comment when you are.
3. Follow EMM on Pinterest. Leave a comment when you have.
4. Follow me on Instagram. Leave a comment when you have.
That makes up to 5 entries per person!!!
Good Luck!
Disclaimer: I was provided with a free cookbook for this review, and an extra one for a fan giveaway. All thoughts and opinions are my own.
Pin It