Pages

Texas Star Chili Cook Off 2012

I was so excited this week to learn that my Beef and Black Bean Chili had been selected as the winning entry in the Texas Star Chili Cook Off 2012! This is an annual chili recipe contest that anyone can enter, and the winner is based on the chili with the most views at the end of the month of October. I am so delighted and honored to be the winner this year with the many wonderful recipes to choose from!


All of the tasty recipes can be viewed by visiting Texas Star Chili Cook Off 2012 at Miz Helen's Country Cottage. 


Many thanks to all who voted for my chili, 
and to Miz Helen for the $50 Amazon gift certificate! 
reade more... Résuméabuiyad

Happy Halloween!!!

It's finally here! If your kids are anything like Monkey, and I think most are, the only countdown bigger than the one to today is the one coming up in about a month towards December 25th! Children everywhere are sitting in classrooms right now watching the minutes tick away just trying to contain themselves until they can get home, don their witches hats, pirate swords, superhero capes and princess tiaras. When Monkey gets home, he is convinced he needs to change right away, and trick or treating should start promptly at 3:45 pm. Well, our city council sees things differently and therefore made trick or treat hours from 6-8 pm, which means I have 2 hours to fill the void with some Halloween fun so I don't have to hear "Is it time yet?" every 5 minutes. So, I'm going to surprise him with these for a yummy, festive after school snack! I know he is going to think they are too cute and be surprised at what lies underneath. Hopefully these will lessen his urge to run out the door a little bit until that magical witching hour. From my family to yours, I wish you and your little ones a very "spook-tacular" and fun filled day!

~HappHalloween~

My Monkey as Captain America


Ghost Pops From Pinterest
1 banana, cut into thirds
1 (6 oz) container very vanilla yogurt
1 c. sweetened flaked coconut
Candy sticks
6 pieces of chocolate puff cereal

Spread each piece of banana with yogurt, coating liberally. Roll in coconut, pressing to adhere. Dip each piece of of cereal in yogurt and press into banana for eyes. Freeze for 1 hour to set.


Shared on Lady Behind The Curtain Oct. 31, 2012
Halloween at Very Good Recipes
Pin It
reade more... Résuméabuiyad

Candy Overload

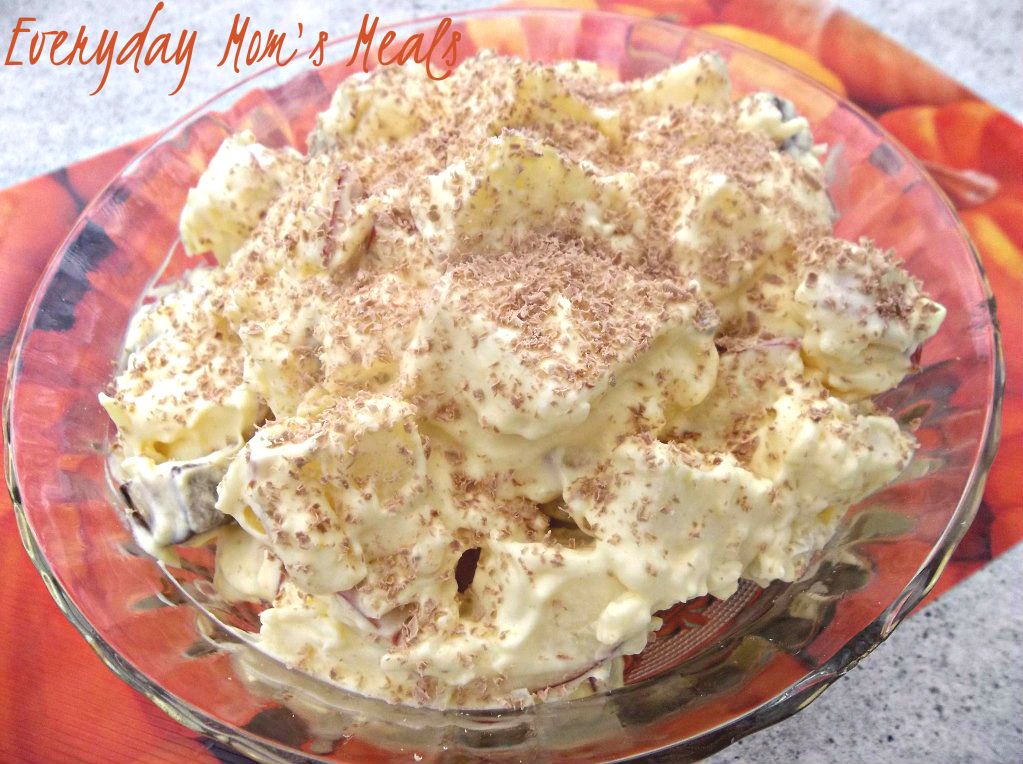
On November 1st, parents across this country, from one coast to another, will all be dealing with the same problem. TOO MUCH candy! Little ones will bring it home by the bagful on Halloween night, and even after picking through and probably disposing of some, there will still more than enough to feed an entire army for months! Or, many of you might have a different kind of candy problem. You bought bag after bag to hand out to the little ghosts and goblins, but only a tenth of what you anticipated rang your doorbell. So, if you find yourself with one, or both, of these problems come Thursday morning, I've got a great resolution for you that is yummy and easy at the same time. Why not take some of those candy bars and turn them into another dessert? How about adding in some fruit so you can feel better about eating it? When I saw this idea I thought it was pretty ingenious, and not just because it contained my favorite candy bar of all time. And yes, before you ask, I'm the mom that when I go through my son's candy bag at the end of the night, is sure to sneak a couple for myself. Don't judge...you know you do it too! So if you find yourself very "candy happy" and want to use some of it in a new,unique way, this salad is just the answer!

Apple Candy Bar Salad Adapted From Taste of Home
1 (3.4 oz) box French vanilla instant pudding
3/4 c. milk
1 1/2 c. Cool Whip
2 large honeycrisp apples, cored and chopped into bite sized chunks
2 Snickers candy bars (regular size), chopped
1/2 c. coconut
1 small chocolate bar, optional

With a wire whisk, combine 1/2 of the pudding mix and milk. Whisk for 2 minutes and let rest for 2 minutes until soft set. Fold in Cool Whip and remaining pudding mix. Stir well to combine. Add apples and candy bars. Stir. Add coconut. Stir well. Using a lemon zester, grate chocolate over the to to garnish. Chill until serving.
~Join me for Tasty Tuesday on Formula Mom~

Shared on Mandy's Recipe Box Oct. 30, 2012
Shared on Lady Behind The Curtain Oct. 31, 2012
Shared on Miz Helen's Country Cottage Nov. 1, 2012
Shared on The Country Cook Nov. 2, 2012

Mandy‘s Recipe Box
Featured On
Apples at Very Good Recipes
Pin It
reade more... Résuméabuiyad

Dipped Pretzel Rods for Halloween

These dipped pretzel rods turned out looking somewhat different than what I had intended when I started to make them, but I think they came out pretty cute anyway. My plan was to make dipped pretzels that looked like candy corn with a white layer, an orange layer, and then tipped with yellow sprinkles, but that didn't happen. Living in a small town has its advantages, but shopping is not one of them. I couldn't find the yellow sprinkles that I needed, so I tried to substitute yellow sanding sugar. It seemed like a good idea, but it didn't work. The yellow sugar didn't show up on the orange candy. That's when I went to plan B, and used the sprinkles that were available.


Instead of candy corn pretzels, mine ended up looking like Indian corn pretzels, so all is well, I think. They're still a yummy, salty/sweet snack no matter what color the sprinkles are.


These dipped pretzels were made with pretzel rods, white and orange candy melts, and candy sprinkles.


Melt the white candy according to package directions and dip about 3/4 of each pretzel rod into the melted candy. Lay the dipped pretzels out on wax paper to dry.


After the white layer has dried, melt the orange candy. Dip the pretzel rods again, this time covering about half of the white layer with the orange. Add the sprinkles at this point while the candy is still wet, then lay on wax paper to dry. My grandson Landon enjoyed helping with this part.


These simple treats look pretty festive all packaged up in pretzel bags and tied with ribbon. After making my Halloween wreath I had plenty of extra spiders, so I added a spider ring to each pretzel package for fun.


This batch of pretzels will be going to school to Landon's class. I'll bet the second graders won't even mind that these pretzels look like Indian corn instead of candy corn.


This post was shared with:
Arkansas Women Bloggers
Crazy Sweet Tuesday
reade more... Résuméabuiyad

Greek Layered Dip


I made this dip for a party this past weekend and it was a huge hit. It disappeared very quickly - and I'm not surprised! This dips starts with a layer of hummus and is followed by sun dried tomato pesto, then topped with all kinds of good stuff: cucumbers, onions, olives, feta and sun dried tomatoes.


I think artichokes would be great too, and I thought I had some in the cupboard, but I didn't. No matter, there was plenty of deliciousness here to be had.

I'm not going to include quantities here, cause it really depends on how big of a platter you are filling up - clearly, I should have used a much bigger plate since this was devoured in no time!

Start by spreading the hummus on a serving platter. You can use store bought or make your own. You don't want to spread this too thin - just for context, I used about 10 oz. for this platter. Top with a thin layer of sundried tomato pesto.


Sprinkle the cucumbers over the top,


then add the onions.


Next come the olives,


then the feta and sundried tomatoes.


Doesn't this look amazing???


It tastes amazing too. Serve with pita chips.


Find more great ideas at Mangia Monday, Mouthwatering Monday, Meatless Monday, This Week's Cravings, My Meatless Mondays, Mop it up Monday, Mix it up Monday, Melt in your Mouth Monday, Recipe Sharing Monday, On the Menu Monday, Healthy Moms' Meatless Monday, French Cuisine Friday, Tasty Tuesday, Tuesday at the Table, Tasty Tuesday (#2), Tempt my Tummy Tuesday, Totally Tasty Tuesdays, Tasteful Tuesdays, Tuesday Talent Show, Hearth and Soul, Cast Party Wednesday, Whole Food Wednesday, What's Cooking Wednesday, Wednesday Extravaganza.

Greek Layered Dip

Hummus (either store bought or homemade)
Sundried Tomato Pesto
Cucumber, diced small
Red Onion, diced small
Black Olives, sliced
Feta Cheese
Sundried Tomatoes

Spread the hummus on a serving platter. Top with sundried tomato pesto, then cucumber, red onion, black olives, feta and sundried tomatoes. Serve with pita chips.


Recipe Source: Inspired by Annie's Eats


reade more... Résuméabuiyad

Two Weeks and Counting

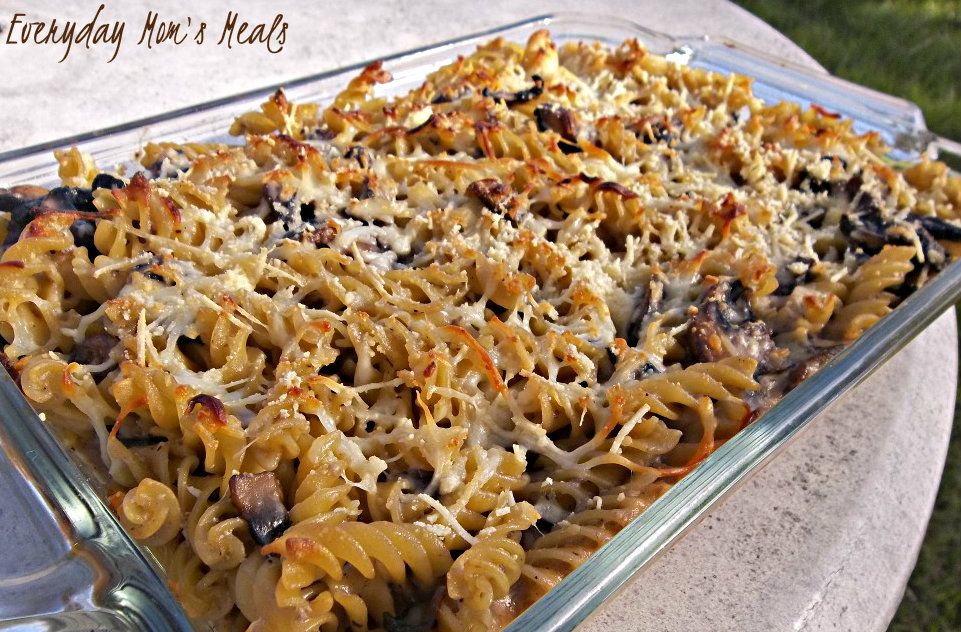
As some of you know, for the second year in a row, I've been selected as a Top 10 Finalist for the Reader's Choice Recipe Contest sponsored by our hometown newspapers. As a finalist, I received two tickets to the Taste of Home cooking show where the winners will be announced on November 13th. Last year was my first time attending a cooking show, and it was so much fun! I learned a lot, had some yummy things to eat, and even got some nice samples to take home. So like I told my family, even if I don't win again this year, it will be an enjoyable evening full of food! But in honor or this upcoming event, I wanted to share a tasty Taste of Home recipe I saw in one of their more recent issues. We are huge mushroom eaters, and any time I see them paired with pasta, my eyes light up and my stomach growls. This was actually published including turkey, as a great use for leftovers after Thanksgiving, but I wanted to keep it strictly meat free. Not for any other reason than it left more room for extra mushrooms!! The flavor of the baby portobellos is so deep, any mushroom lover will gobble this up, rather you include the turkey (Ha! Gobble up turkey) or not! Two more weeks and I will finally know my recipe contest fate, but either way, I'll have a great time learning so new dishes from one of my favorite recipe sources!

Portobello Mushroom Bake Adapted from Taste of Home
1 lb. rotini pasta
1 lb. baby portobello mushrooms, sliced
3 large garlic cloves, grated
1 TBS butter
2 TBS olive oil
3 TBS flour
1 1/2 c. milk
1/3 c. heavy cream
1/2 c. shredded Parmesan cheese, divided
1 1/2 c. shredded mozzarella cheese
Salt and Pepper to taste

Cook pasta according to package directions. Preheat oven to 350. Spray a 8x11 baking dish with non stick spray. In a large skillet on medium heat melt butter in olive oil. Add mushrooms and garlic. Cook until browned and tender, about 7 minutes. Sprinkle with flour and cook 2 minutes. Slowly add milk and cream, stirring constantly. Increase heat to high and bring to a boil. Reduce heat and simmer until slightly thickened, about 10 minutes. Add 1/4 c. Parmesan to mushroom mixture and stir well to combine. When pasta is cooked, drain well and return to hot pot. Add mushroom mixture and stir. Add 1 cup mozzarella cheese, salt and pepper. Pour into prepared dish and top with remaining mozzarella and Parmesan. Bake for 20-25 minutes until browned and bubbly.


Shared on Make Ahead Meals Oct. 29, 2012
Shared on Mandy's Recipe Box Oct. 30, 2012
Shared on Lady Behind The Curtain Oct. 31, 2012
Shared on Miz Helen's Country Cottage Nov. 1, 2012
Shared on The Country Cook Nov. 2, 2012

Pasta at Very Good Recipes
Pin It
reade more... Résuméabuiyad

Church Supper #62


Good Morning and welcome to another Sunday! I hope this finds you enjoying your weekend and ready to share in some good fellowship and great food!

Thanks for stopping by today. I truly appreciate you sharing with our foodie family!
Please link up your favorite recipes from the week. And remember I wish you God's blessings all week long!
 " Rejoice in the Lord always. I will say it again: Rejoice!" (Philippians 4:4)


 Last Week's Most Viewed Recipe:
Congrats! Please feel free to grab my "Featured On" button!

Now, let's eat!

Rules:

1. Feel free to link up as many recipes, but recipes ONLY please, as you like!

2. Link up to your ACTUAL recipe, not just your homepage. Much easier to find you that way!

3. Include a link back to EMM on your recipe post or grab my button!

4. Leave comments so I can visit you back!

5. Visit at least 2 other sites and tell them you joined them at my Church Supper!

6. Follow my blog here w/ GFC and on Facebook :)


reade more... Résuméabuiyad

Mission Organization: Week 43 - Reusable DIY Swiffer Dusters

After making the switch from my disposable-pad mop to my new Rubbermaid Reveal mop with its washable and reusable microfiber cleaning pads, I have been rethinking my dusting methods. I love using my Swiffer duster, and I have always been happy with the cleaning results. The only problem I have with this type of duster is the waste produced from throwing away the soiled dusting cloths and the cost of replacing them. My reusable mopping pads gave me the idea that maybe there was a way to make the dusters reusable too. I started looking around to see if there was any information on how to make a washable Swiffer dusting cloth, and I found just what I was looking for from Abby at Sew Much Ado. She came up with a great design for a flannel duster that fits perfectly on my Swiffer duster arm.


To make a washable and reusable Swiffer duster you will need:

4 pieces of flannel 7" x 7"
4 pieces of flannel 4" x 7"
Pinking shears or scissors
Thread
Swiffer duster handle


Flannel is inexpensive to buy at a fabric store, but you also might want to consider recycling something that you already have around the house. Outgrown flannel pajamas would work well, as would any soft flannel receiving blankets. In Abby's post she said that she had tried some other fabrics, but prefers the flannel over microfiber or fleece.


Cut four pieces of flannel 7" x 7" and four pieces 4" x 7".


Place two pieces of the 4" x 7" flannel on top of two of the 7" x 7" squares, centering the smaller pieces. Repeat with the remaining flannel pieces.


Then sandwich all the pieces together with the 4" x 7" pieces on the top and the bottom of the stack. Machine stitch down the center through all the pieces.


The next step is to make a casing for the Swiffer handle to slide into. Fold the smaller pieces to one side and lay the center of the handle over the center of the fabric where the seam was stitched. Now mark a line for the casing along the edge of the prong, being sure to allow room for the curved edges.


Now fold the smaller pieces to the other side and mark a casing for the other prong in the same way. Machine stitch along each of the marked lines to form a casing for the prongs.


The prongs will slip right into the casings.


Now trim about 1" off the edges of the top large square and the top small piece so that the layers are graduated. Turn the cloth over and trim the other side in the same way.


Then starting at the narrowest layer, clip the flannel into a row of "fringe" at about 1/2" intervals. Repeat for each layer, then turn the duster over and repeat on the opposite side. You'll want to wash and dry the duster to fluff it up before using it. I cut mine with pinking shears to avoid a lot of fraying, but you may want to trim a few threads after it is washed the first time.


So how well does a homemade Swiffer duster work? Here's the comparison of a used and an unused one. The flannel is soft and does a great job of picking up dust, and I'm glad to be living a little greener with one less thing to throw in the garbage.


reade more... Résuméabuiyad

Weekend Company {Guest Blogger Amber}

Good Morning and welcome to the last weekend of October. Yes, you read that correctly. Hard to believe, right??!! But to celebrate, my guest is sharing an awesome autumn recipe that I could absolutely see on your Thanksgiving table. So beautiful and festive.

Today's guest blogger has such an interesting story to tell. I have known Amber since high school, but we've really reconnected over the last year through Facebook...and FOOD! She too is a mama and a blogger; and I have so much respect for how she has totally revamped her family's eating habits. But I will let her tell you more about that. Please welcome Amber to EMM~


Hi, I’m Amber from Whole Foods for Whole Families, and I’m excited to be doing my first-ever guest blogging post here for Krista. Like most of you on here, I LOVE food. But our family eats a little differently. My husband and I follow a Paleo lifestyle – grain-free, dairy-free and legume-free. Since I started eating this way about 6 months ago, I have cured my Chronic Fatigue and GERD, lost 8 lbs (I’m a size 2), and have enjoyed more energy, clearer thought processes (no more brain fog!) among other things. My husband has also had noticeable changes to his health; he’s lost 25 lbs (and counting), his cholesterol levels have come into a healthy range, his skin has cleared up all over his body (his back used to be red and bumpy, now it’s super soft and smooth) and he has much more energy, just to name a few.

But the biggest change has been with my youngest daughter, Little A, now 4-and-a-half-years-old. When she just turned three, she became very sick after having a routine surgery to remove her adenoids and insert a new set of ear tubes. She was diagnosed with Chronic Benign Neutropenia of Childhood which is a fancy way of saying that her neutrophils, the white blood cells that fight bacteria, are chronically low. After taking her to one of the best pediatric hospitals in the country, we were left with no treatment options, just a wait-and-see approach. This wasn’t good enough for us. I didn’t want to sit around, waiting to see if my child was going to fall seriously ill again, so my husband and I researched and researched… and then we researched some more. Our research led us to how our diets can affect our health so we completely changed the way we eat. After being gluten- and dairy-free for a year, Little A’s health has completely transformed. She used to be sick nearly all the time with constant fevers, colds, runny noses and ear infections (even after having ear tubes). Winter time meant endless trips to the pediatrician, but the first winter after we became gluten-free, neither Little A nor my oldest, Big C, had to go to the doctor. Not even once. For us, that was a huge deal! In fact, Little A has not had one fever since going gluten-free. She also put on weight, her skin no longer looks pale and pasty, the dark circles under her eyes have diminished and she is full of much more energy while requiring less sleep. The transformation of Little A’s health has inspired me to blog about our journey on my site in the hopes of helping other families find their path to health as well.

But enough about me; let’s get down to some food. I promised Krista I would come up with a recipe that was gluten-free but without any of the “weird” ingredients we gluten-free people tend to use. I didn’t want to post a recipe that required ingredients most people don’t have, like almond flour or coconut flour, staples in a Paleo diet. And I also wanted to come up with a good fall recipe, something you can make as a special treat for Halloween or even the upcoming holidays. This recipe for Baked Apples is easy, but the results look impressive. And it tastes unbelievable. I’ve been making this for years, long before we became gluten-free, and I’m happy that one of my old favorites still has a home in my new dietary repertoire. I hope you enjoy, and if any of you have any questions about eating and living a gluten-free lifestyle, please stop by my site or my Facebook page and drop me a message.

Baked Apples
4 apples, cut in half across the equator
¼ cup pure maple syrup
1 tsp cinnamon
1/3 cup chopped walnuts
½ tsp vanilla extract
4TBSP butter, divided

Preheat oven to 350 degrees.
Scoop the seeds and core out of the apple halves, creating an opening inside the apple to hold the syrup. Place in an 8x8 square baking dish.
In a small saucepan, gently heat syrup and cinnamon over low heat. Cook, stirring constantly, until syrup has slightly thickened, about 2-3 minutes. Off the heat, stir in walnuts and vanilla extract. Pour syrup over apples, filling the openings created from the cores. Divide the butter into 4 equal parts and place pats of butter on top of the apples.
Bake for 30-40 minutes until apples are tender. Ladle syrup drippings over the apples. Serve warm.


Pin It
Good Morning and welcome to the last weekend of October. Yes, you read that correctly. Hard to believe, right??!! But to celebrate, my guest is sharing an awesome autumn recipe that I could absolutely see on your Thanksgiving table. So beautiful and festive.

Today's guest blogger has such an interesting story to tell. I have known Amber since high school, but we've really reconnected over the last year through Facebook...and FOOD! She too is a mama and a blogger; and I have so much respect for how she has totally revamped her family's eating habits. But I will let her tell you more about that. Please welcome Amber to EMM~


Hi, I’m Amber from Whole Foods for Whole Families, and I’m excited to be doing my first-ever guest blogging post here for Krista. Like most of you on here, I LOVE food. But our family eats a little differently. My husband and I follow a Paleo lifestyle – grain-free, dairy-free and legume-free. Since I started eating this way about 6 months ago, I have cured my Chronic Fatigue and GERD, lost 8 lbs (I’m a size 2), and have enjoyed more energy, clearer thought processes (no more brain fog!) among other things. My husband has also had noticeable changes to his health; he’s lost 25 lbs (and counting), his cholesterol levels have come into a healthy range, his skin has cleared up all over his body (his back used to be red and bumpy, now it’s super soft and smooth) and he has much more energy, just to name a few.

But the biggest change has been with my youngest daughter, Little A, now 4-and-a-half-years-old. When she just turned three, she became very sick after having a routine surgery to remove her adenoids and insert a new set of ear tubes. She was diagnosed with Chronic Benign Neutropenia of Childhood which is a fancy way of saying that her neutrophils, the white blood cells that fight bacteria, are chronically low. After taking her to one of the best pediatric hospitals in the country, we were left with no treatment options, just a wait-and-see approach. This wasn’t good enough for us. I didn’t want to sit around, waiting to see if my child was going to fall seriously ill again, so my husband and I researched and researched… and then we researched some more. Our research led us to how our diets can affect our health so we completely changed the way we eat. After being gluten- and dairy-free for a year, Little A’s health has completely transformed. She used to be sick nearly all the time with constant fevers, colds, runny noses and ear infections (even after having ear tubes). Winter time meant endless trips to the pediatrician, but the first winter after we became gluten-free, neither Little A nor my oldest, Big C, had to go to the doctor. Not even once. For us, that was a huge deal! In fact, Little A has not had one fever since going gluten-free. She also put on weight, her skin no longer looks pale and pasty, the dark circles under her eyes have diminished and she is full of much more energy while requiring less sleep. The transformation of Little A’s health has inspired me to blog about our journey on my site in the hopes of helping other families find their path to health as well.

But enough about me; let’s get down to some food. I promised Krista I would come up with a recipe that was gluten-free but without any of the “weird” ingredients we gluten-free people tend to use. I didn’t want to post a recipe that required ingredients most people don’t have, like almond flour or coconut flour, staples in a Paleo diet. And I also wanted to come up with a good fall recipe, something you can make as a special treat for Halloween or even the upcoming holidays. This recipe for Baked Apples is easy, but the results look impressive. And it tastes unbelievable. I’ve been making this for years, long before we became gluten-free, and I’m happy that one of my old favorites still has a home in my new dietary repertoire. I hope you enjoy, and if any of you have any questions about eating and living a gluten-free lifestyle, please stop by my site or my Facebook page and drop me a message.

Baked Apples
4 apples, cut in half across the equator
¼ cup pure maple syrup
1 tsp cinnamon
1/3 cup chopped walnuts
½ tsp vanilla extract
4TBSP butter, divided

Preheat oven to 350 degrees.
Scoop the seeds and core out of the apple halves, creating an opening inside the apple to hold the syrup. Place in an 8x8 square baking dish.
In a small saucepan, gently heat syrup and cinnamon over low heat. Cook, stirring constantly, until syrup has slightly thickened, about 2-3 minutes. Off the heat, stir in walnuts and vanilla extract. Pour syrup over apples, filling the openings created from the cores. Divide the butter into 4 equal parts and place pats of butter on top of the apples.
Bake for 30-40 minutes until apples are tender. Ladle syrup drippings over the apples. Serve warm.


Pin It
reade more... Résuméabuiyad

Menu Plan Oct. 28- Nov 2

*New Recipes
Links to recipes on blog

Sunday
We are trick or treating early at my mother in law's and having supper with her

Monday
Ham and Cheese Sliders
Mac n Cheese
Baked Cranberry*

Tuesday
Tasty Chicken Tostadas*
Veggies with Salsa Dip*

Wednesday
Happy Halloween
Grilled Cheese
Tomato Soup

Thursday
Cappellini Con Fungi Fresca
Garlic Bread


Friday
I'm going out with the girls.
The boys will have leftovers


reade more... Résuméabuiyad

It Was SO Monday....

So I think most of us can say that we are not huge fans of Mondays. Or should I say Monday mornings. As the day goes on, I'm fine, but the minute the alarm goes off that first morning after 2 days off, I groan, I moan, I try to rationalize how I can ignore it...and then I suck it up and hit the shower. Now like I said, as the day progresses, I'm good...that is until the curse of Monday morning drags on during the entire day. You know what I mean. The kind of day that everything goes wrong, anything you go to do takes twice as long, and if **it can happen, it will! Well, that was the kind of Monday I was having a couple weeks ago. First off, I hadn't slept well the night before, so I was extra exhausted. Then I was late getting to where I needed to be that morning because I had hung out at the house waiting on the mail...only to remember it was Columbus Day. Then even though I was late, I stopped by the bank to do my normal Monday business...only to remember it was Columbus Day. (Do you see a pattern?) Then after cleaning my mom's house, we were on our way to lunch and needed to stop by her post office...only to remember it was Columbus Day. Yep, it took 3 times for me to remember!! (I told you I was extra tired!) Then the next few hours went fine. Mom and I had lunch, we did a bit of shopping (she treated me to a few nice things...this would wind up being the highlight of my day) and I even got new shoes. That always helps to make the day better, right ladies! Then I headed home to pick Alex up from school, do homework, housework and start supper. This was about the time the day went to hell in hand basket. I got the pleasure of doing extra laundry because Alex had found the wet grass during a game of soccer. I discovered even more surfaces in the house that needed cleaned. I got dirt on my shirt, so instead of changing I just put on my pjs. Alex, having to have his clothes washed due to those pesky grass stains, was in his undies playing video games... and that's when the phone rang. It was my husband. It wasn't a "I just called to say I love you" call. It was a "I just got a flat tire, and need the spare in the back of your car" call. Yep, I got the pleasure of driving 30 minutes north of our house to take him the spare, of course hitting every red light possible, only extending the trip.  And before you ask, yes, I went in my pajamas and my child did put clothes on, but they were ones from the hamper, and his shirt was on backwards (which I didn't notice until we returned home) Yep, we were those people. Thank God nobody saw us! By the time we got home, I knew the pasta supper I had planned was not going to happen; but luckily I had these planned for later in the week and I knew I could have them on the table and us eating before too long. Thank goodness for meal plans that can be adjusted at the last minute if need be! These were quick, tasty and the perfect Monday, I need a break before I cry, supper!

Ham and Cheese Crescents
6 slices deli ham, cut into quarters
1 (8 ct) can crescent rolls
8 slices Velveeta singles cheese (found in dairy section), cut into pieces to fit rolls
1/4 c. honey mustard
Poppy Seeds

Preheat oven to 375. Unroll crescents and separate. Using 1 piece of cheese per roll, lay cheese out fitting onto roll. Using a pastry brush, spread with honey mustard. Add three quarter pieces of ham. Roll up, wide edge to thin. Sprinkle with poppy seeds. Press gently to adhere. Lay on baking sheet and cook 15 minutes until golden brown.


Shared on The Country Cook Oct. 26, 2012
Shared on Make Ahead Meals Oct. 29, 2012
Ham at Very Good Recipes
Pin It
reade more... Résuméabuiyad

A Halloween Wreath

Not long ago I wrote about ways to eliminate spiders from the house, and one way was to keep them off the porches. Today I am contradicting myself because I have just invited lots of spiders to adorn my front porch for Halloween. I decided to make a creepy crawly spider wreath for the entertainment of all those little trick or treaters who will soon be ringing my doorbell.


The inspiration for my wreath came from a picture that I saw on Pinterest, but I have not been able to find the original source to give due credit. I used the idea that I saw in the picture with some added embellishments of my own.


To make the wreath I used a green Christmas wreath that I had discarded and stashed in a closet. I also used a can of black spray paint.


I spray painted the wreath with several coats of paint on both sides, covering all the greenery, letting it dry between coats. 


Some of the supplies I used were black tulle, orange wired ribbon, plastic spiders, florist wire, and wire cutters.


I also used some ping pong balls, wiggly eyes, and of course, my hot glue gun.

After the wreath was painted black and dried, I wrapped some black tulle around the wreath to give it a web-like effect. Then I simply hot glued the orange spiders all over the wreath for color and "creepiness".  Peeking eyes were made from the ping pong balls and wiggly eyes hot glued together. The wreath was finished with a big orange bow made from the wired ribbon and florist wire.


I think I'll let these spiders hang around on my porch while the big googly peeking eyes are on the look out for trick or treaters!


This post was shared with:
Arkansas Women Bloggers
Creative Juice Thursday
reade more... Résuméabuiyad

Pumpkin Waffles


I know that everyone seems to be in a pumpkin craze this time of year. Certainly, I've already contributed with donuts and bars. And these scrumptious waffles probably won't be the last of it for this fall!

Pumpkin lends such wonderful flavor to recipes - and it's good for you, too! These waffles are so tasty that you won't even need syrup. I know that sounds like sacrilege - and I wouldn't believe it if I hadn't done it myself. But it's true!

Make your autumn mornings great with these delicious waffles!

In a large measuring cup, combine the milk, egg, oil and pumpkin


and whisk well until smooth. Then add the cloves, cinnamon,


brown sugar,


flour,


baking powder and salt and whisk just until combined. Pour the batter onto a preheated waffle iron


and cook for 4-5 minutes or until steam no longer escapes from the iron. (Of course, each appliance is different so follow the instructions for your waffle maker.)

A little spiced whipped cream (or cool whip!) makes a delightful topping for these delicious waffles.


One year ago: Cranapana Bread
Two years ago: Garlic-Herb Orzo Pilaf
Three years ago: Blueberry Pecan Cake

Get more inspiration at Full Plate Thursday, Swanky Stuff, Recipe Box, Thursday's Treasures, Tastetastic Thursday, Foodie Friday, Food on Fridays, Friday Finds, Foodtastic Friday, Foodie Friday (#2), Ingredient Spotlight.

Pumpkin Waffles

1 cup milk
1/2 cup pumpkin puree
1 Tbsp. vegetable oil
1 egg
1/4 cup brown sugar
1 cup flour
2 tsp. baking powder
3/4 tsp. ground cinnamon
1/8 tsp. salt
1/8 tsp. ground cloves


Combine milk, pumpkin, oil and egg in a large measuring cup and whisk well. Add the brown sugar, flour, baking powder, cinnamon, salt and cloves and stir just until moist.

Coat a waffle iron with cooking spray and preheat. Spoon batter onto hot waffle iron and cook 4 to 5 minutes or until steaming stops; repeat procedure with remaining batter. Makes 4 round waffles.

Recipe Source: Cooking Light
reade more... Résuméabuiyad